Routing optimization with GraphHopper
Introduced in March 2020, this new feature enhances ServiceDesk's capabilities beyond routing-sequence optimization.
Previously, the system could only determine the sequence to minimize a technician's driving time. Now, it offers Whole-Roster optimization, where an AI engine manages your entire roster of appointments and technicians. It considers starting and ending locations, skill sets, specific technician requirements, and existing time assignments to optimize scheduling.
Before GraphHopper, no automated engine could solve this complex problem. Limitations existed with MapPoint, Google, and Bing:
MapPoint is outdated and not produced by Microsoft anymore.
Both MapPoint and Google can't account for pre-set appointment times.
They don't consider the technician's start time or job duration; hence, they can't calculate ETA.
They don't account for lunch breaks.
GraphHopper overcomes these limitations, providing robust routing-sequence optimization and introducing the long-dreamed Whole-Roster optimization.
Geocoding every job address in ServiceDesk
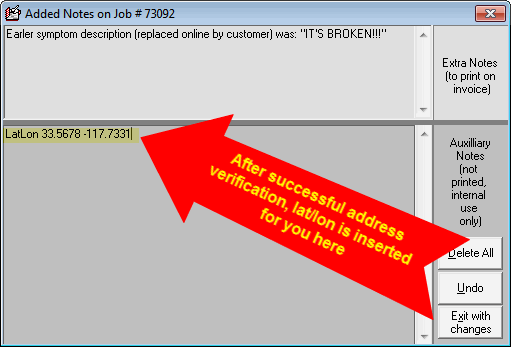
GraphHopper, while more complex than MapPoint or Google, requires latitude and longitude for address submission, unlike the more straightforward address format used by the others. ServiceDesk obtains this information through the address-verification system described here. From version 4.8.148 onwards, successful address verification will add a note with the latitude and longitude in the MoreInfo box of the Callsheet or JobRecord.
When we verify an address with Google, we get exact latitude and longitude information. We've been using this to enhance the grid references on the DispatchMap. Until now, we haven't used this data for anything else.
ServiceDesk can use the data to send it to GraphHopper. To use GraphHopper optimization, make sure all your customer addresses are verified. Ideally, automatic verification should be on. Also, keep doing this for some time before using GraphHopper automation. This way, the appointments GraphHopper wants to optimize will have the necessary lat/lon info.
Don't fret if you occasionally have a job that has yet to be geocoded. If you request optimization and ServiceDesk finds one or more such cases, it will handle it smoothly. It'll let you know about the problem and give you an option to continue with the rest.
Geocoding technician endPoints
What are "endpoints?"
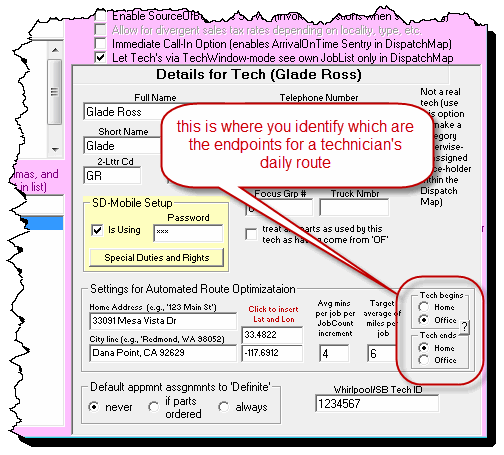
In simple terms, "endpoints" for technicians are (1) the place where their work journey starts each day and (2) the place where their journey ends.
For most technicians, these two places are the same, and it's usually their home. Sometimes, it could also be the company office. But, each technician has a starting and ending point.
You can specify each technician's start and endpoints. This can be done in the Technician Properties window, accessed by clicking on a technician's name from the Tech-Roster section in the Settings form (Ctrl-F1). Here, you can fill in the technician's address and use the radio buttons to indicate if the start and end points are the technician's home or office.
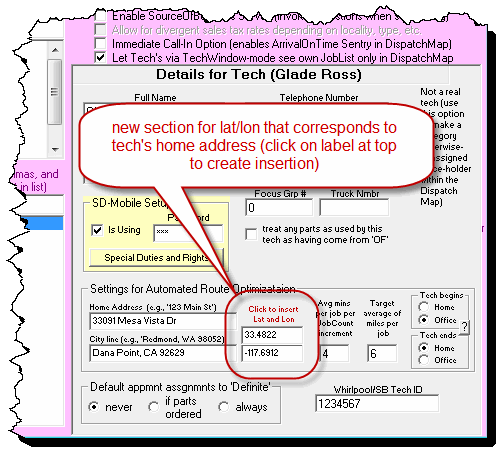
Unlike MapPoint and Google, which accept addresses, GraphHopper requires latitude and longitude information. So, you need to provide this information for each technician's home address and your office. This is quite simple.
First, there's a new feature in the Technician Properties window. You can now enter the latitude and longitude that match the technician's home address. Please ensure the technician's address is already there, then click on the label as instructed. The corresponding latitude and longitude for the address will be filled in automatically. This is done by using Google's Address Verification.
The process will also determine the grid reference based on the latitude/longitude and put it in the Technician Properties box.
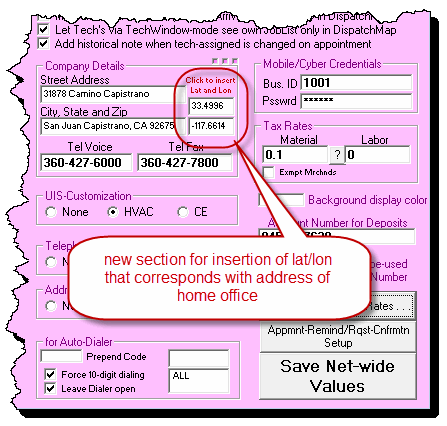
Second, there's a spot in the main part of the Settings form for the latitude/longitude of your office address. Like before, click on the label, and it will be inserted for you.
Building your tech-Info file
ServiceDesk has always had ways to understand necessary details about each technician for efficient routing.
For instance, each technician's properties window has a spot to enter their address. There's also a section to specify if they start and end their daily route from the office or home:
For a more advanced GraphHopper optimization, ServiceDesk needs additional information. We could have made a more detailed Technician Properties window, but we opted for a more straightforward solution because of the volume of extra details and the time it would take us to create a dedicated interface.
Specifically, you can input these extra details into a straightforward file. You can manage any changes, additions, or deletions in the file yourself, and ServiceDesk will read from it when needed.
While you could use other methods, we suggest using Excel or something similar to manage this file. We've provided a template in .XLS format with one example record for reference.
In the given format, you'll create a record (or row) for each technician (please remember to delete or replace the example row in the template as it doesn't describe your technicians). The headers are self-explanatory, but we'll also provide an illustration and further descriptions to help.
There are three sections in this file that ServiceDesk uses to optimize job routing and scheduling: the green, pink, and blue sections.
In the green section, there are four fields that ServiceDesk needs to optimize job routing for specific technicians. We'll call this "Stage-1" of optimization.
The pink section has two fields needed for inserting time-frames after optimization. This is more advanced than the previous auto-time-frame-estimator. It uses actual calculations of the most probable arrival times at each location, making the time-frames more accurate.
The blue section is for "Stage-2" of optimization, which optimizes your entire schedule of appointments. Some fields in this section can override settings in the green section. For example, the blue section will reflect this if a technician usually starts at 7:30 AM but starts at 9:00 AM on Saturdays.
Column L is for special skills (see here). If a technician has special skills, list them here. If a technician has standard skills, leave this box blank.
We recommend using Excel to manage this file. When saving, keep the file in the format of your spreadsheet program to maintain formatting. ServiceDesk looks for this information in a comma-delimited file named TechnicianExtraSpecs.csv in your \sd\netdata folder. So, save your work in two formats: your spreadsheet program's format and a comma-delimited .csv file.
Remember to open the spreadsheet-formatted version of the file for editing next time. The .csv file will look less formatted.
We chose this strategy because people use many different spreadsheet programs today. In the past, everyone used Excel, so we could have made SD read directly from an Excel file. But that's not practical now. So, you can use any spreadsheet program you like and save your work in the common .CSV format, which any program can produce.
A twist on departure times and subsequent ETAs
The TechnicianExtraSpecs.csv file lets you set when each technician starts their first job of the day. GraphHopper can accurately estimate arrival time for the first job by considering travel time. But what if you want to set a fixed arrival time at the first job rather than a departure time?
To do this, add a new column to the file. Write a description in the header, and enter "True" or "False" for each technician row. This indicates whether you want this new feature to apply or not.
When you add a column and mark "True" for a specific weekday and technician, ServiceDesk notices this. It first gets the usual optimization from Graphhopper. Then, it changes the technician's departure time and all estimated arrival times. These are adjusted by the necessary minutes to make the first arrival match the time in Column I.
Using stage-1: the routing-sequence optimizer
This optimizer has a key advantage - it smartly considers the tech's job timings (it can intelligently account for one or more of a tech's jobs already having a time or time-frame assigned), lunch break, and time required at each stop. It gives good predictions about the tech's day.
After setting up, using it is as easy as our old routing-sequence optimizers.
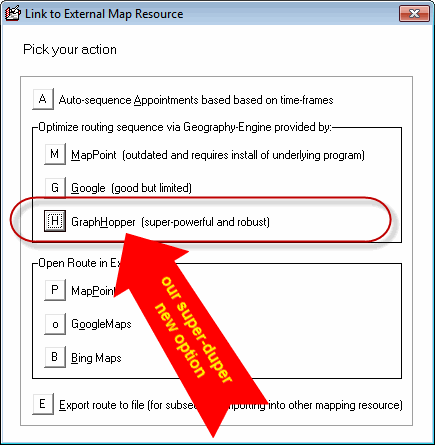
Just assign jobs to a tech's list that you think are best for them. Then, Shift/Ctrl-Click on their name at the top of the list (or choose "Quicklink to external mapping resources"). You'll see some options, and pick the new one as shown here:
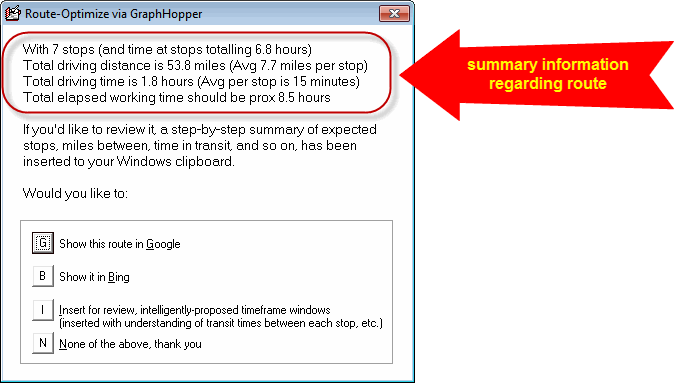
The system will then do its work. Like magic, the route sequence will optimize according to all provided parameters, and ServiceDesk will give you a report. Please note in the report:
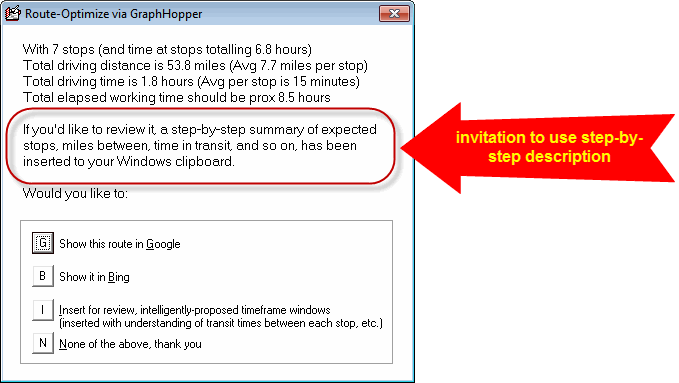
Please further note this element:
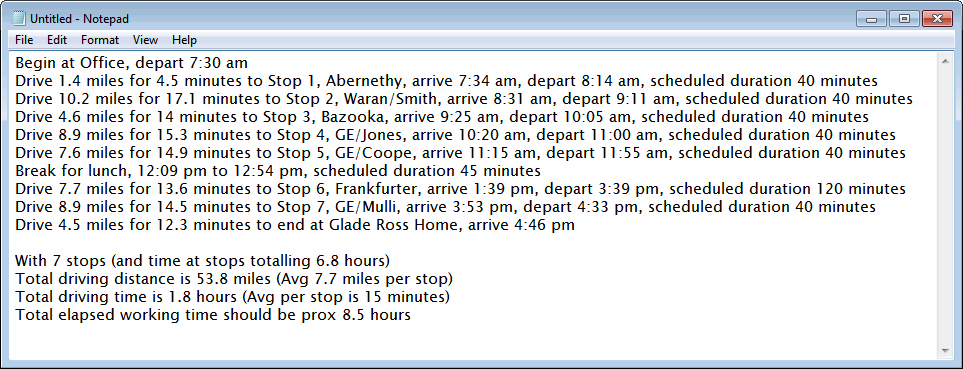
That sentence means that your Windows clipboard now contains detailed information about the route. If you paste (Ctrl-V or right-click and pick paste from the popup) into any text editor (e.g., NotePad, WordPad, etc.), you'll see something like this:
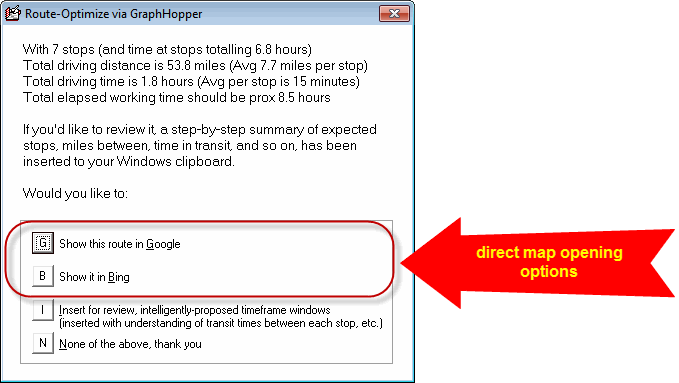
Please also notice that you may choose from the same dialog to open the optimized route in Google or Bing directly:
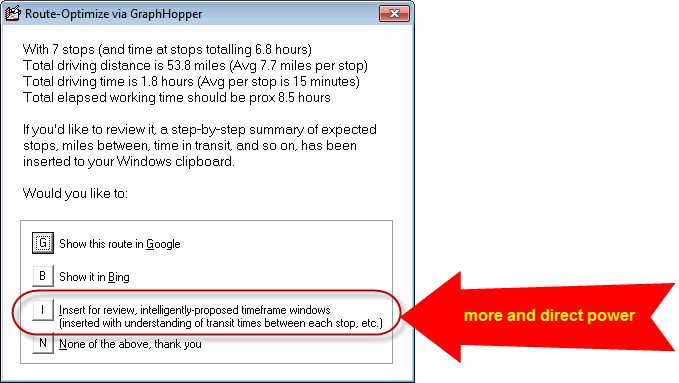
Much more importantly, you may choose to have ServiceDesk insert "intelligently-proposed" time-frames for you:
GraphHopper-based routing-sequence optimization is more straightforward and more effective than MapPoint or Google.
It's simpler because you don't need to insert time-frames manually - it's fully integrated into the sequence.
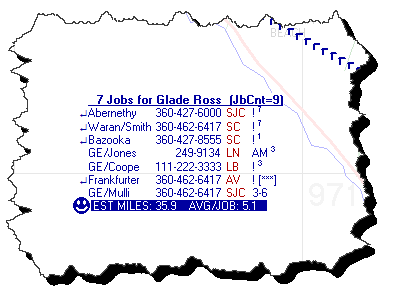
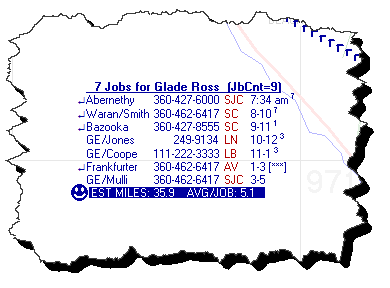
It's better because it uses more precise data and can even insert a smaller time-frame or a specific time (see the example in TechnicianExtraSpecs.xlsx). If possible, it will replace a larger time-frame with a smaller one, making your tech list more efficient.
To look instead like this:
A dialog will ask if you wish to save with the proposed insertions.
It's powerful.
Embracing stage-2: whole-roster-optimization
As of July 2020, we've completed our current plans for this feature.
We introduced it earlier, but there was one major part left: the use of special skills. Now, we've added that part.
To explain it, ServiceDesk takes all your appointments for a specific day and all the available technicians. It uses all relevant information (like existing times for jobs, specific technicians assigned to jobs, special skills needed for some jobs, each technician's start and end locations, work schedule, capacity, etc.). It presents this "problem" to GraphHopper.
GraphHopper, using a high-level artificial intelligence system, sorts through the data to find an optimal solution for which technicians should do which jobs and in what order. It then gives this solution to ServiceDesk, which arranges your appointments accordingly.
Even though this seems complex, implementing it is easy.
Be sure you've set up so your jobs are all being geocoded (as described here).
Be sure you've set up geocoding for each of your techs (as described here).
Be sure you've appropriately set up for each tech in your TechnicianExtraSpecs file (as described here).
For now (and assuming you are proceeding now because you do not require this), please don't worry about implementing any matching of skill sets between techs and jobs (again, we expect to provide a facility for this a little bit later).
Display the date in your DispatchMap that you wish to have whole-roster-optimized.
Hit "Alt-O" on your keyboard (the "O" is for "Optimize"), and follow the prompts (alternatively, you can pick "Invoke Whole-Roster Optimization via GraphHopper" from the menu/cheat sheet).
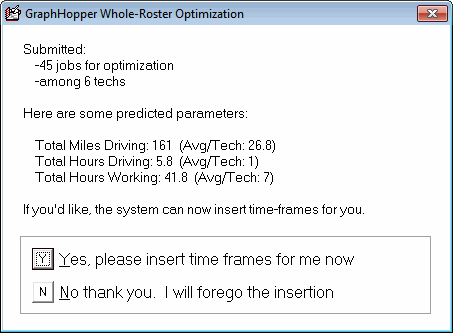
As a consequence of the above, you'll see the magic occur. After it's done, you'll immediately see the result in your DispatchMap, and you'll get a report that looks something like this:
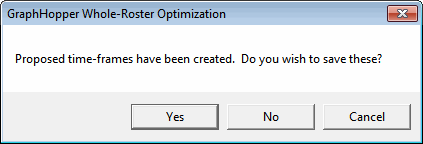
If you accept the option to insert time-frames, the system will do so. More specifically, it will first show you the proposed insertions with dialog such as this:
If you consent to save, the system will do so.
Thus, with minimal effort and time, you can achieve a very optimum tech distribution and sequential arrangement of your appointments, along with very intelligent insertion of times or time-frames.
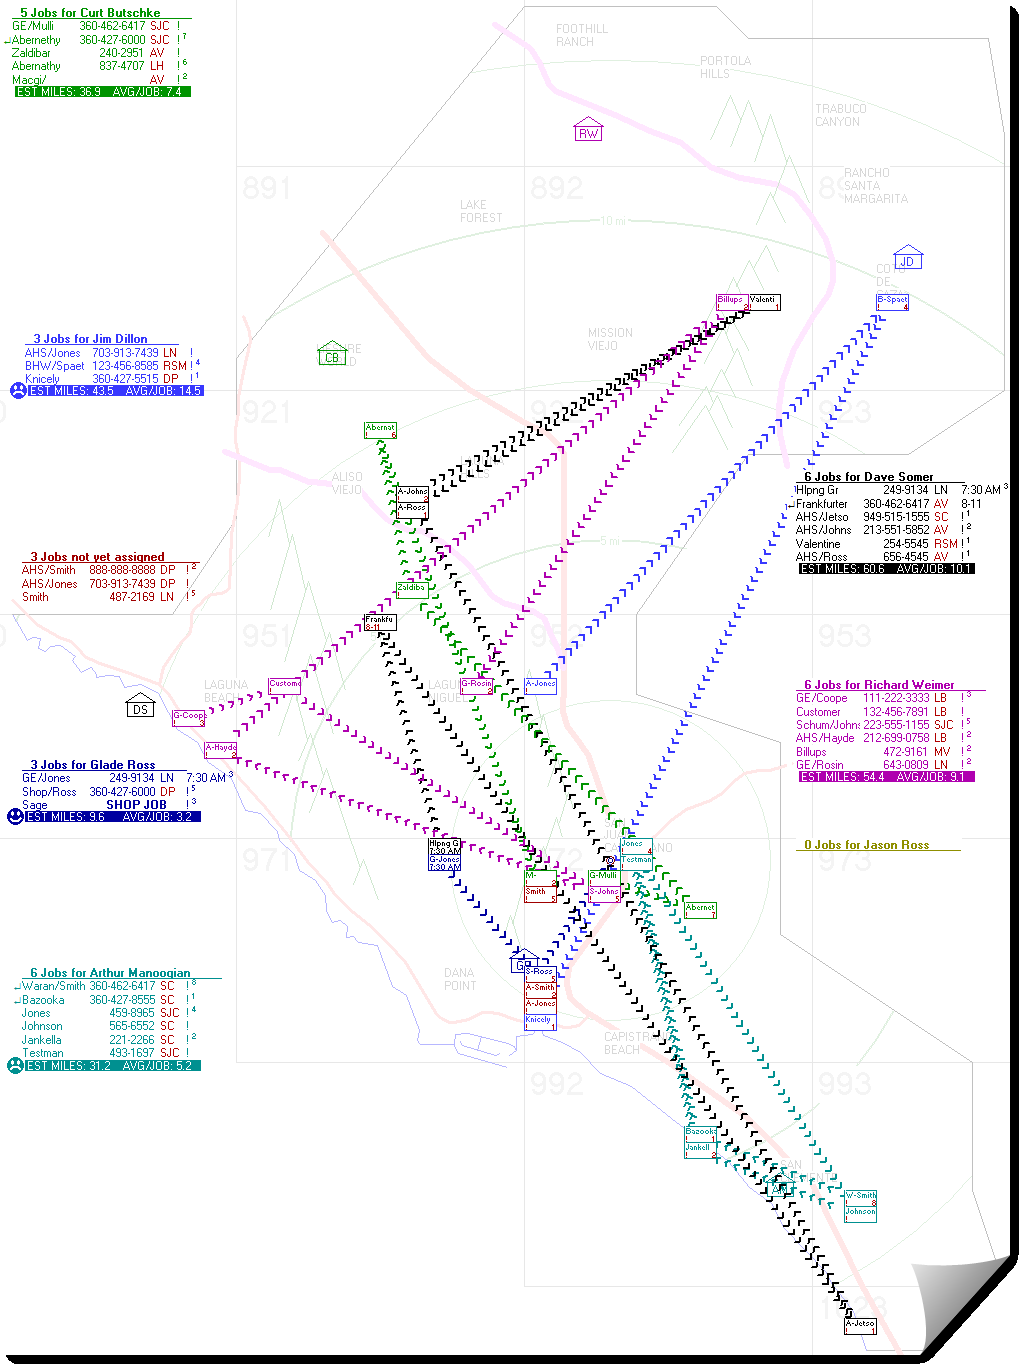
In particular, you may almost instantly transform from a dispatch/assignment layout that looks as confused and unhappy as this:
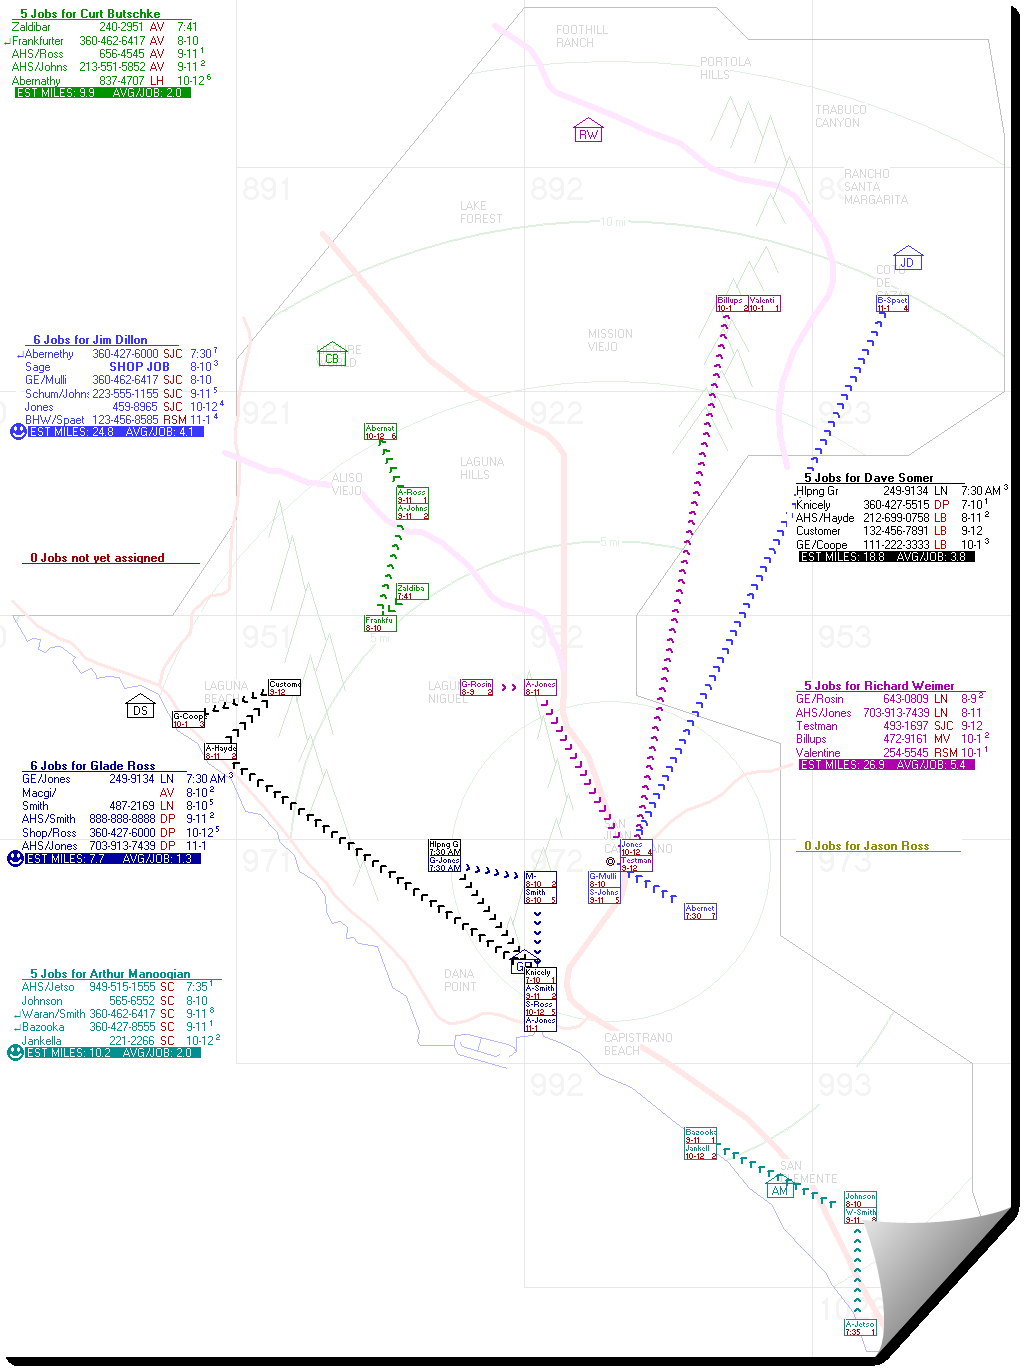
To one that instead looks rather more like this:
Some things you should understand:
Regarding which techs the system will reckon as available for the optimization process:
A technician must be appropriately geocoded.
A technician must be listed in your TechnicianExtraSpecs file.
If, in Column H of the TechnicianExtraSpecs file, you've listed particular days of the week a tech works, the applicable weekday must be among those listed.
A technician must not have an "Unvlbl" entry in the ServiceDesk ScheduleList that effectively forecloses him from work on the day in question (an entry there merely forecloses him for a portion of the day is fine).
A dialog will inform any techs in your roster to be foreclosed from inclusion for any of the above reasons.
Regarding when the tech may begin his work:
A tech's default start time is whatever time you have listed for him in Column B of the TechnicianExtraSpecs file.
If you have a specific-to-weekday start listed in Column I of the same file, and if the day you're optimizing corresponds with that weekday, that start time will supersede what's found in Column B.
If there is an applicable-to-date "Unvlbl Until" entry in the ServiceDesk ScheduleList, that entry will supersede both of the above.
Regarding when a tech must finish his work:
A tech's default end time is calculated by taking his start time, then adding his maximum job count, multiplied by his average job duration. These values are in his Technician-Properties window and Column C of the TechnicianExtraSpecs file.
If there's an entry in Column J of the TechnicianExtraSpecs file specifying how many hours the tech can work on a certain day, this will override the previous calculation.
Both calculations are overridden if there's a relevant "Unavailable After" entry in the ServiceDesk ScheduleList, which means the tech can work until the time specified in that entry.
Regarding which appointments are deemed suitable for inclusion in an optimization request:
The JobRecord that underlies any such appointment must be geocoded.
The appointment must be "real" (i.e., it cannot be a pseudo or fake).
It must not be a "Hlpng" type appointment that: (a) is not in "Definite"-assigned status to a working-that-day tech; and (b) does not specify a time or time-frame that is as small or smaller than the scheduling time-frame specified for the assigned tech (if otherwise, it's possible the GraphHopper engine would specify a sequencing and time-frame that is not a fit for the primary tech). Please note, if you do this, you should ensure the primary tech is also "Definite"-assigned and with a time-frame that matches that of the "Hlpng" tech).
A dialog will inform of any "real" appointments where, per above, inclusion in the optimization request was not feasible.
Though these details may seem a trifle complex, we've worked hard to make it all happen for you logically in the background and generally without much need for you to worry over the details. We need to share them with you so you'll understand if you need to.
Try it.
You'll see.
It's, it's . . . well . . . it looks like magic when you see it happen!
At least, we hope so.
Regardless, we would like to provide a caveat.
If you constrain what GraphHopper can do by having a lot of jobs that are already "definite-status" assigned to particular techs; if you further constrain it by having a lot of jobs that already have a time or time-frame assigned. . . well . . . those things necessarily limit just how elegant it is that GraphHopper can otherwise make the optimization. Ultimately, it must work within the constraints you give it. If you can, give it a whirl with an unconstrained roster and see how beautiful that looks. Regardless, if you see sequences and assignments that look less than optimum, we suggest you try your abilities by comparison. We doubt you'll be able to do it as well.
As a final note, when looking at ServiceDesk's very flat and relatively featureless DispatchMap, you have a different awareness of road routes available for actual travel by your technicians. You're looking at straight lines for the routes, while GraphHopper is considering actual road paths on which each tech may drive. Because of this, a routing setup that, on its face, looks to you less than perfect may actually be very good. As a test, if you're doubting something, we suggest you do your own best eyeball optimization and then open applicable routes in Bing or Google to see distance and driving times. Then, let GraphHopper do the work and see if it does not do better.
Incorporating special-skill requirements
If all your techs can do all your jobs, ignore this section.
However, this section is important if only certain techs can do certain jobs.
Usually, humans decide job assignments based on understanding each tech's skills and job requirements.
However, GraphHopper's AI lacks this understanding unless explicitly provided. This is what "Incorporating Special-Skill Requirements" is about.
With that said, let's get into the details.
Step 1: Create your "SpecialSkillsList" file
As with creating your TechnicianExtraSpecs file (see here), we suggest you use Excel or something similar to create this, then save the functional output in the needed CSV format.
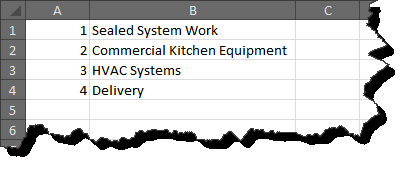
You need to create a simple spreadsheet with two columns for different skills you want to use. The first column is a single-digit number representing the skill type in the second column. So, your setup should look like this, but with your own chosen skill types:
You can list up to nine different skills. We'd like to suggest only listing unique skills and not including standard skills. This way, jobs with basic skills don't need a skill list, and no technicians need to be labeled as having basic skills. Simply put, all jobs require basic skills, and all technicians have them, so there's no need to define them.
The file should be saved in a comma-separated format in your \sd\netdata folder, just like the TechnicianExtraSpec file. The file name should be SpecialSkillsList.csv.
Step2: In your "TechnicianExtraSpecs" file, indicate which of the listed skills each of your techs possess
Please have a look here for instructions on how setup is done in that file.
Step 3: Within ServiceDesk, initiate the practice of specifying required special skills on any applicable appointment
The first version of ServiceDesk equipped to do as described here is 4.8.172 (thus, you'll need to be in that version or newer to implement as described here).
Several elements are introduced in this release:
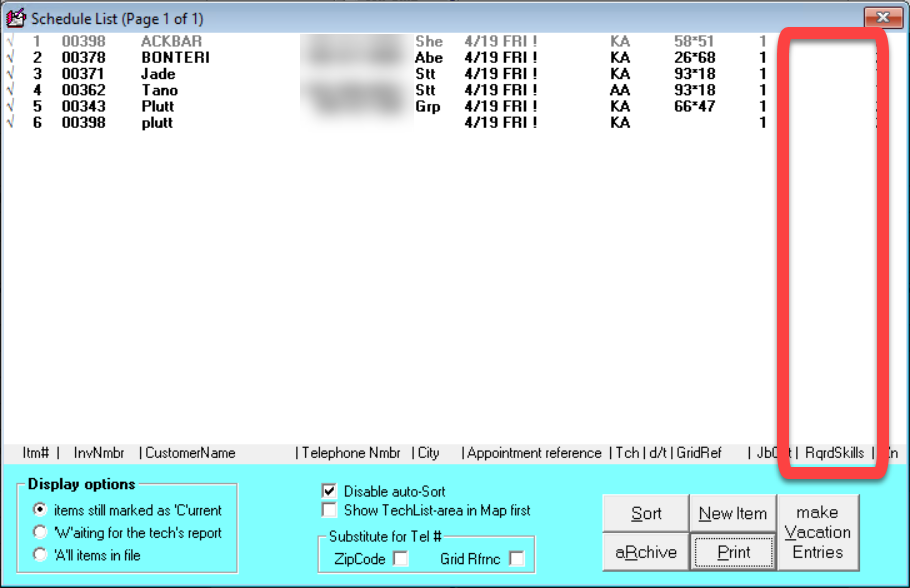
First, the F6 ScheduleList interface has a new column wherein the required skills for any appointment can be indicated:
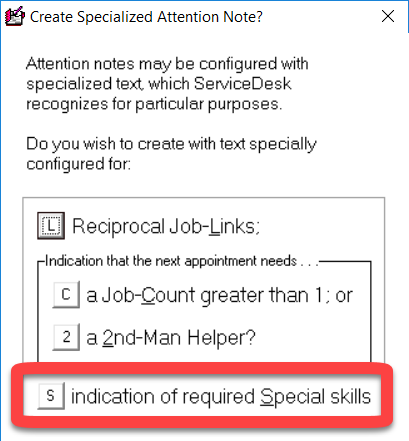
Second, you can now create a new type of AttentionNote from the F7 Current-JobRecords interface. To do this, right-click on the "add AttnNote" button, and you'll see a new option:
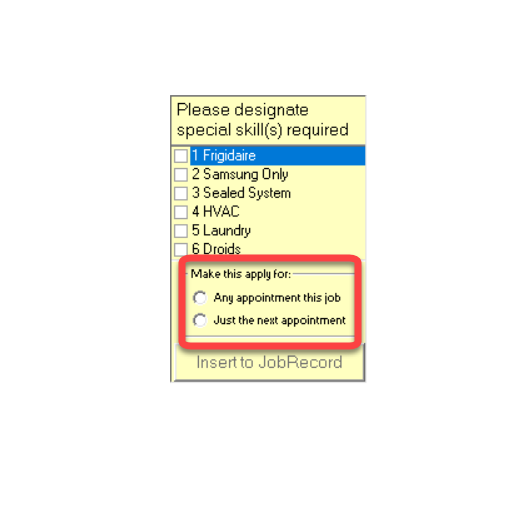
This type works much like others, indicating when the next appointment requires a JobCount above 1 or a second-man helper. But there's a twist. Instead of only signaling a specific treatment for the next appointment, this new option lets you say that any appointment for the job needs this special treatment:
Like other specific note types, when an appointment is set up from a JobRecord of this new type, the system will automatically add the necessary skills. It will also delete the note if needed, and so on.
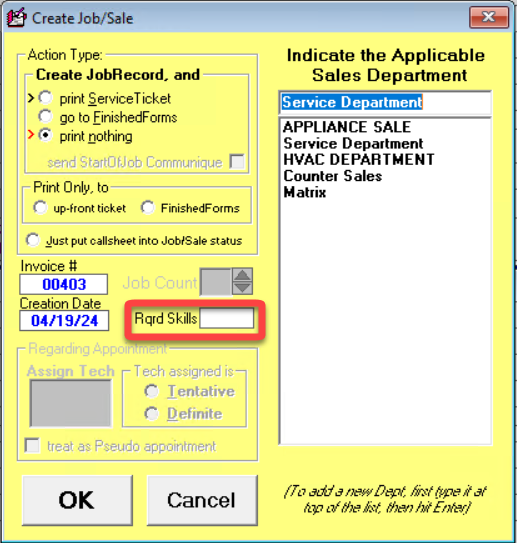
Thirdly, there's a new box now in the Create-Job/Sale interface. You can click on it during the job creation process to show that the appointment being created needs special skills or that any appointment for the job requires these skills.
When creating a job, if specific skills are needed, check the box and indicate them.
ServiceDesk uses your input about the required skills for each job and the skills of each tech to optimize job assignments through GraphHopper. This ensures jobs with specific skill requirements are only assigned to techs with those skills.
Two special cases
1. Dealing with Different Start and End Locations
ServiceDesk allows you to set each tech's start and end locations at home or the main office (see here).
But what if some techs need to start or end at a different location?
For instance, some techs might start their workday at a remote parts depot.
You can solve this by using two more optional columns in your TechnicianExtraSpecs file.
We've already discussed using a "first extra column" for another purpose here.
To do this, add two more extra columns, as shown here in yellow:
Remember, the titles at the top of the columns don't affect their function; they're just for your reference. The important thing is that these columns are in positions N and O in the spreadsheet.
To define a unique start or end point, put the latitude and longitude in the cell, separated by a comma. You can also add a location description in brackets if you like.
That's all there is to it.
2. Coping with Already-Set-Time, First-of-the-Day Appointments
This guide is for those who schedule specific appointment times (like 8:30 am) as their technicians' first task of the day. We'll call these "ASTFA" (Already-Set-Time, First-Appointment).
If you're only optimizing the order of jobs for each technician, ASTFAs are fine. But if you're trying to optimize the schedule for the entire team, it gets tricky.
Here's why:
Even without using the "Treat-Tech's-Nominal-Departure-Time-As-First-Job-Arrival-Time-Instead" option (see here), you might not have any technicians who start early enough to get to an ASTFA on time. If that happens, the scheduling tool won’t include those ASTFAs in its plan.
You might have a technician who starts early enough to get to an ASTFA on time, but they live far away. If technicians who live closer start later, the scheduling tool might send the far-away technician to that job anyway, which isn't efficient.
The scheduling tool might assign the same far-away technician to other jobs in the area, even though they live far away.
If you're using the "Treat-Tech's-Nominal-Departure-Time-As-First-Job-Arrival-Time-Instead" option, you might have set a technician’s departure time for their first job. But unless their travel time is zero, the scheduling tool won't be able to schedule them to get there on time.
So, how do you solve this problem?
It's more straightforward than it sounds. Just assign each ASTFA to the best technician who can handle it.
Please note: for any discrete-time appointment that is “Definite”-assigned to a working-that-day tech, ServiceDesk will see if the discrete-time is within 90 minutes of the tech’s indicated begin-driving time. If yes, ServiceDesk will treat that appointment as an ASTFA.
That’s all you must do.
ServiceDesk has a special trick for certain situations. Before it sends its main request to GraphHopper, it does a separate check. For each "Definite"-assigned ASTFA, it finds out the drive time from the technician's starting place (usually their home) to the ASTFA address. Then, when it sends its request to GraphHopper, it suggests a start time for the technician. This time is early enough for them to get to the ASTFA on time but not so early that GraphHopper might schedule another job before the ASTFA.
Specifically, it will calculate backward, from the appointment time, by the calculated driving time plus 5 minutes. Thus, if you had a discrete and “Definite”-assigned appointment of 8:00 am, and if the calculated driving time from the assigned tech’s departing location to that appointment was 23 minutes, ServiceDesk would submit to GraphHopper a begin-driving time for the tech of 7:32 am.
This solution might seem simple and obvious now, but it wasn't at first.
Additionally, any "Hlpng" type appointment must be assigned to a tech who is part of SD's daily roster and set for a specific time or window no larger than the tech's usual scheduled timeframe. The optimization request won't include the "Hlpng" appointment if not.
Options to set priority basis and whether tech/zone associations control
Depending on your needs, you should change some settings in GraphHopper from the default.
Firstly, the default setting in ServiceDesk asks GraphHopper to distribute work evenly among all technicians. Essentially, "Please provide the optimum technician assignments and sequencing wherein each of the available techs shares reasonable equality among such jobs as need to be assigned."
But you may want to reduce the travel costs for your technicians, even if it means some technicians have fewer jobs while others have more.
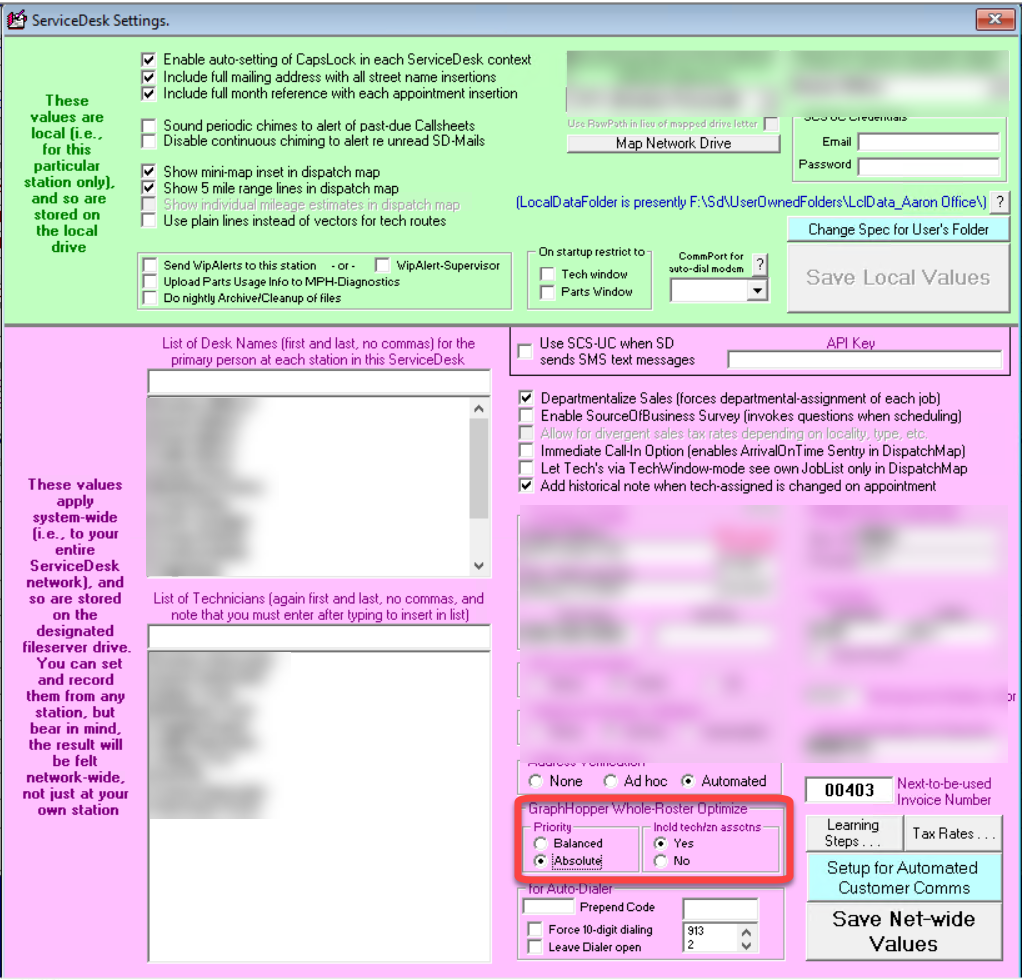
If that's what you prefer, you can change this in the Ctrl-F1 Settings form, as shown here:
Choose "Absolute" instead of "Balanced." This will ensure that ServiceDesk aims for the least travel time, even if it means some technicians have many jobs and others have little to none. Essentially: "Give me the optimization that results in the least possible windshield time, even if some techs are loaded to the max, and some end up with few or no jobs."
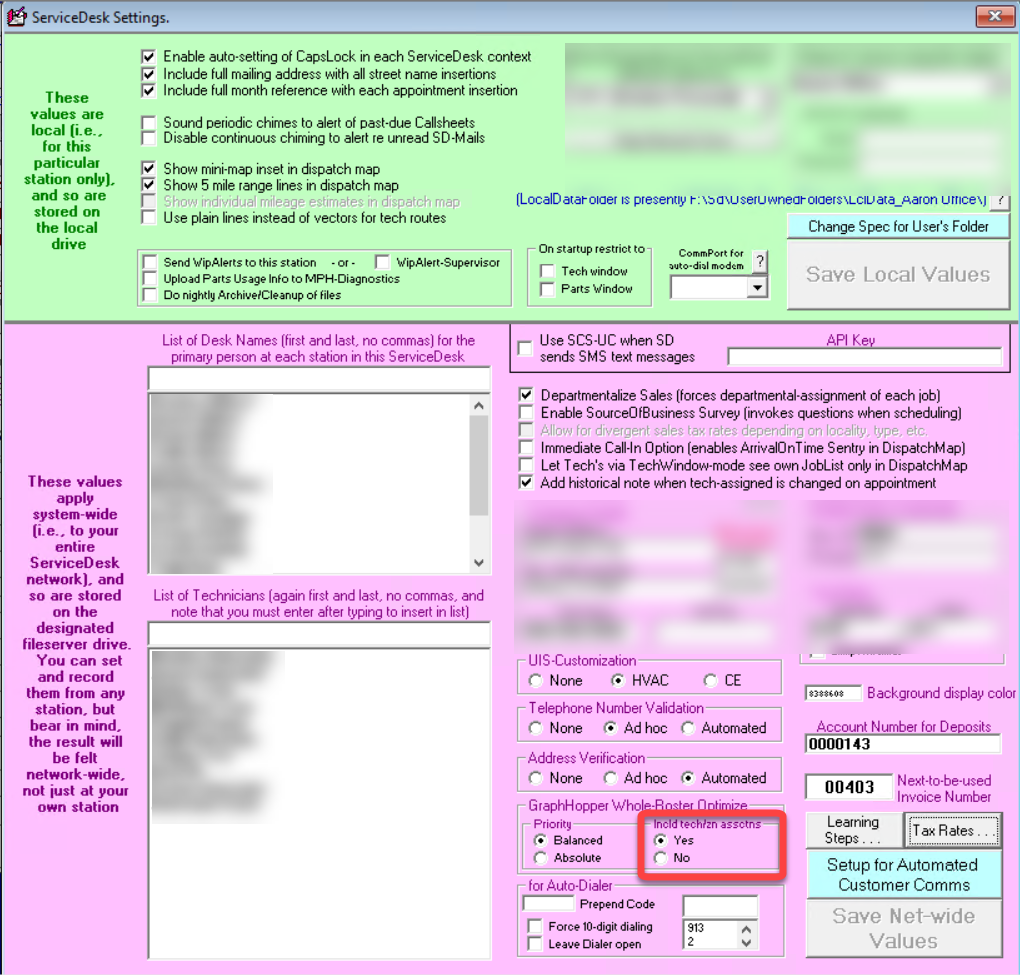
For the second option, you might use a WhchTechToWhchZone file (learn more here) to specify which technicians should work in which zones. If so, you might want GraphHopper to respect these technician-to-zone assignments. If so, this is the setting for you:
Just change from the default of "No" to "Yes" instead, and that's the result you'll get.
What does it cost?
Despite the increased power, we're thrilled to offer Stage-1 GraphHopper-based routing-sequence optimizations at the same price as Google's, which is just 1.5 cents per optimization.
For Stage-2 whole-roster optimizations, we've reconsidered our pricing structure.
GraphHopper charges us using a "credits" system. Each request uses a number of credits calculated from the number of drivers and total locations. Locations include your job sites and each tech's start and endpoints. For instance, if you have eight techs and 64 jobs, there are 80 locations (64 jobs and 16 for tech's start and end points). An optimization request would require 640 credits (80 locations times eight techs).
We discovered that a fixed price per credit, although considered initially, would be too expensive for larger operations. The reason is that the need for credits increases significantly with more techs and jobs. For example, a request with 32 techs and 256 jobs needs 10,240 credits. If credits had a fixed price, the operation with four times as many techs would pay 16 times more. Also, we get discounts from GraphHopper for larger volumes, so it's only fair that bigger operations benefit from this.
Therefore, we plan to introduce a sliding scale for the per-credit fee. Right now, we're providing it for free until September. Here are some examples of what you might expect to pay for an optimization event with the specified number of techs and jobs:
Four techs and 32 jobs, $0.28 (request consumes 160 credits at $0.00178 per credit)
Eight techs and 64 jobs, $0.81 (request consumes 640 credits at $0.00127 per credit)
16 techs and 128 jobs, $2.34 (request consumes 2,560 credits at $0.00091 per credit)
24 techs and 192 jobs, $4.33 (request consumes 5,760 credits at $0.00075 per credit)
32 techs and 256 jobs, $6.70 (request consumes 10,240 credits at $0.00065 per credit)
40 techs and 320 jobs, $9.40 (request consumes 16,000 credits at $0.00059 per credit)
50 techs and 400 jobs, $13.20 (request consumes 25,000 credits at $0.00053 per credit)
60 techs and 480 jobs, $17.42 (request consumes 36,000 credits at $0.00048 per credit)
As with other incremental fee services that Rossware provides, this one will be tallied for you every month, reported via email, and simply added as part of your total monthly fee.
In the past, we planned to offer the first 100 requests for free. But, we concluded that providing unlimited free access for a limited time is better.
Graphhopper troubleshooting
For a guide to troubleshooting Graphhopper operations, please see this article.

