
ServiceDesk 4.8.65 Update 07/19/18
Barcode-scanner enabled check-offs in the PartsPick form
This is another item for which we must credit Tony Tyrell in Maryland.
Tony runs a big operation. His people have a ton of mouse-clicking to do, within the PartsPick form, as they click to indicate a particular expected item is being placed in the tote to go outward to a tech, and or as they click to indicate another particular item has appropriately come back from him.
They have so many items that, even though simple mouse clicks are quick and easy, the time consumption overall can still be quite large.
Even worse, because they are going through so many items, errors happen all too frequently. As an example, it's pretty easy to click on a wrong item to indicate -- and perhaps erroneously -- that it's been moved to or from the tech.
Tony wanted a method that would be both faster and more accurate.
Accordingly, if you look in the PartsPick form (shortcut is Shift-Ctrl/F8) when running with this new release, you'll see three new little squares:
If you float your mousepointer over any of the three, you'll see a Tooltip appears, to inform you of the purpose in those little squares.
The purpose, simply, is you may click on any such little square to toggle its list section into barcode-scanner mode. And, when you do, you'll see a bit of visual transformation, as shown here:
The purpose of this transformation is to make it visually obvious that the applicable list section is in "active mode" to receive barcode-scanner input.
Thus, if (with a list section in that mode) you "zap" a part-number-containing barcode, ServiceDesk will instantly look within the list for matching part number. Upon finding a match, it will instantly react just the same as if that item had been mouse-clicked.
Based on this, we think it should now be super fast and accurate to move items to and fro, between your central location and your techs.
As a BTW, if you're interested in acquiring one or more wireless barcode scanners, we recently acquired this Bluetooth one, and find it quite nice ($50 at full retail, but if you find it on sale it can be cheaper).
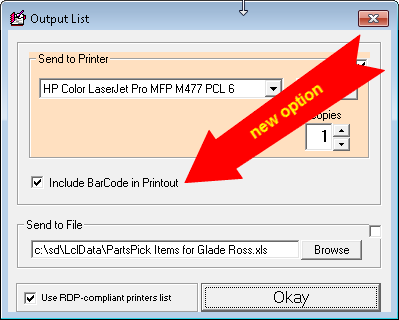
New "With-Barcodes" printing option
In the same PartsPick form as above discussed, there has long been an option to print any particular technician's "PartsPick" list. Now, when you choose to print and are presented with the "Select Printer" dialog box, you'll see there is a new option checkbox that, if checked, will cause the printout to include barcodes:
New filters in JobPerusal form
If you did not know, the keyboard shortcut for this form is Shift-F7. This interface is used when you want to review pending jobs that fit within any of several particular categories (e.g., waiting for parts, needing to be scheduled, etc.). As time goes by, we continue to receive requests from clients for new bases by which to "filter" the particular set of jobs that are shown. Recently, we accepted two new requests.
First, while the JobsPerusal form has long had ability to show only such jobs as are most-recently associated with a particular technician, it has not had ability to show only such jobs as have no association with any tech at all. So, that's the first new filtering option that is now added:
Second, there is now a filter for Wants Sooner:
For context, several years ago we added a colored toggle box to the appointment sections (applicable in both Callsheets and JobRecords) which you can toggle to red to indicate the customer wants the appointment changed to a sooner date, should opportunity arise within your schedule. Here is the toggle box:
Simultaneously, we added a function in the DispatchMap where you can display the locations of each pending appointment (regardless of whether the appointment is for the displayed date) that is toggled for Wants Sooner. By this means, you can look at any particular day where capacity has opened up, and see what Wants-Sooner appointments are convenient to where techs are already driving.
Regardless of that existing capability, a particular user thought it would be nice to be able to also review Wants-Sooner requests from the perspective of the JobsPerusal form, so that capacity is likewise now added.
New "Inventory Import" feature
I am not sure why this happens, but from time to time we are contacted by a client who, having decided to finally to begin using ServiceDesk's inventory control system (it's a function that many users initially put off), began in the effort by laboriously entering all of their inventory into an Excel spreadsheet. I don't think this path generally makes sense because, absent certain narrow exceptions, it's far easier to enter inventory directly into ServiceDesk from the get go.
Regardless, if you have basic and reasonably accurate inventory data in an Excel spreadsheet, you naturally hope for a way by which to import it into ServiceDesk's inventory system. Prior to now, there was no mechanism in ServiceDesk by which to do this. It's somewhat of a complicated matter, because everyone ends up arranging inventory data in their spreadsheets differently. So, when contacted by a client wanting to import such data, I have in each instance written custom program code, tailored for the particular data as arranged in the client's spreadsheet. There was also in each instance a fee for this custom work.
Well . . . that's not needed anymore.
I've created a system that allows you to describe how the data is laid out within your Excel spreadsheet and -- on the basis of your description -- ServiceDesk will perfectly import that data for you.
By way of disclaimer, I have not invested so much as would be needed to make this system as beautiful as it could be. In particular, an optimal method for describing the layout of your spreadsheet data would involve an interface where you can point to actual columns from your spreadsheet and tell ServiceDesk (simply by picking from a dropdown in regard to each such column): "Okay, this column contains part numbers; this column contains descriptions; this one indicates what we paid for each part, etc." Instead of investing to make that kind of more optimum interface, I've taken a shortcut via which you provide ServiceDesk with needed details via a back-and-forth dialog (e.g., it asks which column number contains part numbers, and you answer).
Regardless, it works. The method for invoking the dialog (and of course for proceeding with an actual import as the dialog completes) is to use the keyboard shortcut Ctrl-I from within your F10 Inventory Control form (the "I" is for Import).
FYI, the import is designed to add to whatever such Inventory and MasterPlan data as already exists in your system. For such reason, if you want it toreplace existing Inventory and/or MasterPlan data, you should delete applicable files first (our support team can of course assist).