ServiceDesk 4.8.74 Update 10/21/18
Enhanced Vendor Management
From the beginning in ServiceDesk, there has been provision for a simple list of your vendors. This list makes it so, as you're indicating having ordered or received an item, you can pick from a drop-down to indicate which vendor is involved.
Creation of this list is done on-the-fly, as need arises. Simply, in any place where you need to indicate the applicable vendor, if the vendor that's applicable is not already in the list, you just type the name or abbreviation that's wanted. There is then a dialog that asks if you want this vendor added to the list. If you answer yes, the dialog then asks for the counterpart of whatever you've typed (i.e., if you'd first typed an abbreviation, it asks for the the full name to go with it, or vice versa).
This system has been so simple, we never even provided a means for you to after-the-fact edit the list. And, historically, there has been little demand for greater sophistication.
Nonetheless, there has recently been need for more.
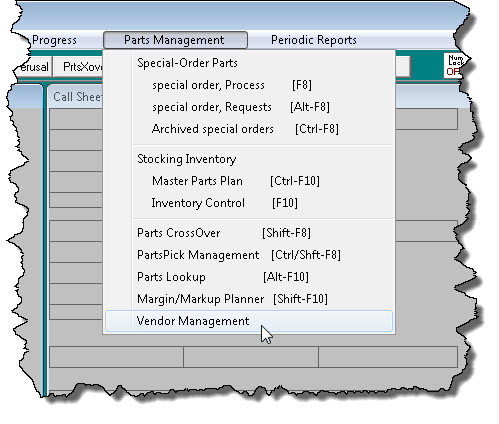
Thus, there is now a new option in the MainMenu, as shown here:
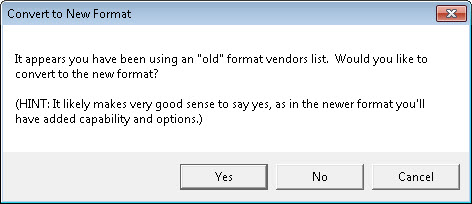
When you first pick that option, you'll see this dialog.
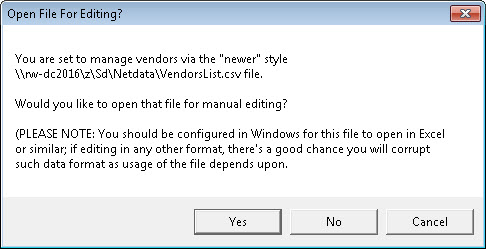
If you consent to make conversion to the upgraded method, the system will do precisely that. In particular, it will supersede the old file that was formerly used to keep track of your vendors. It will take information from that old system and place into a new file (placed into your NetData folder and title VendorsList.csv). -- in particular, a new file which will have more capability, and is now easily editable. After you've accepted the option to do this, if you pick again from that same MainMenu item as shown above, you'll see this:
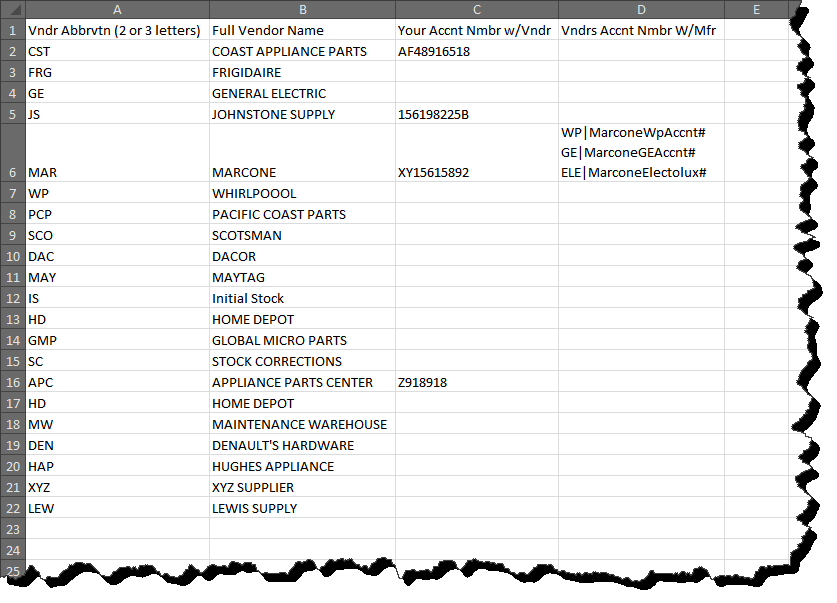
Consent to let ServiceDesk open the upgraded file for you, and it will do so. You'll find this file opens in Excel or similar (at least it should, assuming your Windows is appropriately configured). So opened, it should look something like this:
As you can see, this file is nicely laid out in rows and columns, and should be very easy to edit according to your own preference and need.
In regard to such editing, please notice there is a column in which to place your company's account number as applicable to each particular vendor.
Additionally -- and rather more importantly -- there is a column in which you may indicate each such vendor's own distributor account number with one or more manufacturers.
Why is this latter important?
It is because, simply, when you make warranty claims on parts, the manufacturer needs to know who it is that you purchased each such part from (the manufacturer then reimburses that vendor, which is then able to credit your purchase cost back to you).
So, we have provision here by which you may indicate (at least you should do so for each vendor and manufacturer for whom it is is a concern) each vendor's distributor number with each applicable manufacturer.
This raises a question.
Since each particular vendor may have different and unique distributor account numbers with each of multiple manufacturers, and since the general spreadsheet structure that we've designed for this VendorsList.csv file contemplates just a single line-item (aka "row") for each vendor, how do you: (a) put in multiple distributor account numbers for any single vendor; and (b) indicate in regard to each which manufacturer each such distributor account number goes with?
The answer to (a) is you put multiple sub-lines within a single cell.
The answer to (b) is you prepend each distributor account number with your own QET abbreviation for the applicable manufacturer, plus a separating bar symbol.
Confused?
It's more simple than it sounds.
Suppose Marcone is a company you buy warranty parts from, and as connected for work you do for Whirlpool, GE and Electrolux. You'd want to click into the cell that corresponds with the row you have made in the spreadsheet for Marcone, and in the column under "Vndrs Accnt Nmbr w/Mfg" (in particular, Column D). In that cell, first type the QET abbreviation you have setup for Whirlpool, then the bar symbol ("|", it's just above the Enter key on your keyboard), then whatever is Marcone's distributor account number with Whirlpool. Then hit Alt-Enter on your keyboard. This creates a sub-line within the cell. Now type the QET abbreviation you have setup for GE, then the bar symbol, then Marcone's distributor account number with GE. Finally, hit Alt-Enter again on your keyboard, then type the QET abbreviation you have setup for Electrolux, then the bar symbol, then Marcone's account number with Electrolux. You'll end up with cell contents that look roughly like as shown in Cell D-6 above.
I say "roughly," because you'll likely need to stretch the column widths and row height so as to make all of the enclosed text fully visible -- and because I've not placed in true account numbers (only stand-ins), and because it's likely you've picked different QET abbreviations than as shown in my illustration.
There is one important precaution in regard to editing text in the first column of this list (which contains each vendor's abbreviation, as prior configured by you). Please don't change that abbreviation for any vendor in connection with which you already have applicable inventory and/or parts-process records in ServiceDesk. The reason is because any such preexisting records are tied to that vendor by virtue of the particular abbreviation that already exists. If you change the abbreviation, it will break the tie.
After any edits, of course, just exit and save the file as per normal when editing such a file.
One little matter you may note is that Excel will warn, upon such saving, that you're going to lose some formatting. Try not to be concerned with that warning. It's simply to inform that if you save in the same .CSV format in which the file was originally loaded, any formatting that's particular to layout in Excel will be lost. That, actually, is exactly what you want -- so don't be alarmed by the message.
Enhanced IQ when fill-in of on-screen NARDA decides which particular vendor's account number information should be inserted
If you do warranty work, you must submit warranty claims to get paid. If you use parts when doing such work, your claims must include appropriate reference to such parts, in order to be paid on them. More particularly, you are likely to receive credit back from the vendor from whom you purchased such parts, assuming your claim is successful.
If you think about it, you will realize that significant mechanics are involved in getting such credits back to you. After all, you’re making your claim to the underlying manufacturer (even if in many cases it’s via a third-party such as ServiceBench or ServicePower). Somehow, when the manufacturer accepts your claim, it has to know which vendor you purchased each part from. Only by knowing this can it then provide reimbursement funds to that vendor, which allows the vendor to credit your account. More particularly, it must know not only which vendor is involved, it must likewise know what is your own company's account number with the vendor and what is the invoice number on which you made your purchase -- so that it can inform the vendor of these matters, which thereby allows the vendor to know precisely how and where to apply the credit back to you.
It is because of this that each claimed-upon part must carry information which informs the manufacturer not only of which vendor was involved in its acquisition (in particular, of that vendor's "Distributor Account Number" with the manufacturer).
We have long designed for this information to be included in such claims as are created by ServiceDesk, but there has been a limitation.
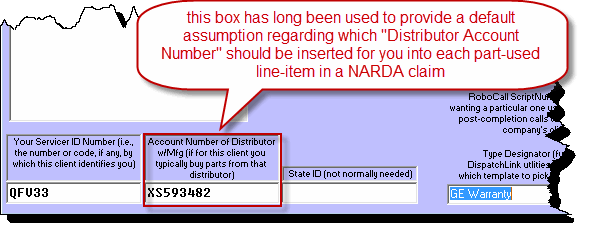
In particular, prior to this release, ServiceDesk did not in its composition of claims directly distinguish who is the vendor from whom you acquired applicable parts. Rather, it has had provision by which you indicate who is the vendor from whom you normally acquire parts when working for each OEM. As it formulates each claim for you, it simply assumes that this "normally-acquired-from" vendor is in fact the vendor from whom you acquired such parts as were used on the job. The place where you indicate this normally-acquired-from vendor (for any particular manufacturer client) is in the QuickEntryTemplate (QET) that you setup for that client. In particular, it's done via the box shown here:
The problem with this scheme, of course, is you may not always purchase the parts as used in work for a particular manufacturer from one and the same vendor. It's possible, even on a single job, you might have acquired one or more parts from one vendor, one or more from another, and other parts from still another vendor. In fact, it's our understanding that such multi-vendor sourcing is becoming an increasingly common practice, and it makes it surprising that our simple "default-assumed-vendor" scheme has been accepted as long as it has.
Regardless, we are past-due for the time when we should have transcended this old limitation. In fact, to so transcend was precisely the main impetus behind our Enhanced Vendor Management System, as described in the entry above this one.
This upgrade allows ServiceDesk, when inserting part-item entries into a claim, to do much better than just assume that each such part was acquired through your QET-default-indicated vendor. Instead (and so long as you have the new Enhanced Vendor Management system appropriately setup), ServiceDesk will look to see who was the vendor from whom you actually acquired the part, and will insert that particular vendor's Distributor Account Number (assuming, of course, that it's provided in your Enhanced Vendor List).
Inventory Control: Order restock on basis of items presently deficient, but for a particular location (and, optionally, with request for vendor to ship to that location)
One of the sweetest methods to use when ordering inventory restock is where the system shows you solely those items where you've fallen below minimums. Perusing through that list, you effortlessly indicate the quantity you want to place in an order as being formulated for a particular vendor. On this basis the system creates a very nice purchase order -- which, typically, is directly emailed to the vendor.
We've had this feature forever, and it's great.
Recently, however, a very large client who covers a very large area (most of the maritime provinces in Canada) requested an enhancement. It was needed because this company manages many techs who are in areas so remote it is not practical for them either to go to a central location so as to obtain restock, nor for a courier to make deliveries to them. Instead, what was needed is easy ability to create re-stock orders, directly to a vendor, for direct shipment to each such technician individually.
If you did not know, until this release the "Order Restock on Basis of Items Presently Deficient" method assumed you are ordering for the entire company, system-wide, with expectation shipment will be made to the main location, and with intent you will use other facility thereafter (also within the Inventory Control form) to parcel out to each tech according to need.
Anyway (for the reason explained above), that assumption did not work for this client (and maybe it doesn't work for you).
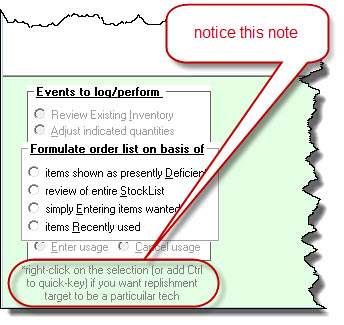
So now, when in the Inventory Control form (F10) you pick the succession of options to get to here, you'll see a little note appears just below the selection area:
Simply follow the path suggested, then follow the prompts. You'll see it's now very easy to use the old mechanism, but now as directed to ordering for a particular location. In fact, if in the Settings form you have provided an address for the tech whose location you are requesting restock to, the purchase order as created for you will request to the vendor that shipment be made directly to that address.
Option to pick specific purchase-invoice-numbers when returning parts to vendors
This feature should not typically be needed. However, if the odd situation arises where you want to "use" a particular purchase-invoice number when returning parts to a vendor, this option allows that opportunity.
[For context, suppose you have 15 widgets on your shelf, and want to return 2. Internal system data might reckon that eight of your widgets were purchased on Inv # X, four on Inv # Y, and three on Inv # Z. For some reason, you want to assure your returns are reckoned by ServiceDesk as having been purchased on Inv #Y (i.e., as opposed to letting ServiceDesk more randomly pick which particular widget instances it reckons you moved). Thus, if you made this pick and using the new option, ServiceDesk would in consequence reckon you'd reduced the quantity of widgets purchased on Inv #Y to two, while leaving the other quantities the same as prior.]
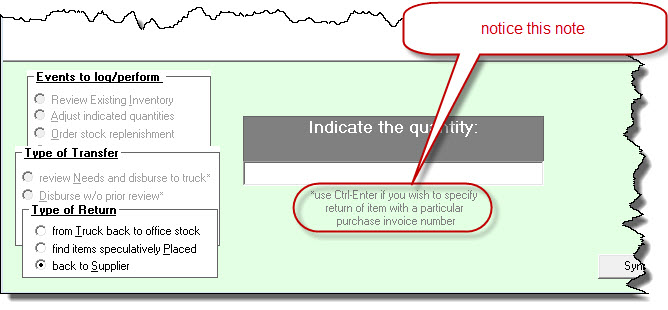
Anyway, if you you want this option, just follow the normal sequence for indicating a return of items to vendor (it is F10-->Transfer-->Return-->Supplier). You'll be prompted to indicate the applicable part number (which widget?), then to indicate the quantity. At such a point, the relevant portion of your interface will look similar to the following:
Please simply notice the note, and do as it says.
"Deep Archive" now available for JobRecords
If you've been in business and using ServiceDesk for a long time (especially if this is true and yours is a large operation), it's possible that, in various operational areas of ServiceDesk, you have accumulated not just big data, but, in fact, hundreds of thousands of records that are becoming pretty darned ancient (e.g., more than ten or fifteen years old). While such an accumulation is not in itself a direct problem (ServiceDesk is designed to quite seamlessly cope with very big data), it adds heft to the burden of daily backups, and is more for ServiceDesk to regularly sort through. Especially because there is little benefit in maintaining data that's so old, it's possible you might want to lighten these loads.
For that reason, several months back (and, actually, without announcement here) we added a facility whereby, if wanted, you can move a selected quantity of your oldest PartsProcess records into what we call a "deep archive." The data is not thrown away. It's just moved into a separate place that's outside the normal operational areas. Though we've not done it yet, it's our intent to make facility where, should the odd need arise, you can from within ServiceDesk directly access such "deep-archived"data (we plan to do this as soon as anyone expresses the need).
We've now added the same facility for JobRecords.
To access the facility for PartsProcess records (please bear in mind these access points are purposely somewhat "backdoor-ish" in nature), bring up your PartsRequest form (the shortcut is Alt-F8), right-click on its "Run Purge/Archive" button, then pick the option as offered.
To access the facility for JobRecords, bring up the archived-JobRecords form (the shortcut is Ctrl-F7) and, on your keyboard, press Alt-C.
In either case, there will be a dialog to go through before anything is actually done to your data, and the system will demand presentation of your Master Password.

