ServiceDesk 4.8.197 Update 12/23/20
Enhanced Guidance on Capacity-to-Book in DayPlanner Interface
This is the first in what we plan as a series of ongoing enhancements to our new DayPlanner interface (first described here).
This one relates to the fact that you may specify, for each tech, what is his daily capacity in in terms of JobCount value. This is done within the Settings form (Ctrl-F1), in Technician Properties window as applicable to each tech:
What this improvement does, essentially, is to inform, via color-coding, as to whether each potential scheduling cell still has capacity for added appointments (where a cell consists of the intersection of a particular tech and particular date).
In particular, where a tech and date combination still has two or more JobCount slots the remain open, the corresponding cell will continue to show with the default white background. Where there is only one JobCount slot remaining, the corresponding cell will show with a yellow background. If all of a tech's capacity is already booked (or overbooked) for a given date, the corresponding cell will show with a red background.
This obviously provides a scheduler with at-a-glance ability to easily see which tech and date combinations still have capacity for booking, and which do not. If, moreover, you combine this with use of the DayPlanner in Target-Specific mode (see here), you'll be able to readily see not just which techs still have capacity and on which dates . . . much more specifically, you'll be able to readily see which techs work in the needed zone and have the needed skill and also have capacity on which dates.
It's pretty powerful.
Enhanced Specification of Tech-Pick and Carry-Through in DayPlanner Interface
Until now, when going to the DayPlanner in Target-Specific mode (again see here), you'd likely pick a date and technician combination that seemed suitable for an appointment. You'd then click on the header at top of the date column you'd picked. ServiceDesk would then insert that date back into the Callsheet you'd linked from or, if you'd linked from a JobRecord, into a poised entry in the ScheduleList form.
This mode lacked any method for you to directly specify, in context, the particular tech you figured you'd be scheduling for, or for any direct communication of such a choice back to the calling context.
Now this mode has such capability.
In particular, when going to the DayPlanner in Target-Specific mode, if you float your mousepointer over any scheduling cell, you'll see a ToolTip, like this:
Instructional ToolTip appears when mousepointer is floated over any scheduling cell
Just do as the ToolTip suggests. In reaction, the system will return you to the calling context with information not only about the date you picked, but also concerning the technician you picked.
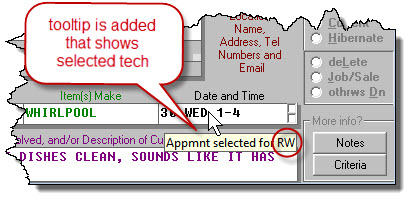
In particular, if the calling context was a Callsheet, the system will add a ToolTip to the appointment box indicating your technician pick:
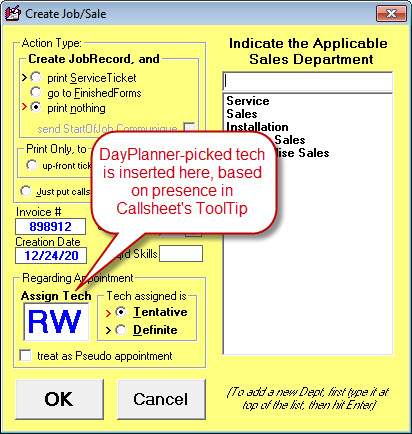
When you then do a Create-Job/Sale transition from that Callsheet, ServiceDesk will note contents in that ToolTip, and will auto-populate the assigned technician box in the little yellow form:
If instead the calling context is a JobRecord, the system will simply auto-populate the tech whose cell you have picked into the poised-for-entry ScheduleList item:
DayPlanner Link to Specific-Date-Displayed in DispatchMap
It's possible you'll be in the DayPlanner, looking at a particular date column, and you want to see more details regarding the layout and which techs have which jobs in what arrangement on that date, in particular in such mode as shown in the DispatchMap. Certainly, you could hit F5 (shortcut to open the DispatchMap, then page to the date in question (or hit "C" for calendar and pick the date from a DatePicker). However, there is now an easier option, as revealed by a ToolTip if you float your mousepointer over any date at top of a date column:
Just do as the ToolTip suggests, and the DispatchMap will instantly open showing the date you've right-clicked on.
Enhanced Options and Documentation in Regard to Variable and Miles-Determined S.Call Rates
Though there have been a few enhancements over the years, this is a pretty old feature (main manual description here). The present enhancement was triggered by recognition that it had a significant gap in that it could show you within the DispatchMap what would be a service call amount based on estimated distance and a formula you've specified, yet that amount was not automatically inserted for you back into the Create-Job/Sale interface. Instead, if in fact wanting to use the amount displayed in the DispatchMap, you needed to manually type it into that second venue. When this gap was pointed out, we felt it was something that must be addressed.
While so addressing, we figured we ought to also offer the option to base the Miles-Determined amount on true driving distance as calculated by Google, which will be much more accurate than driving distances as estimated on basis of ServiceDesk internal algorithms. So, that is another improvement.
At the same time as making these improvements, we realized there was a need for comprehensive and current documentation regarding how the combination of these features now stand, and may be harnessed. So, we created a new little handbook on precisely that topic. Please see here.
New Export Exposing Details of Techs' Work on Prior Days' Dispatches
No matter the variety and quantity of prepared reports that ServiceDesk provides, it always happens that some users want to delve in with other and/or deeper kinds of analysis. Many times over the years, we've added export options that provide such raw data as is needed for particular such purposes. This is another such instance.
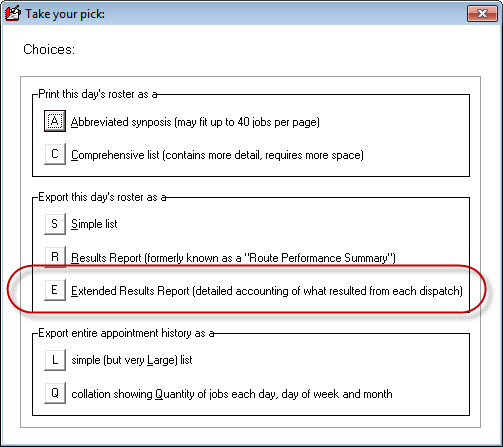
In this case the client wanted, in an export, a plethora of details regarding what had happened on each of the appointments as present in a prior day's schedule. We already had a simple export that otherwise met that criteria (obtained by looking at any past day in the DispatchMap, then picking Alt-P, then choosing "R"). Though we could have extended that already export, we felt it made more sense to leave it as is for those that want just the prior-existing offering, and create a new export for the requesting client (and, of course, for any other user that would like to make use of it). So, the new export option is shown here:
If you think you might like to make use of such an export, try it out. You'll see exactly what it provides.


