Managing Special-Order parts
Some service companies may not face challenges when ordering non-stock parts. For others, this can be a frequent and significant task. Rest assured, ServiceDesk has a well-developed system to handle this.
Firstly, let's define two types of parts. Stocking parts (also known as "inventory") are items you buy and store, expecting to use them on a future job. When you first get them, they're not for a specific job, and you have no immediate use for them. These are speculative.
On the other hand, special-order parts are never kept as "inventory". These are acquired for specific jobs or to meet specific Point-Of-Sale (POS) requests. When we realize that a certain part is needed for a job (or POS request) and it's not a stocking item, we must order it specifically for immediate use.
Birth of the internal “PartsRequest”
The first thing that must happen, in managing a special-order part, is for an internal “request” to be generated. This request can be created via any of several mechanisms:
A tech in SD-Mobile makes the request, via his Mobile interface;
tech makes the request via a PostVisitReport, as entered (by him) directly within ServiceDesk;
An office person creates the request, via a PostVisitReport, as performed on behalf of a tech;
An office person creates the request via a POS operation; or
n office person creates the request via a button as provided within the JobsCurrent form, and as connected with the job then displayed.
All your parts requests are saved in one place, and you can see them on the PartsRequest form (press Alt-F8 to open it). This is where you can view, edit, and even create new requests.
Now, to manage a special-order part, we first need to create a request for it. This request is just a note that says we need a particular part for a specific job, but that part is not in our regular inventory. The request is the first step in the process of finding suppliers, placing the order, tracking it, and checking the part when it arrives.
This request is crucial. For parts related to jobs (not Point of Sale requests), it is usually created in one of three ways, all of them related to the PostVisitReport (either via Mobile or internal PVR Types I or II). All these methods lead to the same result: a request for a part that needs to be ordered, or at least checked.
The system knows that sometimes we need to research a part to check its price and availability before deciding whether to order it. The PartsRequest form allows for this by offering an option to mark the order as "Definite" (get it no matter what) or "Tentative" (just researching for now).
Processing PartsProcess items—general concepts
So, you have multiple ways to create a PartsRequest and a form (Alt-F8 PartsRequest form) for each request. But just creating and storing these requests isn't enough. We also need a way to do the necessary work like looking up the parts and ordering them.
The PartsRequest form isn't suitable for these tasks.
Imagine an old-fashioned office. Each part-request was represented by a paper slip. The person in charge of parts would collect these slips and sort them out, deciding which parts to get from which vendor.
In a digital system like ServiceDesk, we need an equivalent to this sorting process. That's where the PartsProcess form (shortcut F8) comes in.
The PartsProcess form is your main workspace for handling parts. It's like a digital version of the large desk where you sort out your requests.
If you're an average shop, you'll have many pending parts-requests. Some will be new, some will be waiting for a response from the vendor, some will be waiting for the shipment to arrive, and others might be waiting for the customer's approval.
Imagine if you had a separate table for each category of requests in a paper system?
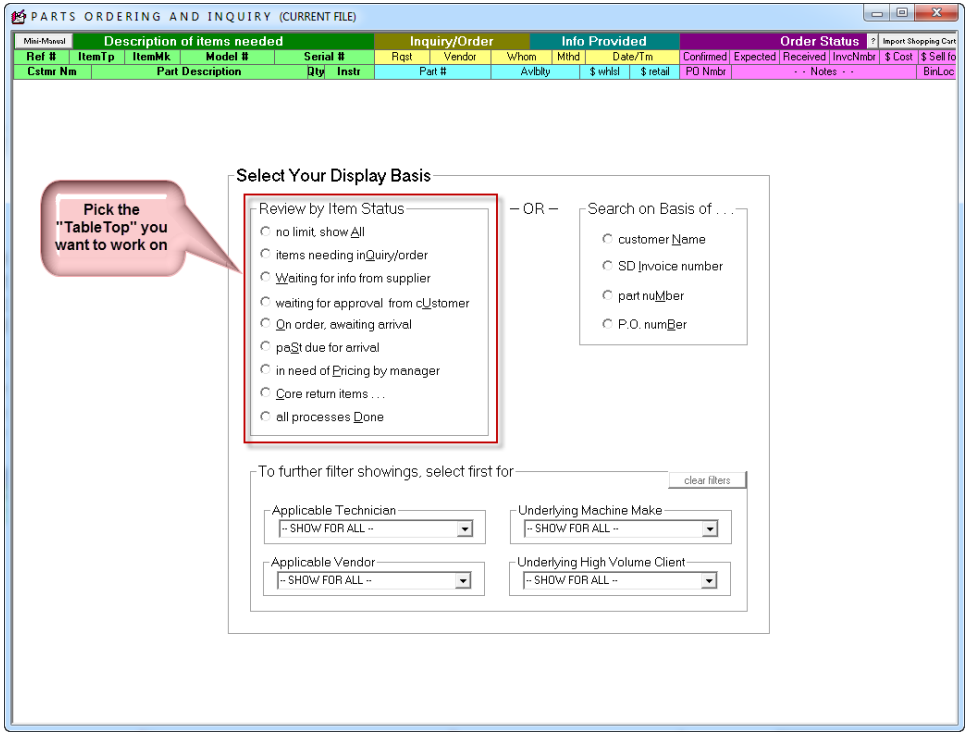
That's what the PartsProcess form does. It gives you several "virtual" tables, one for each stage of the parts request process. On the first page, you choose which "table" you want to work on.
When you select a specific display category, the system presents you with a "tabletop" related to the type of work you're currently focusing on.
In the background, the system checks each pending request to see if it fits into the selected category. If it does, it's added to the "tabletop" display.
Simply select your display category and ServiceDesk will instantly sort and present your tabletop.
This "tabletop" can display up to 18 requests on a single page. If there are more than 18 requests, the extra ones appear on the following pages (use the PgUp and PgDn keys to navigate).
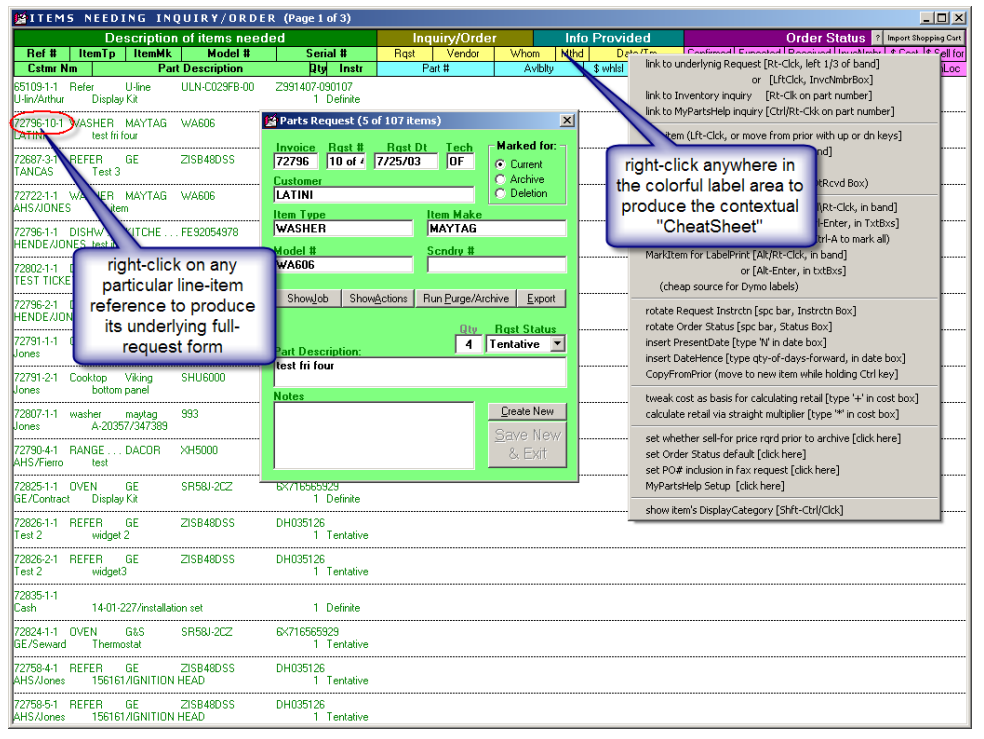
Each request is presented in an "info-band" which stretches from left to right and contains two lines of text.
The left third of each band (green text) gets information directly from the PartsRequest form. This information is shortened to leave room for more process-related details. If you need more detail, right-click on the item's reference number (top-left of each band) to see the full PartsRequest form.
The colorful label area at the top of the PartsProcess form is there to help you understand what each information band is for. To understand what each space is for, match it with the label in the same position at the top.
The colorful label area has another feature. We've talked about "Cheat-Sheets" before - they're parts of the Command Summary that relate to a certain work context. Like Callsheets and the DispatchMap, your PartsProcess interface has many hidden commands and tricks. These are useful tools, especially when you're starting out, and it's handy to have a reminder. Since the colorful label area at the top doesn't have any other function (it's just a label), you can right-click there to bring up the Cheat-Sheet. This works whenever you're in a context that offers a Cheat-Sheet and you're right-clicking in a non-functional space. You can also right-click in other areas of the PartsProcess form, as long as the spot you're clicking doesn't have any other function.
The right two-thirds of each info-band is for details about ongoing processes related to the request. Check the label areas to understand what goes there.
The first added information could be the required part number for the request, but it depends. Some offices have their techs find the part numbers before making the requests, while others do this in the office. For this example, let's say your office does the latter.
Managing PartsProcess items—specific operation
You're the parts person who handles ordering and lookup. When it's time to collect all the requests from your techs and maybe the parts counter workers, you go to the F8 form instead of gathering paper slips. Here, you select the display category "Items needing inquiry/order" and see a list of partially filled info-bands.
For each request, you note the machine type and desired part and decide the best way to look up the part (if you're in appliances, SmartParts (Alt-F10) might be the fastest).
After finding the correct part number, click on the info-band and type it in the designated box.
Your tech may already know the number when creating the request. If so, it will automatically show up in the right box when you click to edit. This means you won't need to find it yourself.
Alternatively, your vendors can find the numbers. They can do this for free, so it saves you time. The system allows this too.
The system also lets you send requests to your vendors in many ways. You can ask for lookups, price checks, and availability, or place orders.
You can pick up the phone and call a vendor. For each item, you can ask the vendor for the number if you haven't already found it. Once they give you the number, type it in the right box. Add any other relevant info like availability and price. If you already know the number, you can just ask about price and availability. If you're placing an order, tell the vendor and fill in the right boxes to show this.
But making phone calls can be inefficient. You might prefer to use a vendor's website for these tasks. If you do, fill in the boxes to show the info you received and the actions you took. You can even note down how you contacted the vendor.
For more efficiency, let the system do the work. It can send fax or email requests to each vendor for you. Just review the new requests and decide which vendor is best for each one. Then use your mouse to group the requests for each vendor.
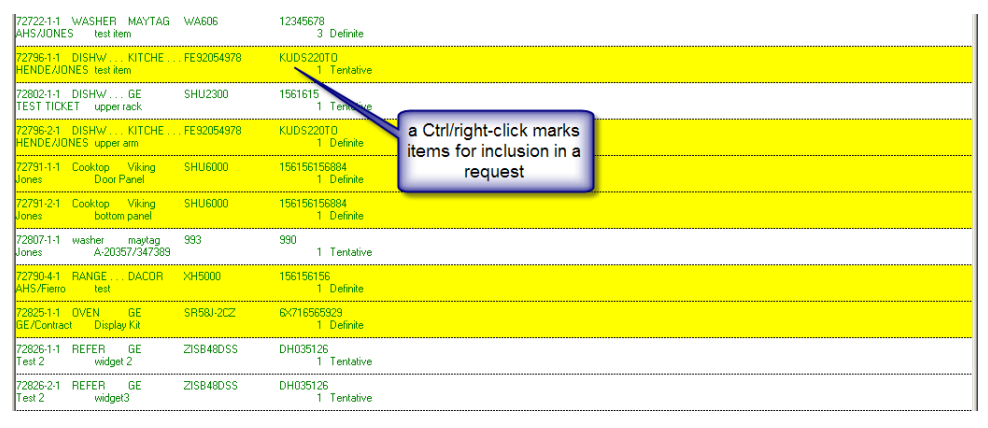
Here's how easy it is: Say you have some items that Vendor X can provide. Tell yourself, "I'm making a request for Vendor X." Look at all the open requests and decide which ones should be in Vendor X's pile. For each one, do a Ctrl/right-click on its info band. You'll see it turn yellow. This means it's marked for inclusion in the request you're preparing for Vendor X.
Here's how you can create and send a request to Vendor X:
Scroll through the list and select the items you need from Vendor X.
Press 'Enter' on your keyboard. This will open a dialog where you can choose how to send the request (email, fax, etc.)
This way, you can easily send customized requests to each vendor. ServiceDesk will tailor the request based on the information you've previously filled in. For instance, if you didn't provide a part number, the vendor will be asked to do so. If the order is tentative, the vendor will be asked to provide price and availability. If the order is confirmed, the vendor will be asked to ship.
After sending the request, the vendor is expected to respond with the necessary information. This could include the part number, price, availability, and shipping status. There might be a waiting period for this response.
So, what do you do in the meantime?
Think of ServiceDesk as a digital desk with multiple tabletops. Each request you send is like a slip of paper that gets moved from one tabletop (or category) to another. Once a request is sent, it moves from the "Items needing inquiry/order" category to the "Waiting for info from supplier" category.
When the vendor responds, you'll need to update the information on ServiceDesk. This moves the request from the "Waiting for info from supplier" category to a new one. For example, if the vendor confirms shipping, you'll update the order status and expected arrival date. This moves the request to a new category.
Note: If you update an item that should no longer be in the current category, it will turn grey. This is to prevent confusion if the item suddenly disappears. Grey items won't appear in the same category the next time you view them.
ServiceDesk uses the information you've filled in to determine the appropriate category for each item. The logic is designed to mirror human reasoning closely. Here is the precise criteria it’s using for this determination:
All Items In File: Obviously, this category selects every item regardless of its content
Items Needing Inquiry/Order: To show in this category, an item’s ‘Instrctn’ status must be set to other than “Declined’ and its ‘Request’ status to other than “Dormant,” plus its ‘Confirmed’ box must be empty. In addition, it must not fit the criteria for Categories 3 or 4, as below described.
Waiting for Info From Supplier: To show in this category, an item must fit the criteria as described in the first sentence under Category 2. Additionally, its ‘InquiryDate’ box must be filled-in with a date, while ‘Availability’ box remains empty.
Awaiting Approval From Customer: To show in this category, an item must fit the criteria as described in the first sentence under Category 2. Additionally, its ‘Instruction’ box must indicate “Tentative,” and the ‘InqjuiryDate’, 5. ‘Availability’ and ‘$ Sell for’ boxes must be filled-in.
On Order, Awaiting Arrival: To show in this category, an item’s ‘Request’ status must be set to other than “Dormant,” and its ‘Confirmed’ box must be filled-in, while its ‘Received’ box remains empty.
Past-Due for Arrival: To show in this category, an item’s ‘Request’ status must be set to other than “Dormant,” and its ‘Confirmed’ box must be filled-in while its ‘Received’ box remains empty (same as above). In addition, the “Expected” box must be filled in, and the present date must be beyond the expected date.
In Need of Pricing by Manager: To show in this category, an item’s ‘Request’ status must be set to other than “Dormant,” and either: (a) its ‘Received’ must be filled-in while it’s ‘$ Sell for’ box remains empty; or (b) its 9 ‘Instruction’ box must indicate “Tentative,” while its ‘InquiryDate’, ‘Availability’ and ‘Wholesale’ boxes are filled-in, with its ‘Confirmed’ and ‘Wholesale’ boxes remaining empty.
Part Arrived, Process Complete: To show in this category, an item’s ‘Instruction’ status must equal “Declined,” or its ‘Request’ status must equal “Dormant,” or its ‘Received’ and ‘Sell-For’ boxes must both be filled-in. Please note that items must be in the last category (i.e., # 7) before they will be ready for movement out of the current PartsProcess file and into its archive.
The colorful label area can give you quick tips. It’s like a cheat-sheet related to the work you are doing. Just right-click in this area to get a list of commands and tips.
We have talked about how to work with your "to-do" list, or the “Items needing inquiry/order” table. You start there, do some work, and expect a response from your vendor. When the response comes back, you enter that information in a new table.
At this point, your requests are in one of three states:
the part is on order
you have price and availability info for the customer
the initial vendor’s response was not good (for example, price was too high, the part was out of stock)
If the initial vendor’s response was not good, you need to ask another vendor. You don’t want to create a new "Request Item", because you are still trying to fulfill the original request. You also don’t want to delete the information from the first vendor. You need to remember not to ask them again. Instead, you can create "daughter" bands. These are like sub-tasks of the original request. You can create up to seven "daughter" bands for each original request.
To create a daughter band, refer to the cheat-sheet in the F8 form. Look for the entry that reads "Request New Info Band." That tells you how to use this method.
So that's the process for handling multiple inquiries or orders related to one request. But what if the customer wanted you to check the price and availability first, then call them back?
If you happen to be in the appliance repair field (as always, we apologize to our clients in other fields for describing something that, at present at least, can only be used in this one), there is an incredible tool that can fly right past the occasional need to deliberately and separately inquire with a succession of vendors. It’s not our tool (it was developed by another company), but we do exclusively link to it. It’s called MyPartsHelp (http://mypartshelp.com). Believe it or not, once you are subscribed to the MyPartsHelp service (with credentials appropriately setup within ServiceDesk), all it takes is a Ctrl/Right-Click on the part number within any info-band, and inside of about one second P&A info for each of your preferred vendors will display. The pricing info is specific, even, to your own account. The availability info is specific to each of the vendors’ locations. If you don’t see what’s wanted among your preferred vendors, one more click and you’ll get a nearly instant nationwide search. It’s such an incredible tool—you just won’t believe its power until trying it.
As a rule, it likely makes most sense for the parts person himself to call the customer back, for a yea or nea, immediately upon acquiring the information. It’s easy to bring up the underlying JobRecord (with all appropriate contact info)—by doing the right-click on any info-band’s item reference number (this brings up the underlying request form, where you may then click on its “ShowJob” button). But, of course, sometimes the customer will not be available for immediate discussion. We suggest adding a note to the JobRecord’s history indicating the effort was made. Additionally, it makes sense to periodically review the F8 form’s “Waiting for approval from customer” tabletop, and, for any items where a yea or nea has not been received, renew the effort (try, in other words, to keep that “tabletop” cleaned up—just as you do all the others).
When and if you get a yea, of course, you can appropriately change applicable boxes to indicate the request is now “Approved,” and place the order with a vendor, much as you would have had the request initially been “Definite.” If you get a nea, you can simply change the request status to “Declined” (at such point, ServiceDesk will figure your work on that item is complete, and once again appropriately move it to a different tabletop). If your customer never responds and you finally tire of the effort, there’s another put-this-item-to-bed category called “Dormant” (look for it; you’ll see it).
Finally we are left with the general subject of how to deal, after the fact, with items actually ordered.
In terms of immediate response, this is perhaps the most simple. The parts come in, and you fill-in boxes to indicate the circumstances of their arrival. Essentially, you’re “checking-in” the parts (bear in mind, we’re talking about special-order parts here, and not stocking parts, which are “checked-in” through a totally different process). This is done, obviously, as shipments are received (or any equivalent event).
More specifically, as you open a box of just-received special-order parts, you’re going to open your F8 form, and pick the “On order, awaiting arrival” category of display. This will show you all items you’re expecting to receive. So, the general idea is, you pull an item from the box, then look within the displayed info-bands (use PgUp and PgDn to move between multiple pages, if applicable) to locate the one that pertains to the item in your hand. Once you’ve located that info-band, fill-in boxes to indicate date received, the vendor’s invoice number, and so on—as applicable to the circumstance.
The above method works just fine if you’re handling a relatively small quantity of special-order parts. If you’re handling more (so that, for example, at any point in time you have many pages in the “On order, awaiting arrival” display), perusing through so many items (to find the request that matches an item as just pulled from the box), is too laborious. For that situation, you can make the display-selected items more specific to what you’re likely pulling from a particular shipment. Specifically, you can narrow the selection criteria by applicable vendor, and even PO Number (see the face of the F8 form’s first-display/menu page for instructions).
Upon filling-in boxes to indicate an item has been received, you’ll often have your work interdicted with a message. The message will indicate that it appears no more parts are on order for the underlying job, and will ask for your consent for the job’s status to be changed into “Working to Schedule.” This change facilitates other office processes in achieving the re-scheduling purpose (assuming, of course, the job wasn’t already scheduled for a return visit in anticipation of receiving the part).
The interdicting message may make further offers.
If you have the customer’s email address (i.e., within the underlying JobRecord), it will offer send an email to the customer, informing parts have arrived, and requesting a telephone call to book the return visit.
Even better, if you’re using SD-CyberOffice, it will offer to make it an email that includes a hyperlink—on which the customer can click, and be taken to an interface on your website to re-book, day or night, and without other human intervention. That’s true space-age stuff, and you’d better believe it impresses the customer.
At any rate, once the part is checked in, part-process work on the item (as such) is essentially done. The underlying request and its connected process info-band will be moved to the PartsProcess archive (contents accessible via Ctrl-F8), thereby leaving the current work-area uncluttered by the work that’s already one.
Actually, there is a potential further stage. Some service company owners (yours truly being among them) feel that pricing on specialorder parts cannot be optimized via any formulaic solution—that, essentially, human judgment is needed on a case-by-case basis. This is because sometimes cost on a part is very low, such that if typical markup was used the ultimate retail would be much lower than anyone would likely guess as normal. Some owners feel they should take advantage of this, and profit by pricing the part more in the region where a layman would guess it should be. Contrariwise, sometimes a part comes in with a cost far higher than any consumer would expect to pay, even at retail, and some owners feel it’s best in those situations to apply little if any markup. There is no way to assess these situations except with human judgment, and it’s not typical that the same person who does the parts check-in is simultaneously adept at exercising this judgment. If wanted, you can structure the PartsProcess system so, once actual received-cost information is put in on an item (but still without sell-for pricing), it’s automatically moved to a tabletop titled “In need of pricing by manager.” It’s a simple task for the “manager” to review that tabletop (at least daily), and type in pricing as applicable. If this is your preference, you’ll need to open the PartsProcess form’s CheatSheet, and click on the selection labeled “Set whether sell-for price required prior to archive.”
From here forward, operations in the office (as connected with any job that had one or more special-order parts) resume with job- and schedule-management processes.
As an adjunct to checking in these special-order parts, you may want to create labels for them (much as when checking in stock parts). In this case, however, since the entire checking-in process is rather less formalized (e.g., in the case of checking in stock parts there’s almost a dialog you must go through), there’s no concrete inquiry prompting you to do so. Instead, it’s up to you. At any time you want (and regarding any info-bands as displayed in the PartsProcess form, whether newly checked-in or not), you can simply do an Alt/Rt-Clck on an item (or any set of items). In response, the info-band will turn blue, which indicates it’s designated for inclusion in a label print (distinguish this from marking items for fax transmission, where a Ctrl/Rt-Clck turns an info-band yellow). After each of the items you want are so marked, just hit Enter—which begins a dialog for printing your labels
—At least, special-order parts-processes are done for the most part.
Why the qualifier?
In answer, read the next section.
Taking PartsProcess items “to the grave”
Until around 2006 to 2008, not much was changed with PartsProcess items, beyond what's been mentioned. When you checked in a special-order part, ServiceDesk assumed it was used for the job. There was no way to make sure it was really used, or to check if it happened. There were no methods to ensure that if the part wasn't used, another suitable action was taken. This could be returning it to the vendor for credit, or deciding to move the part into stock.
To use a metaphor, we were good at giving birth to special-order requests, and at managing their matriculation through to graduation from normal finishing school (assuming normal graduation occurred). But we had no mechanisms for dealing with (or even counting) dropouts.
Documenting usage of S/O Parts, when usage occurs:
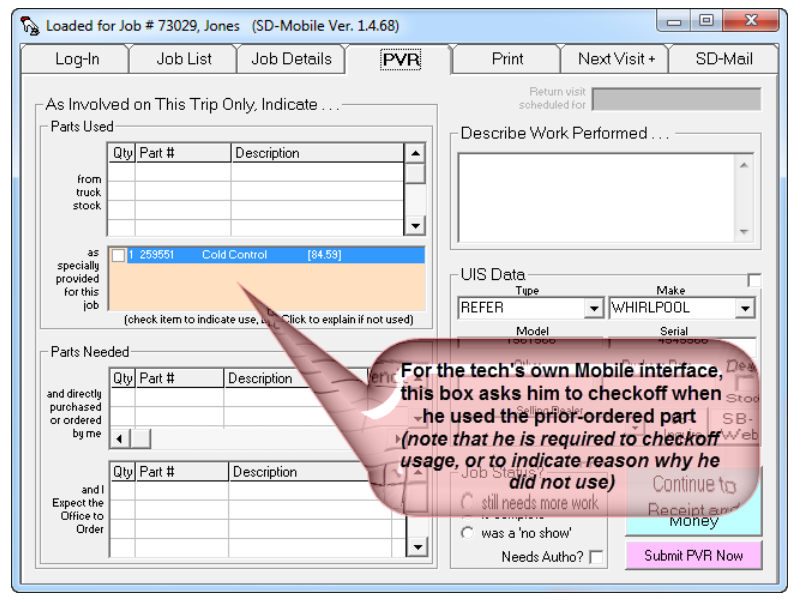
The first element of change involved creating a method to check-off, when a special-order part is actually used on a job, that it was used. We added a box in the Type-II PostVisitReport form that displays items prior-ordered for the job, and invites the reporting person to indicate (via a simple checking action) whether each such item was in fact used.
When creating SD-Mobile’s PVR interface, we provided a nearly identical function there.
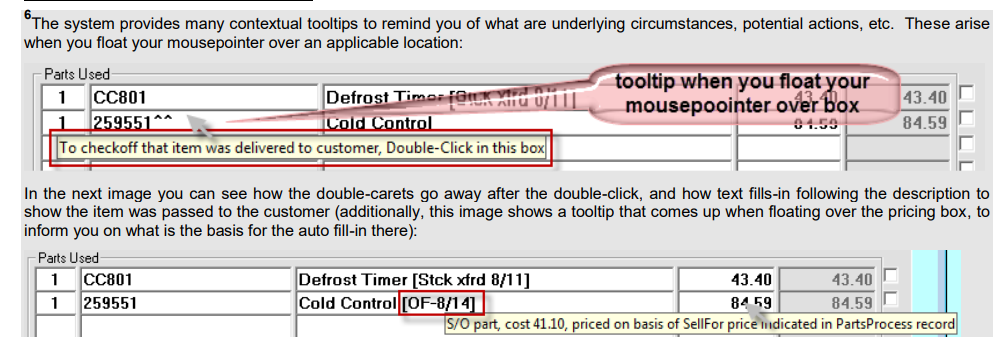
From either context, if an operator “checks” a listing to indicate the part was used, ServiceDesk inserts text in the underlying PartsProcess item’s BinLoc box. This text is a particular form, to signify usage. This BinLoc box seemed sensible for the purpose because, once the item has been used, it can’t be sitting in any bin waiting to be used. The particular text that’s inserted consists of the applicable technician’s two-letter abbreviation, followed by hyphen, then date (e.g., “GR-10/15”)—thus signifying use by that technician on that date.
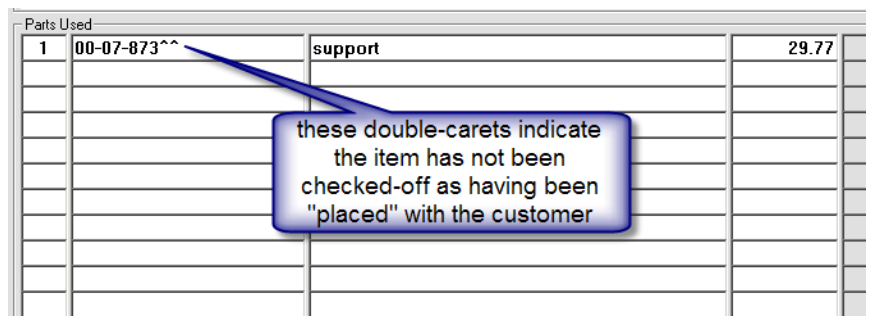
Not long after creating this check-off method, we realized there was no corresponding method to check-off use (or, in this case, receipt by the customer) of items that were special-ordered in the POS context. So, in the FinishedForm windows where parts are listed (specifically, as applicable in a POS operation), we added a simple notation to indicate if any special-order item has not been checked as having been “placed” with the customer (I’m using the word “placed” instead of “used,” because, in this context, an item could be picked up by a customer, shipped to her, etc.). The notation is a double-caret symbol next to the part number, within the listing of items being sold.
Given this structure, the parts-counter/POS guy has a simple task to perform when either the customer comes in to pickup a POS/special-ordered part, or if he ships it. He needs to do a double-click on the part number that has the double-carets.
This tells the system the item was placed with the customer (i..e, “used”). In response, the system inserts similar text (as described above for special-order items being used on the job) in the underlying PartsProcess item’s BinLoc box. Plus, it changes text within the FinishedForm/POS interface to show usage (i.e., it removes the double-carets).
With the above explanation, we’ve described how special-order items get checked-off as having been used. That’s all well and good, but what happens if a parts does not get used? That is the subject to which we now turn.
Documenting any other final disposition:
The primary question in this segment is: How do you document any non-usage, final disposition of a special/ordered part (such as, for example, returning to the vendor for credit)?
The simple answer is, much as each PartsProcess item’s BinLoc box is used to indicate actual usage (when such occurs), you’ll use precisely the same box to indicate any other particular disposition.
More specifically, when you are working directly in the PartsProcess form (regardless of whether in its F8/Current or Ctrl-F8/Archived mode), you’ll use a built-in dropdown from the BinLoc box to pick one of the dispositions offered:
As you can see, there are six options to choose from. The first is the same as is inserted by the system for you when, from any of the applicable contexts, you simply tell it the parts used as per original intent. You could select it here manually, if in fact the part was used, but the insertion had not been made via normally-intended means. The other’s speak somewhat for themselves:
RARqstd (to signify you've requested Return-Authorization from your vendor)
RtToVndr (to signify you've returned it, with expectation of receiving credit)
CrdtRcvd (to signify credit was in fact received)
MvdToStk (to signify a deliberate decision was made to move the item into stocking inventory)
WriteOff (to signify a deliberate decision was made to count the item as a loss)
You might notice that placing an otherwise unused part into these other disposition categories is a hand-on process. There are some things that, simply, humans must do.
You might also notice, if you use the system as above-described in a very simple manner (e.g., you simply select “RtToVndr” when you’ve returned the item, and change to “CrdtRcvd” when that event occurs, etc.), there is no inherent documentation as to when such events occurred. The only indication of such fact is a single, naked status indicator. This may be fine for some operations, but others will want more explicit documentation of what’s involved in the sequence of events. This is where you’ll want to take a further step.
We prior discussed “daughter-bands,” as adjunct info/process-bands that may be created to underlie a primary PartsProcess item request. In that discussion, added daughter-bands were described as useful when on the basis of a single request you need to place inquiries (or actual orders) with more than one vendor. For the present context, we’re revealing another use. Specifically, from the Ctrl-F8 Archived-PartsProcess window, it’s possible to create a special variety of daughter-band, configured for the particular purpose of managing return of the primary underlying part (i.e., as received within the main band). The idea is that this special variety gives you added places to put in dates, and such, as applicable to particular return effort (and credit received) events.
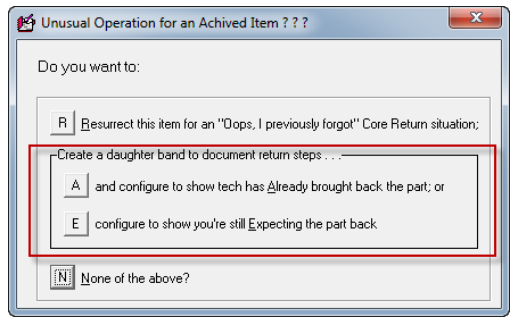
To create this special “manage-return” specie of daughter-band, just right-click on the primary item of interest (i.e., the info-band for the item you want to return), from within the Ctrl-F8 window. In response, you’ll get an option box:
As you can see, in regard to creating the wanted new info-band, you have two options: one is obviously applicable if the part has already been retrieved from the tech; the other if it has not. Make the appropriate selection, and you’ll instantly see a new daughter-band appear under the primary item, with some boxes already appropriately filled-in for you:
So now you have spaces where, much as you filled-dates on the parent band to indicate when you’d ordered a part, when you expected its arrival, when it arrived, invoice number on which it arrived and price on the invoice, you can use equivalent-position boxes to indicate then the part was returned, date by which you’re expecting credit, date credit was actually received, invoice number and amount of credit, etc. (Just as in any other context, of course, you’ll see such editing boxes actually displayed when you click on the item for editing.)
So mechanisms exist to enable meticulous documentation of what happens on every special-ordered part, whether used, returned or otherwise. But such mechanisms are worthless if not used. Indeed, even if there’s an effort to use them, they remain nearly worthless if not combined with a system that allows you to review and police, to assure all items eventually reach a proper end-disposition. This is our next topic.
Assuring all corpses are buried:
Again, our overriding concept is “cradle-to-grave” management of special-order parts. In the prior two segments, we discussed how items ultimately go into the grave (i.e., either by use or some other deliberated end-disposition). The problem is, service offices are extremely busy places, and even well-meaning employees may, if not well-policed, let at least some parts fall-through-the-cracks, never appropriately being used or brought to other appropriate disposition. It’s not as though, after all, (like real corpses) they emit a nauseating stench that advertises their need to be buried. Instead, they sit quietly on a shelf (or kicking around in a technician’s truck), costing the business serious money.
What you need, therefore, is some mechanism via which you can regularly canvass the field, illuminating such corpses as need to be buried. And, of course, once they are illuminated, each needs to be buried (as per descriptions in the prior segment). That canvassing method is the subject of this segment.
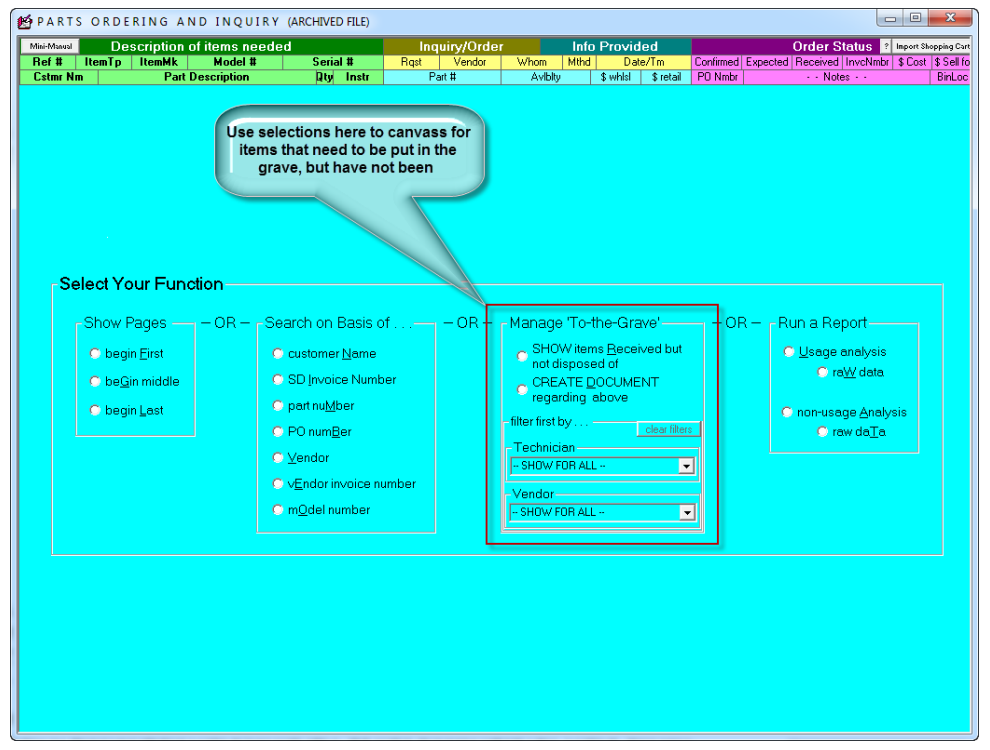
In a nutshell, the Initial-Menu in the PartsProcess form’s Archived mode (Ctrl-F8) has a section listing particular functions designed for this canvassing:
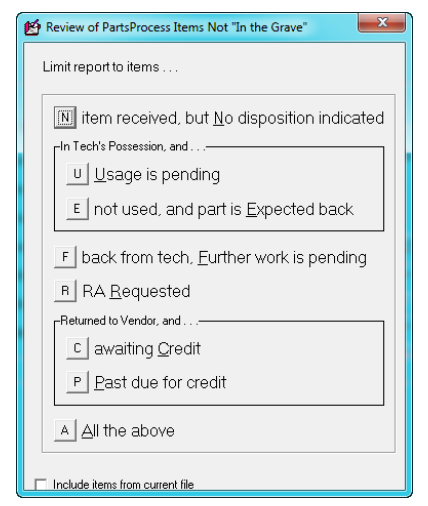
The main options, as you can see, are either to examine the items on-screen in their native/actual context, or to create a separate document that contains the information. You’re likely to also notice there are filtering options (i.e., so you can limit your canvassing to items that apply to a particular tech and/or to a particular vendor). Regardless of which option you pick, you’ll be presented with a set of sub-options, as follows:
As you can see, the options allow you to get rather specific. The main idea is you need to regularly open the review in particular sensitive above categories, to assure there are no rotting corpses there.
And, of course, you’ll use your native intelligence in doing so.
For example, parts in the “Usage Pending” and “Awaiting Credit” categories are generally of much less concern (and hence merit less frequent and concerned canvassing) than parts in the “Expected Back” and “Past-due for Credit” categories. Regardless, it should be a daily ritual for someone in the operation to canvass at least most of the categories, to assure none has members that are due to be moved to the next station (and, of course, to invoke appropriate underlying work to assure that it happens).
By using these tools, you will reduce your “parts-leakage” cost (referring specifically to special-order parts that fail to reach a proper end-destination) to near zero. It’s important. Most service company owners have little idea how much they are losing via such leakage. Most lose a lot. And, it’s a double-edged sword. You not only lose via the direct money-outgo from never used parts, you also lose via the burden they then impose by taking up space in your building and trucks (where they also add weight, fuel expense, etc.). By harnessing just these tools alone, you’ll make significantly more money.
I’ll venture a “soapbox” point at this juncture. It’s that most service company owners are far too prone, when they’ve special-ordered a part then find they can’t use it, to figuring: “Ahh, I’ll just put it into stock.” I believe that sentiment is almost always a mistake. Parts that are put into stock in such circumstances are almost never used – making the decision to throw into stock tantamount to throwing away money, but worse, because now there’s the burden of storing the junk (it’s how most service company offices fill up with tons of stuff that’s never used). Please don’t do it. The reason you were in the position of special-ordering the part, in the first place, is because you’d prior not deemed it worthy of stocking. The fact that you now have the part should not change your judgment.
Managing Core Returns
Sometimes you order a part on which there is a “Core Charge” — meaning, besides the direct-quoted price on the part, you’re also required to pay a temporary fee that’s designed to assure you return the old part that’s being replaced. If you don’t return that old part (i.e., the “core”), you won’t receive any refund on the extra charge. Instead, you’re out of pocket for it, and sometimes core charges are very substantial (in the Consumer Electronics industry in particular, they are often hundreds of dollars). Given this, proper management of core charges and credits can make the difference between business success versus failure – making it imperative to assure that, for each “core” that should be returned for credit, the needed return in fact occurs (plus verify appropriate credit is received, etc.).
ServiceDesk’s system for managing this relies on a feature that will now be discussed for the third time: Daughter Bands. As you may recall, these are generally designed to deal with situations where the vendor that you initially check with, on an underlying F8 request, either does not have the part in sufficient quantity, can’t ship soon enough, or if his price seems too high (i.e., you need to shop elsewhere). In such a case, you simply open new info/process bands (daughter bands), and use them to document other inquiries and/or orders as placed with other vendors (yet still pursuant to the same underlying request). In all, you are permitted to use up to eight info bands as connected with a single request (the parent plus seven daughters).
Our strategy for managing cores mainly depends on using — in respect to any part that’s ordered and which involves a core — one such daughter band, but in a special way.
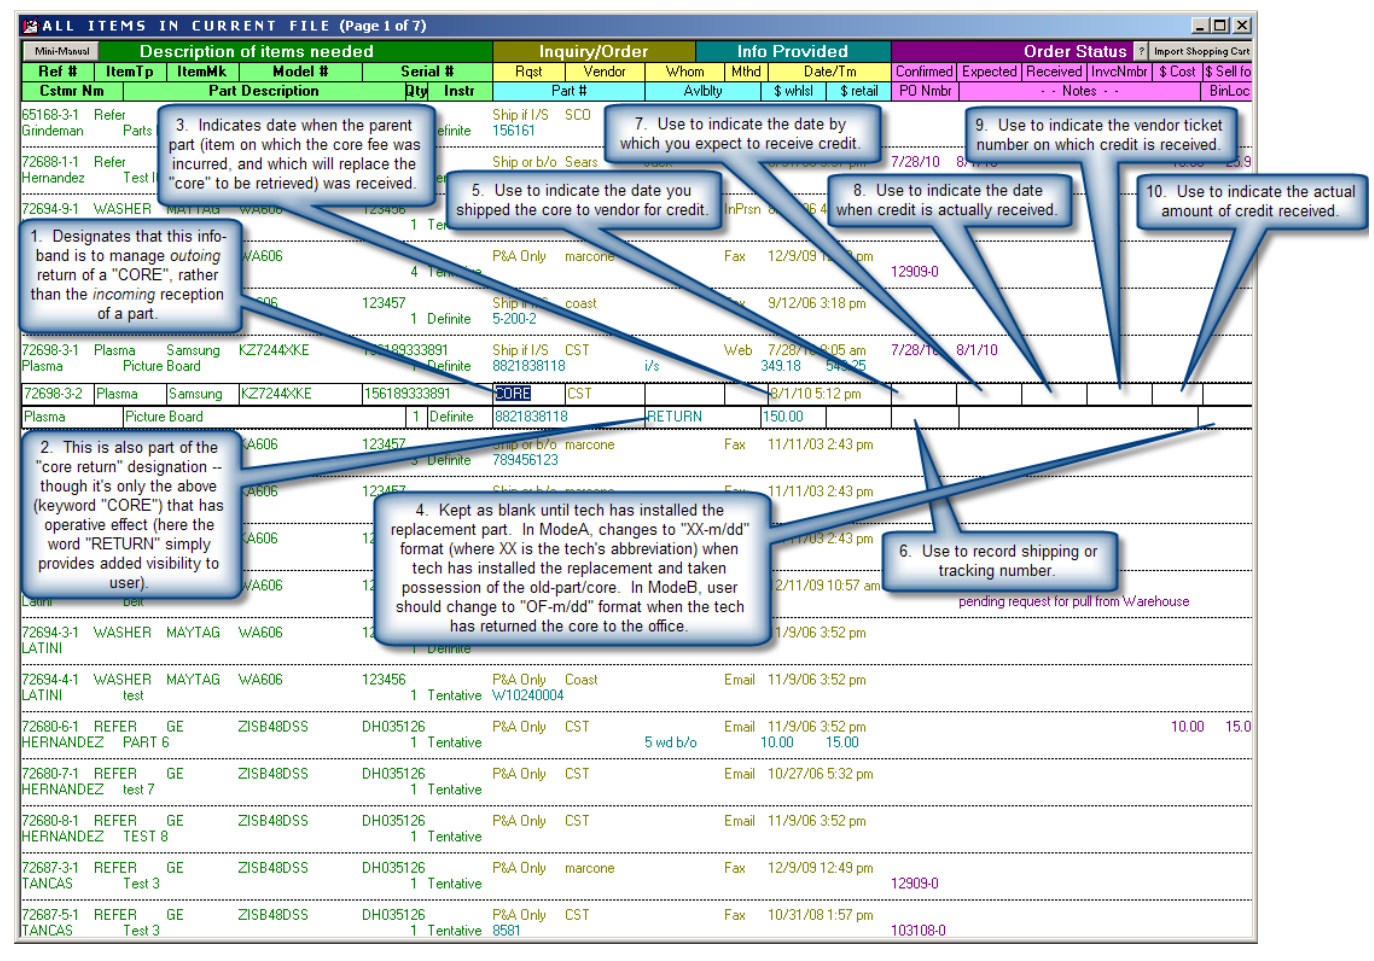
Specifically, when ordering and/or receiving the part (it can be done at any point, really), you should create a daughter band in the normal fashion (right-click within the right two-thirds of a parent that’s not enclosed within editing boxes). Once this daughter band is created, click in the Rqst box to expose its dropdown, then select the bottom listing, labeled “CORE.” Upon such selection, ServiceDesk will insert that word to the Rqst box, and insert the word “RETURN” in the Avlblty box. This serves to setup the daughter in a manner that makes it so: (a) it’s visibly apparent (to you as the user) that its purpose is to manage the core return, and (b) ServiceDesk itself can treat that as its purpose.
Once this special variety of daughter band is created, you should use its boxes in a manner that is analogous to what you do with a part that’s ordered (i.e., filling-in particular boxes as applicable to various progress events). But here, of course, the meaning of the boxes as filled-in will be changed — to fit the actual and specific circumstances as applicable to getting a core sent back to the vendor. In other words, the meaning of the fill-ins will be different for this context: somewhat similar, but not the same.
On the following page, we provide an illustration with notations to show, specifically, how we believe boxes should be differently used in a Core-Return situation (again, via a “daughter band,” as applicable to a parent via which the replacement part was actually ordered and received).
Please notice that items 1 and 2 (as labeled in the illustration) fill-in for you, on the basis of your selection of “CORE” from the Rqst box dropdown.
Item 3 will also auto-fill for you — specifically, when you “check-in” the part to which the Core-Return daughter-band applies.
Item 4 will auto-fill (for ModeA, as there labeled) if your tech is using SD-Mobile, and if when queried via Mobile he confirms having retrieved the old part, upon replacing with new. By contrast, your parts management person should manually change to the ModeB designation upon receiving the underlying core from the tech.
An important element in the overall scheme involves the fact that SD-Mobile will be programmed to remind the tech, as he begins any repair involving a core, of the fact he’ll be needing to retrieve the older part. It further reminds, as he concludes the job, and requests his confirmation that he has retrieved the old part and is properly in-process to transport it back to the office.
Items 5 through 10 should each be manually filled-in by your parts management person, at appropriate steps in the return process. By such filling-in, you may easily keep track of each element in the process, to assure ultimate and timely completion.
But the above is not all.
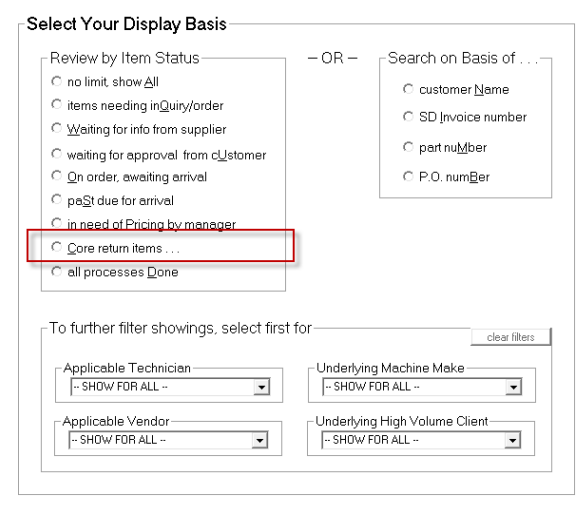
The PartsProcess form also possesses a viewing/filter option designed specifically to assist in monitoring Core-Return items in each of several categories.
If you look at the illustration of the F8 form’s MainMenu display as shown near this chapter section’s introduction, you should notice that, compared to the actual menu as currently offered, it’s out of date. The current menu features an option — not shown there — labeled “Core return items.“
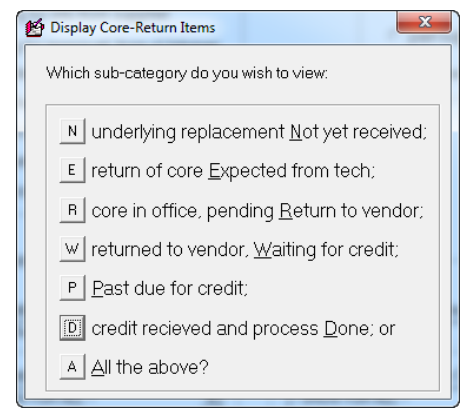
If you select that option, you’ll next be presented with the following dialog box:
In some respects, these options parallel the operative purposes as existing for reviewing actual parts as not yet placed in-the-grave, reviewed (with a somewhat similar-looking options box displayed) a few pages back). Just as there, there are choices to allow your parts operations person to review particular categories, for the sake of review/policing, and assuring that all items keep moving appropriate toward their proper end destination. The difference: there we were referring to actual new parts, as purchased but not used, being returned, and here were talking about the old replaced-parts/cores going back to a vendor. Regardless, the similarity is there are display categories to aid the review/policing process, and they should be used on a regular (likely daily) basis.
To summarize, the general strategy for managing cores is as follows:
Create an appropriate CORE-RETURN daughter band for any/every part that involves a core charge;
Periodically review the above-shown categories, to assure that items within each are being expeditiously processed from one stage to the next; and
As items move from one stage to another, document such movements by appropriately filling in applicable boxes.
Security is ultimately found in the fact that, once a Core-Return daughter band is duly attached to a parent PartsProcess request, the entire request bundle will refuse movement to the archive until the Core-Return daughter band is appropriately marked to show proper membership in Category 6 (“credit received and process Done”). In fact, it will pester you by virtue of its very, not-yet-processed-as-it-should-be-presence within your current work area, until and unless you certify that the ultimate step (receiving credit after return) has been accomplished.
We believe, by following the above prescriptions, you can easily assure proper processing on 100 percent of your core charges. We further believe it’s absolutely what you should do. If your operation involves cores at all, please figure implementation is an essential necessity.
Core-Return sub-categories
An earlier description provides details as to the criteria used by ServiceDesk to determine which display category any normal parts process item belongs in. In a parallel fashion, we here provide a description of the criteria it uses to decide which of the above Core-Return sub-categories an item belongs in:
underlying replacement Not yet received: The Received Date/Tm box on the parent item is empty.
Replacement for core Not yet installed: The Inquiry Date/Tm box is empty.
return of core Expected from tech: The Inquiry Date/Tm box has a date, and the BinLoc box does not have text in the “OF-m/dd” format.
core in office, pending Return to vendor: The BinLoc box has text in the “OF-m/dd” format, while the Confirmed box is empty.
returned to vendor, Waiting for credit: The Confirmed box has a date, but the Received box does not.
credit received and process Done: The Received box has a date.
All the above: Any item where text in the Rqst box consists of the word “Core”.
Please note that once any item is in Category 6, the parent request with it’s daughters will likely be ready for movement to the Archive — meaning that the quantity of items you’re able to view in this category, at any time, will be limited.

