Rolodex
The electronic Rolodex was added to ServiceDesk in February 2010. It may be accessed via File Functions in the Main Menu, or via the quick key F4.
The electronic Rolodex in ServiceDesk functions similarly to a standard mechanical Rolodex, facilitating easy access to and tracking companies, persons, addresses, emails, and telephone numbers with enhanced management features.
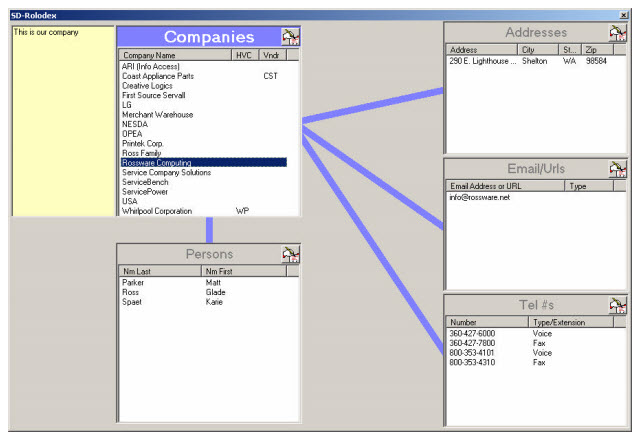
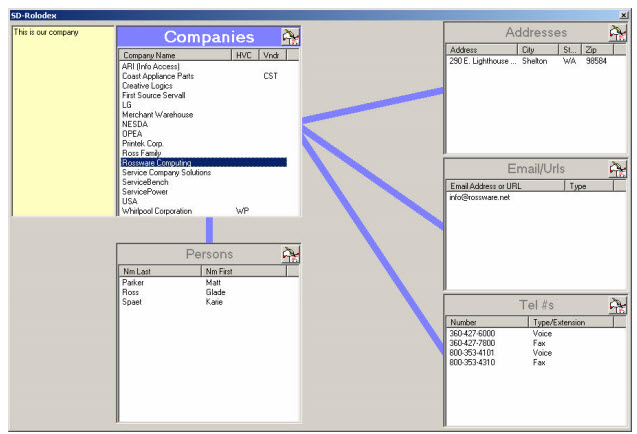
The main interface has five boxes, one for:
Companies,
Persons,
Addresses,
Emails (and/or Urls),
Telephone numbers.
The main idea is that each person (in the Persons box) is linked to a Company (in the Company box). Each Address, Email, or Telephone number can be linked to either a Person or a Company. If you want to have Persons not linked to a real Company, you might create a fake Company called "Other Persons" or something similar.
In any box, click the AddNew button in the top-right corner (the button with the small AddNew icon).
You can only create a Company entry first because other entries need to be linked to a company. Once you have one or more Companies listed, select a Company and you can add entries to the other boxes (Persons, Addresses, Emails, or TelNmbrs). Each new entry will link to the selected Company. In Add mode, graphics change to show which "parent" the new item will be attached to.
Once you add one or more people in the Person's box, you can select any person and then add addresses, emails, and phone numbers connected to that person. Graphics will change during this process to help you see the connections.
When you select any company or person, a large yellow note area appears on the left. You can enter any notes you want here, related to the selected company or person.
Reviewing and retrieving your data
Once you have enough entries, there are many useful tricks.
Each column of data has a header at the top. Click on any header to sort the column. Click again to reverse the sort. For example, to sort by Last Names in the Persons box, click the “Nm Last” header. Click again to reverse the order. To sort by First Names, click that header.
If you are focused on a list and press a letter or number key, it will jump to the matching entry. For example, to find “Smith” in a long list of names, focus on the “Nm Last” column and press “S”. It will jump to names starting with “S”. Press “m” to narrow it down to “Sm”.
By default, the Persons box only shows people linked to the selected Company. Similarly, Addresses only show those linked to the selected Company or Person. This is useful, but sometimes you might want to see all Persons, Emails, etc.
This is where the “MasterList” comes in.
In default mode, SD-Rolodex sets the Companies list as the Master. This means all Companies are shown, and other lists only show relevant items.
You can make any list the “Master” by clicking its title header. When you do this, graphics will change to show that list as the Master, and all items in that list will be shown.
We think most of the time you’ll likely want to keep the Companies list as Master, but whenever there’s a preference to temporarily swap in another list as Master instead, just click to make it so.
Editing your data
In general, to delete any line item in any list box, right-click on it (this is the normally-ruling convention within a plethora of ServiceDesk contexts that display items of text line-by-line). The one exception from this convention, within the Rolodex, is that a few columns in a few of the boxes have other functions assigned to the right-click action (see "Linking tips"). Wherever that’s the case (and assuming you want to delete) just assure your right-click is on a column that does not have any such special other function.
To edit any line item in any list box, double-click on it. This will open the same red box as was used to initially create a new listing, but now the box is oriented for editing instead.
About particular fields
Most of the columns in these boxes are obvious in intended use. We’ll now discuss some exceptions:
From the Companies List:
On its face, you’ll see that besides the first column (“Company Name”), there are two narrow columns — “HVC” and “Vndr”.
“HVC” stands for HighVolumeClient, used for clients you do a lot of work for. If you have a Quick-Entry Template for a company with an HVC abbreviation, include it here to connect them. This will remind you that the company is an HVC and its abbreviation.
“Vndr” is for parts vendors. It shows the two- or three-letter abbreviation used in ServiceDesk to identify that vendor. Previously, these abbreviations were set up in the Inventory and PartsProcess systems. Now, use the SD-Rolodex to specify vendors and their abbreviations.
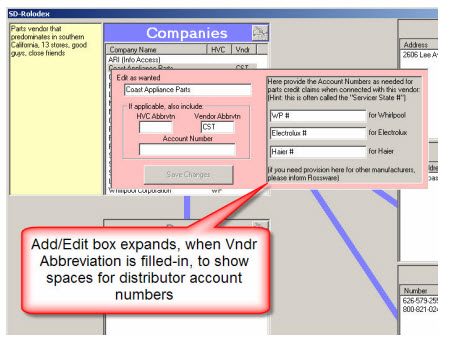
When adding or editing a company in the list, if you enter a Vendor abbreviation, the box will expand to show a new input area.
This area is for placing in the Distributor Account Numbers (sometimes known as “Servicer State Numbers”) that, for some manufacturers, must be provided with each claim for warranty reimbursement on parts (it’s the account number via which the manufacturer sees the vendor in question). The intent is, when ServiceDesk fills-in the onscreen NARDA for you, it will look to see who supplied the part, then go here to see what the applicable Distributor number is, and plug that into the appropriate place of the NARDA for you.
From the Persons List:
This area is totally self-explanatory.
From the Address List:
Ditto.
From the Email/Urls List:
This box has a second column called “Type”. Use this column to show if an email is for business, personal, etc. This column might often be left blank.
BTW, “Urls” stands for Uniform-Resource-Locator, which is just a fancy way of saying website address. You can list websites here as well as email addresses.
From the Tel #s List:
Here again, there’s nothing that’s not obvious.
Linking tricks
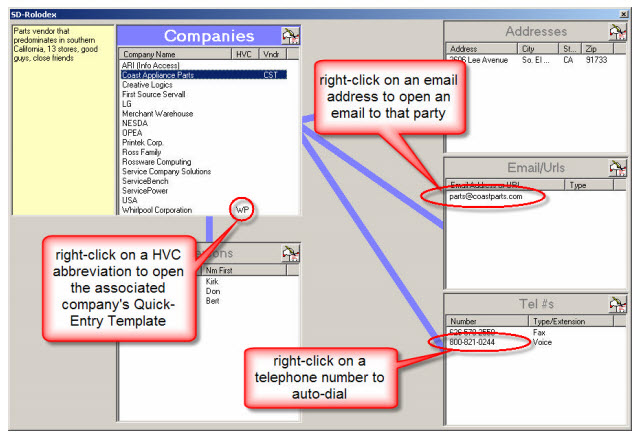
In the Companies list, if you see an HVC abbreviation, right-click on it to open the client’s Quick-Entry Template.
In the Emails/Urls list, right-click on an email to open your default email program with a new mail addressed to that email. Right-click on a website URL to open the website.
In the TelNmbrs list, right-click on a phone number to use the auto-dial feature.
SD's Rolodex info provided to techs
There's no need to give techs anything like the full Rolodex interface in SD. They just need the info.
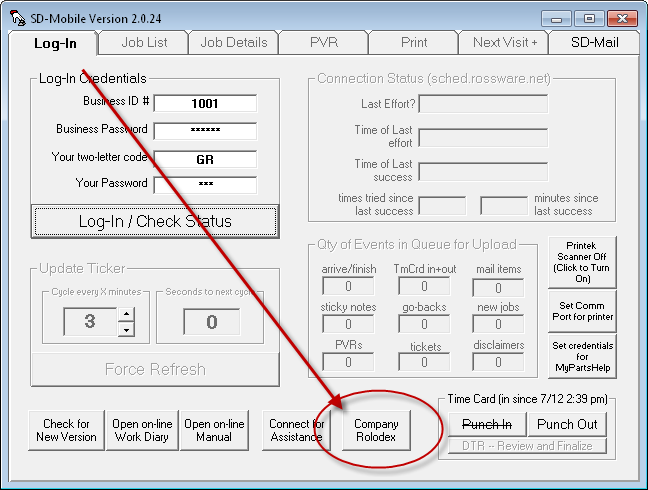
There is a button on Mobile's Login page, as follows:
Click the button, and your system will open a text document with all the info (except physical addresses) from your company's SD Rolodex. The document is called Rolodex.txt. It is created by MobileLink, uploaded to our server, downloaded by Mobile, and saved in your c:\sd\sdmResourceData folder. It will open with whatever application your Windows setup uses for ".txt" files.
Creating a special Rolodex file for technicians
If you don't want your techs to get the full data set from your SD Rolodex, you can create a simple text document with the information you want them to have. Save this document to the x:\sd\netdata folder (where "x" is your server drive). Name the file Rolodex.txt.
When SD-MobileLink sees this file, it will upload its contents for your techs instead of using the standard SD Rolodex. This way, you avoid sharing your full Rolodex and provide your techs with the specific information you want them to have.
ServiceDesk has a shortcut to make creating this file easy. There will be a new button within its Rolodex interface:
This button helps you create a simple text file summarizing your Rolodex contents. When it pulls from your Rolodex to upload to the techs, it runs the same process as SD-MobileLink.
You might want to share most of your Rolodex data with the techs but leave out a few sensitive parts. If that's the case, use this button to create a full export, then edit it to remove what you don't want the techs to see.
By the way, we've also added a feature in MobileLink that lets you check if it's using the full Rolodex or your custom Rolodex.txt file. You can see this by hovering your mouse over the "Other" upload button to see the ToolTip.
Above is how the ToolTip will usually look when MobileLink pulls contact info directly from your SD Rolodex (emphasis added to guide your eye).
The above shows how it looks when MobileLink sees and is ready to upload a specially-created file.

