SD-Mobile user guide
This is the mobile app the technician(s) in the field can use on their mobile device to see their jobs, check in, check out, and do their post visit reports. It also communicates all this information about what the technician does back to ServiceDesk in the office.
Getting started
There's just a few steps you need to get up and running with SD-Mobile.
Install SD-Mobile on your tech's device(s). This is the app that runs on each tech's mobile device. It's what they use as they work in the field. It's available for both Android and iOS devices. There is also an older Windows version if you prefer to use a Windows device in the field.
Install SD-MobileLink: this app runs on the same computer running ServiceDesk back at the office (it can also be installed on any computer that has a network-drive connection to the ServiceDesk installed computer). Click here for the installer.
This app is what uploads and downloads information between the office and the techs in the field, therefore it should be kept open 24/7 to maintain the constant information flow.
DO NOT RUN MORE THAN ONE INSTANCE OF SD-MOBILELINK
Because SD-MobileLink is the conduit between the office and the techs in the field, it is important that you do not run more than one instance of it at a time. This will result in conflicts and errors.
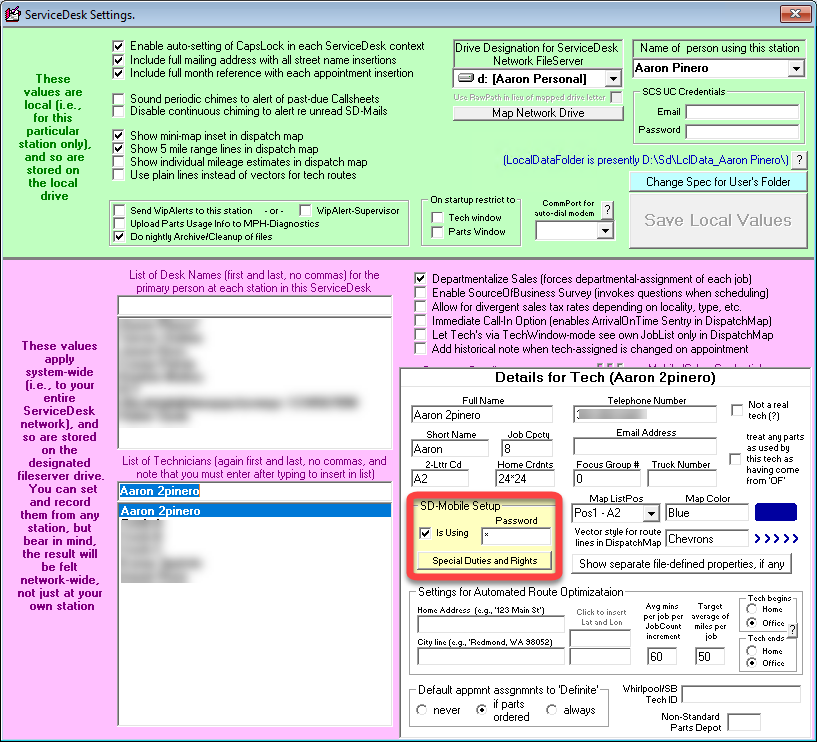
Setting your tech(s) as "Is Using" SD-Mobile in ServiceDesk. This is done in the ServiceDesk Settings form. This is required for the tech to be able to log in to SD-Mobile and is also where you set their password.
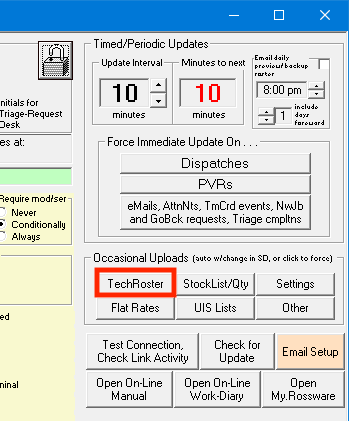
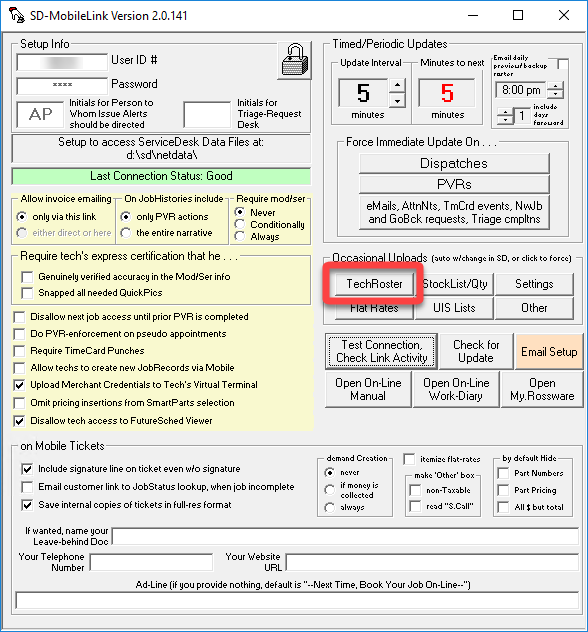
Run SD-MobileLink to upload the tech's information to the server. With SD-MobileLink open, you may notice there's a timer in the upper-right corner. This is the timer that controls how often SD-MobileLink will upload information to the server. By default, it is set to 10 minutes. You can change this to any interval you like. If you would like to force an upload of a certain type of information immediately, you can always click one of the Force Immediate Update On buttons.
Clicking this will immediately upload the tech's information to the server, rather than waiting for the Update Interval.
Log into SD-Mobile. Once you've downloaded SD-Mobile onto a mobile device, it's as simple as opening it and logging in. Assuming SD-MobileLink is running and uploading the tech's information to the server, the tech should be able to log in immediately.
There are 4 fields to fill out when logging in:
Company ID: The 4 digit User ID number you get when you originally sign up for ServiceDesk. If you do not have this handy please contact us.
Company Password: The matching password to the above User ID.
Your 2 Letter Code: The two letter tech code assigned in the ServiceDesk Settings Form.
Your Password: The password assigned to the tech in the ServiceDesk Settings Form.
You may notice there's a huge amount of settings in ServiceDesk, SD-MobileLink, and SD-Mobile in regard to the SD-Mobile system. Please check out the ServiceDesk tech settings and SD-MobileLink settings at the bottom of this page for more information on what each setting does.
Hardware considerations
For use in the office, no new hardware is needed. You already have one or more office computers, ServiceDesk installed, and presumably have a good internet connection there as well. Here are some recommendations for devices to use in the field.
Technician's mobile device: This is the device the technician will use in the field. It can be a iOS/Android phone, iOS/Android tablet, or Windows laptop.
Though a technician using SD-Mobile on a mobile device technically only needs to connect to the internet twice per day (once at the beginning to download jobs for the day, and once at the end to upload the work done), it is recommended you maintain connection throughout the day.
If you want to use SD-Mobile on Windows, due to SD-Mobile connecting to the internet constantly, anti-virus programs such as Norton and McAfee may flag SD-Mobile as a virus. If you are using a Windows device in the field, please make sure to add SD-Mobile to your anti-virus program's whitelist.
Credit card swiper: If you're using RosswarePay your techs will be able to take card payment in the field. You can enter card info manually or accept via swipe/chip/contactless with one of our supported swipers. To order contact our payments team.
Using SD-Mobile
Once all the above is figured out and set up, the next step is to start using SD-Mobile.
Managing your SD-Mobile technician roster
Your monthly billing for SD-Mobile will be based on your tech roster as uploaded online via the SD-MobileLink. If you add or remove techs, the billing will adjust accordingly. If you remove all technicians from your tech roster, SD-Mobile charges will only occur for the next billing cycle with technicians on the roster. It's that easy!
Adding a technician
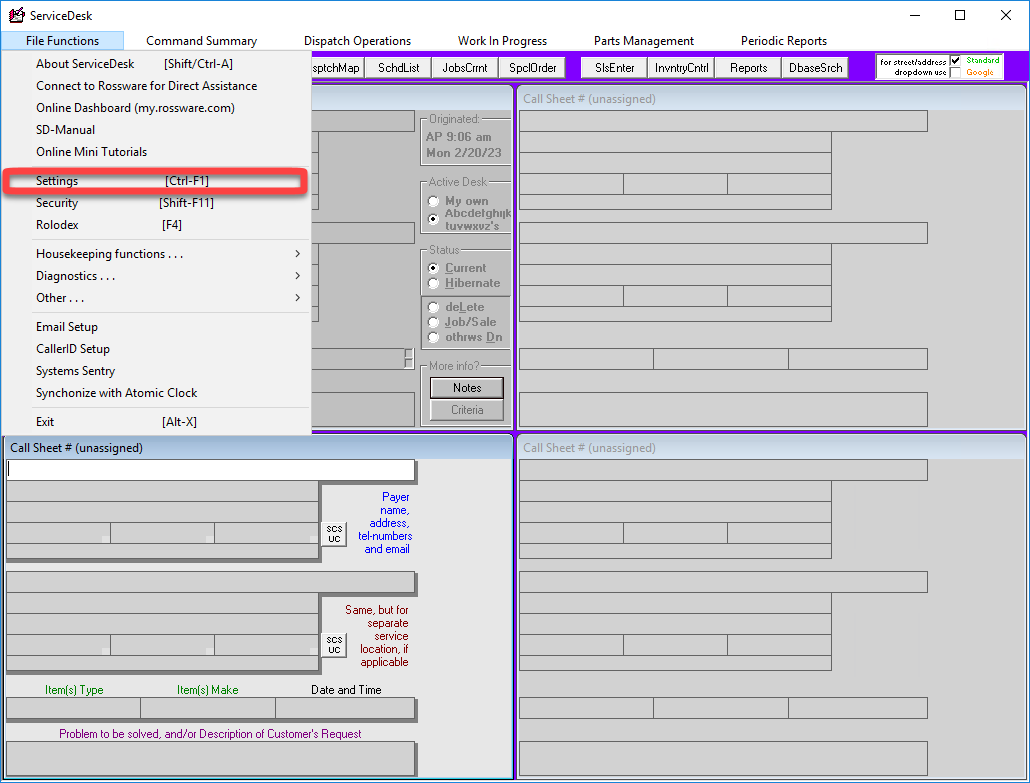
From within ServiceDesk, click on File Functions.
Select Settings.
Click on a technician's name to bring up the Details for Tech Window.
Check the box for "Is Using."
Create a password for the technician by typing it into the password field.
To review this password later, just Right-click on it and enter the ServiceDesk master password.
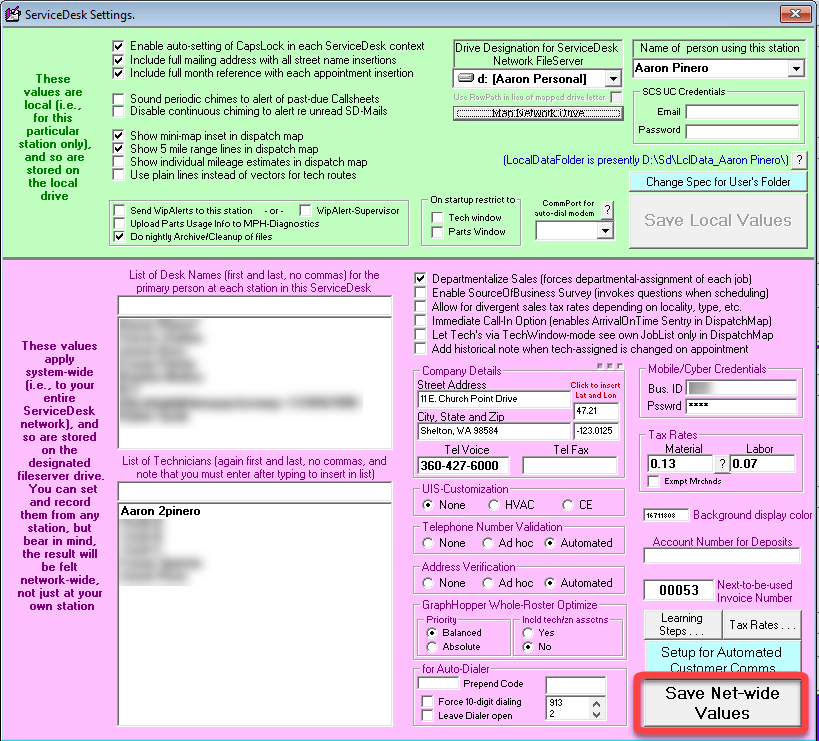
Press ESC to return to the Settings Form.
Click on Save Net-wide Values.
From within SD-MobileLink, click "TechRoster" to upload the newly created technician credentials for the technician to use when logging into the mobile device.
To remove a technician, it is as simple as unchecking the "Is Using" box in Step #4 above, then making sure SD-MobileLink updates our servers with Step #8.
Logging in and seeing jobs
The first step is to login. Once logged in, the tech will see the Job List page. This page shows all the jobs the tech has for the day. The tech can click on any job to see the details of that job.
There's a few things to note about the Job List page.
You can refresh all the data in the app by swiping down in the job list or by tapping the refresh circle in the top right corner of the app.
Each job has three separate sections to give you at a glance information:
Job status is on the left
Day/time, Job title, and location of the job is in the middle
Other info such as if there is an attention note, parts needed, or if there's been prior visits is on the right
A job highlited in green hasn't been opened yet.
You can tap on a job to open it.
You can tap on the down arrow under the job status to perform quick actions such as Call Ahead, Make a Note, or Punching in and out.
Swipe up from the bottom to access other features such as:
Mail
The Queue of current data being uploaded back to the office
Refresh job list
Show route for the day
And more
Viewing job details
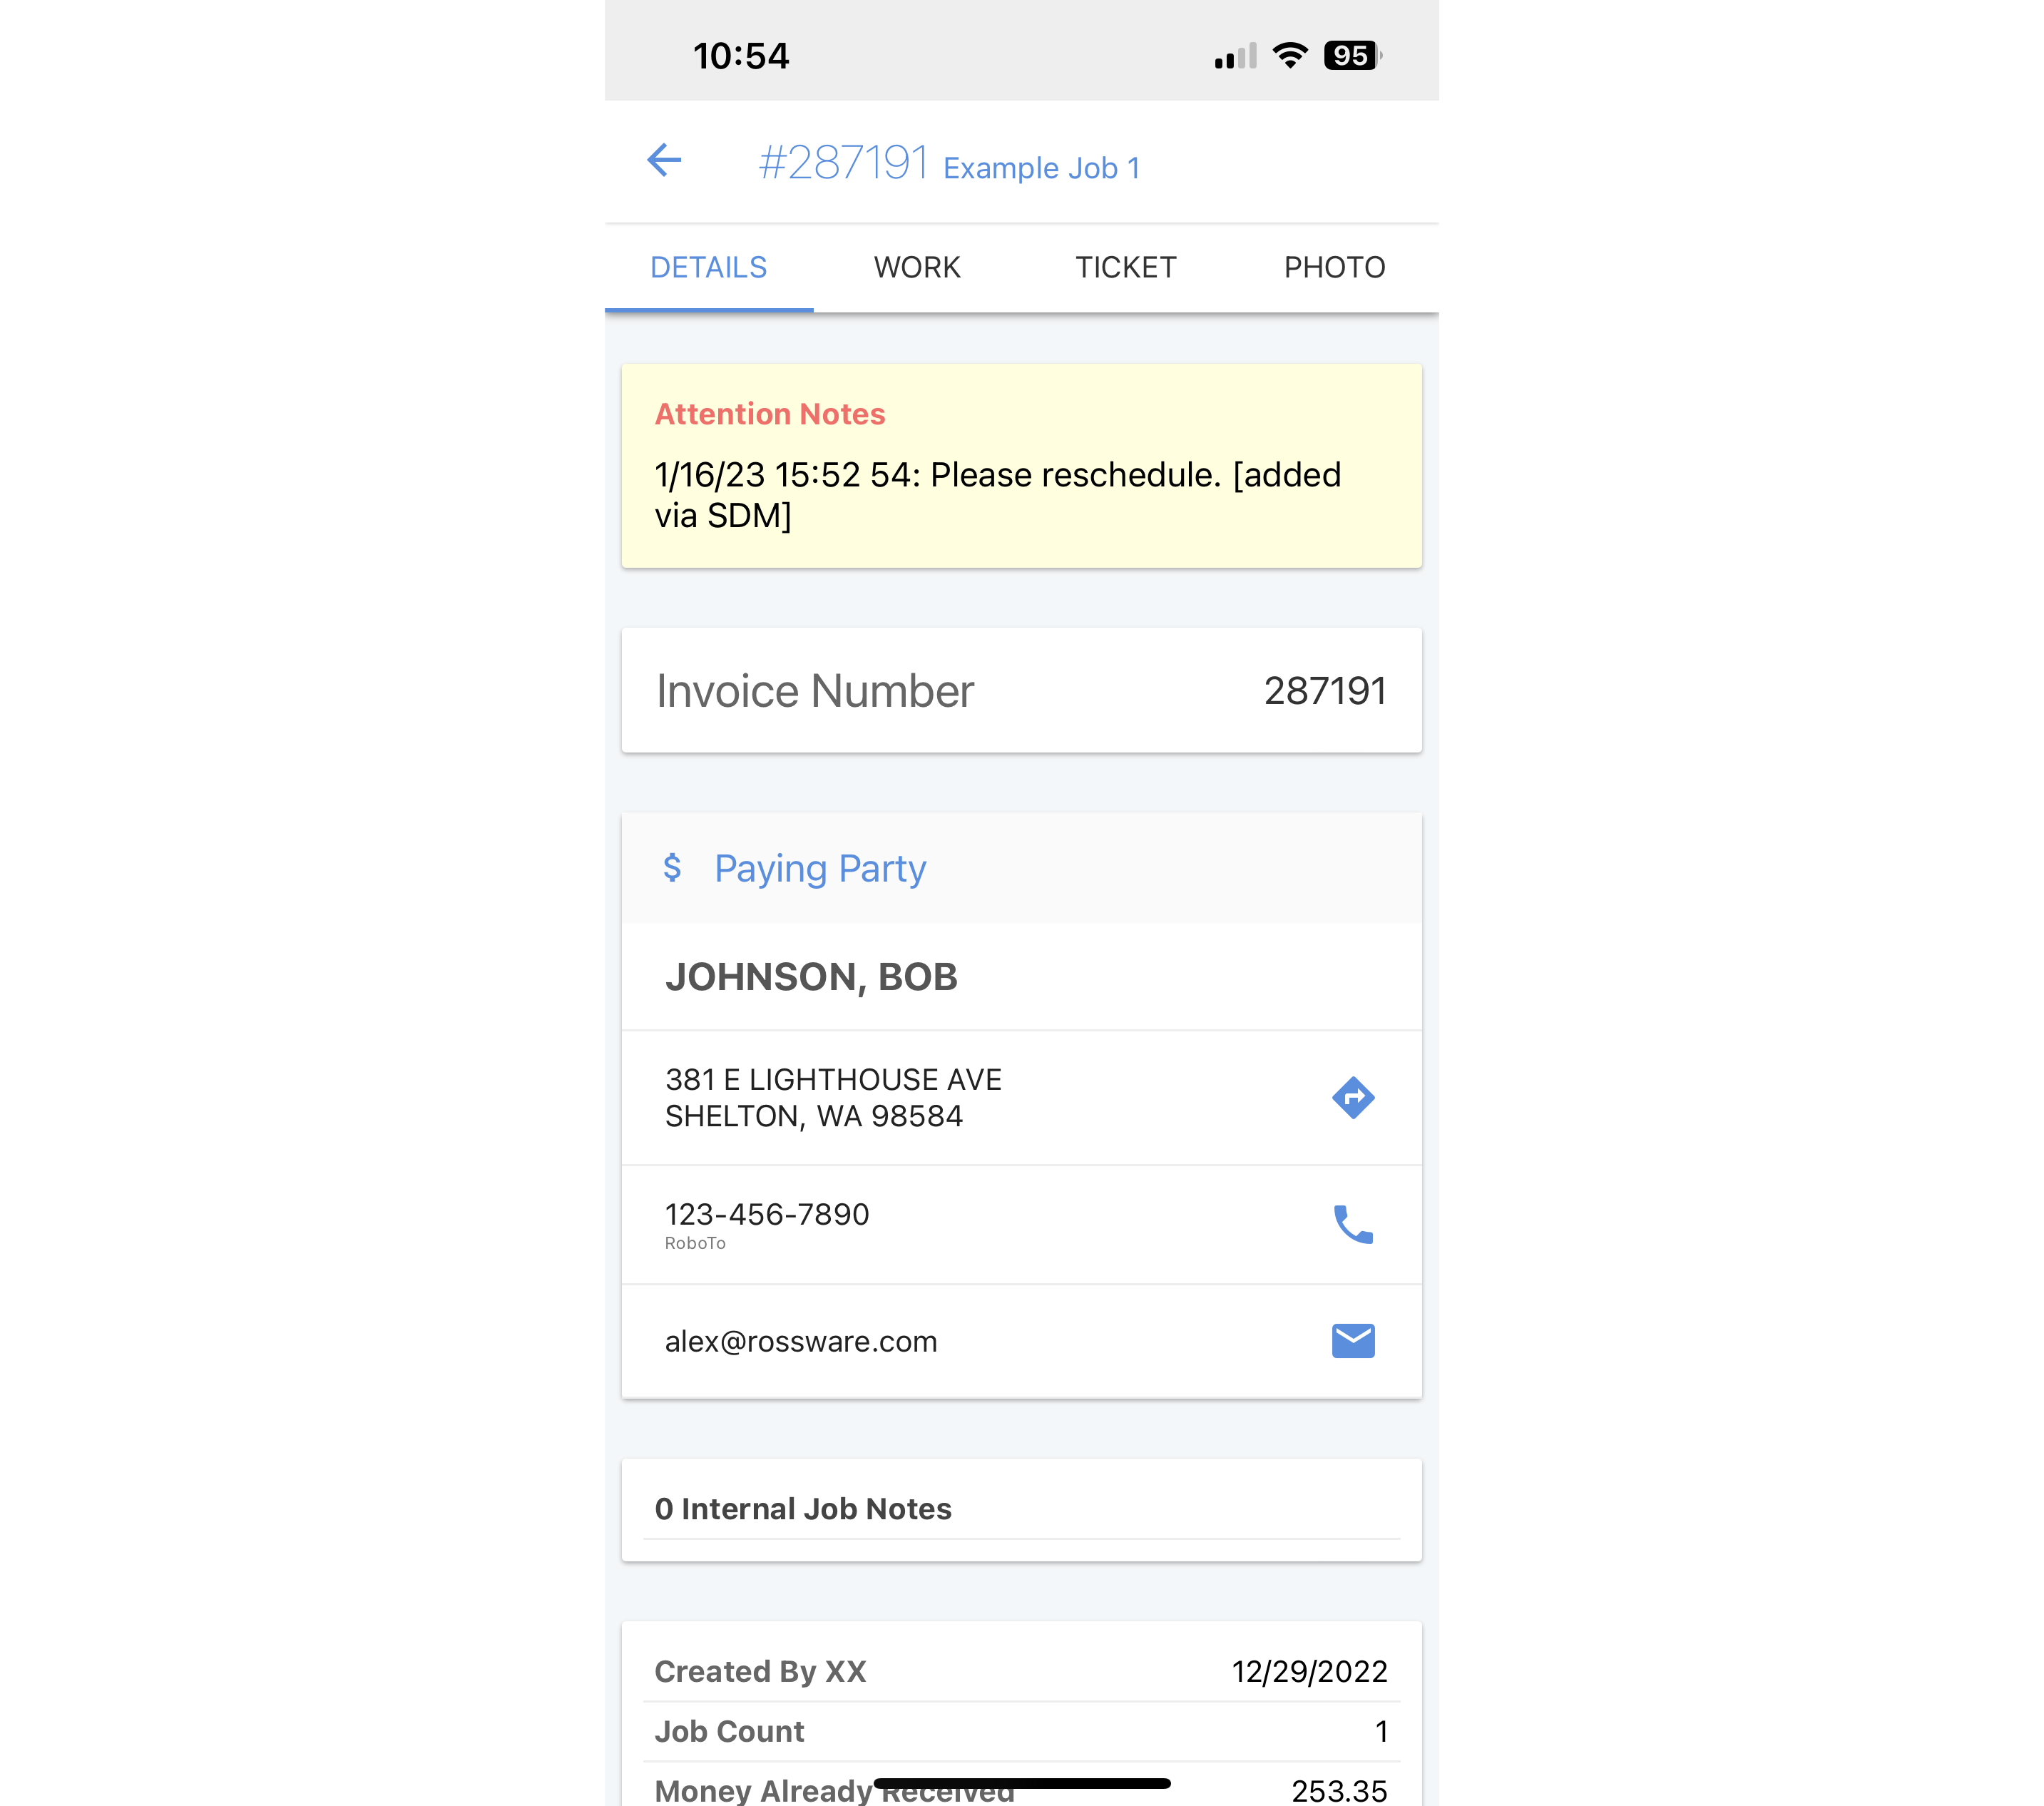
When you tap on a job from the Job List, it will take you to the details of that Job. You find information here very similarly to how you would in ServiceDesk in a Job Record. You can see the customer's information, the job's information, and the job's history. If the location is different from the Paying Party, that information will be displayed here as well.
At the top of the page you will notice there are four tabs for each job. This page is the first of the four tabs. You can tap on the tabs to navigate between them, or swipe left or right anywhere on the screen.
Working on a job
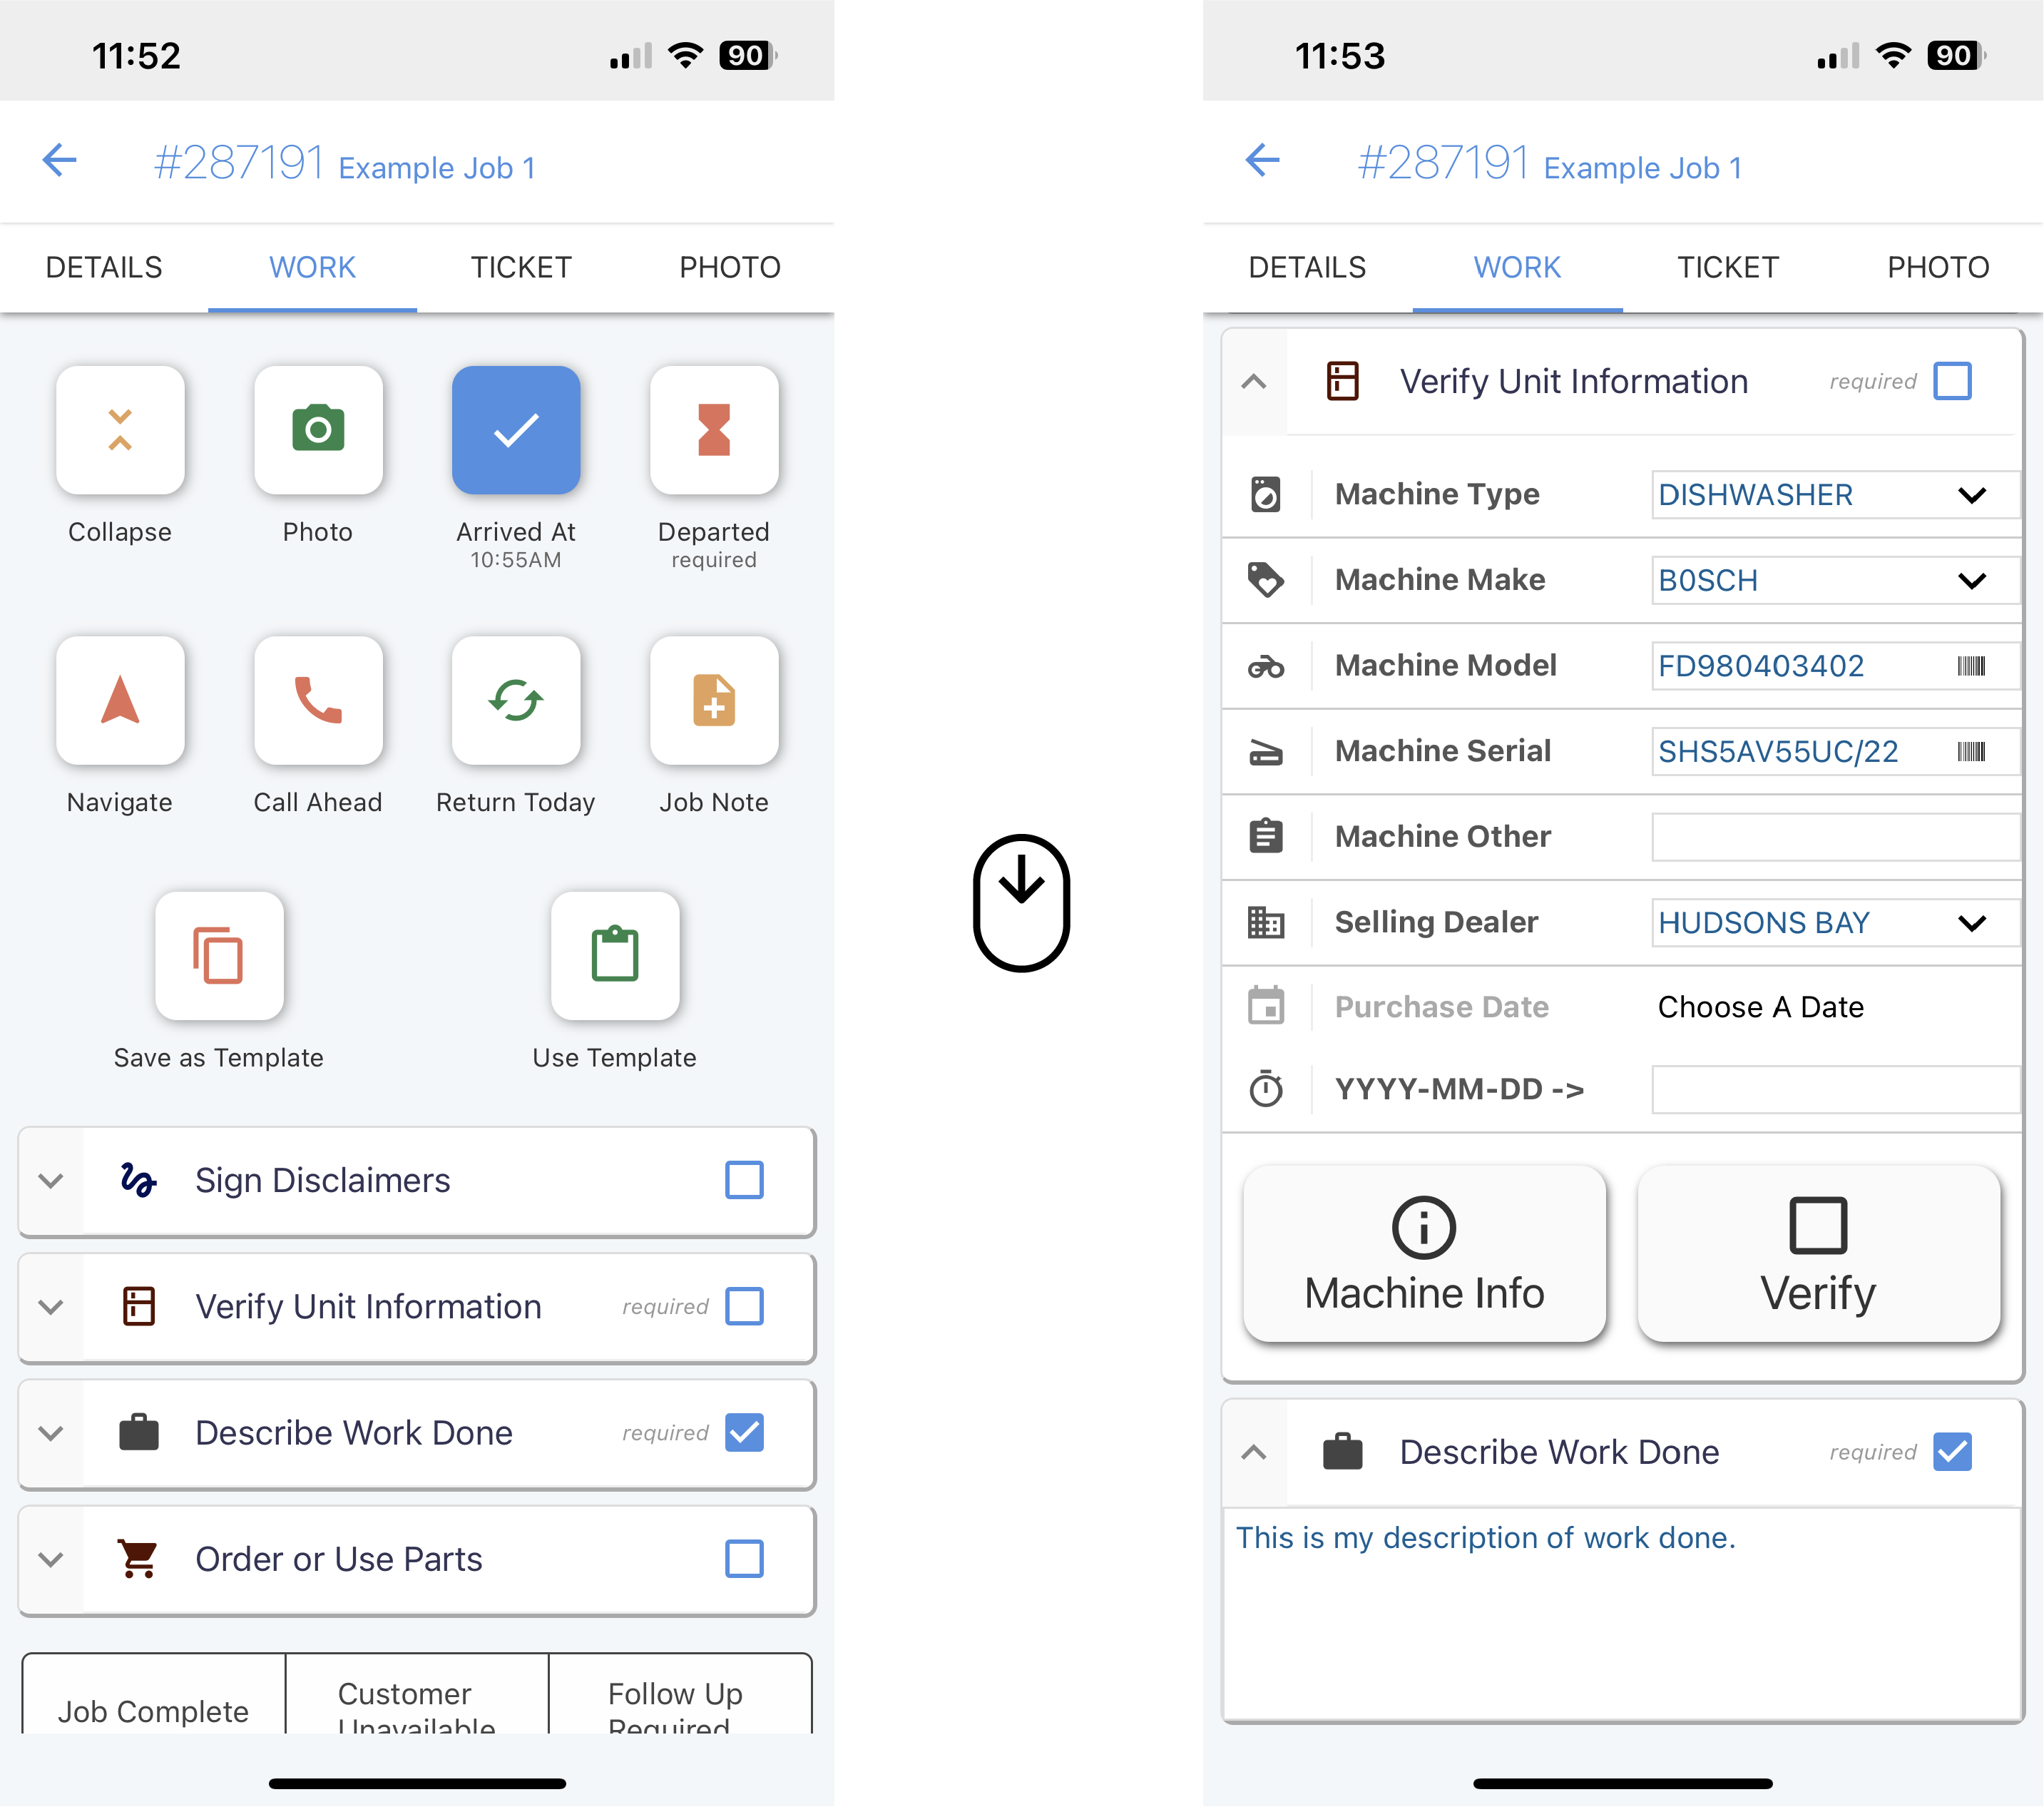
The second tab inside a job is the Work tab. This is where you will do all the work on a job. You can add notes, add parts, add labor, collect info about the machine being serviced, and more. All the work done here will be submitted as part of the Post Visit Report (PVR), some will also be visible on the ticket that is submitted to the customer.
Creating tickets
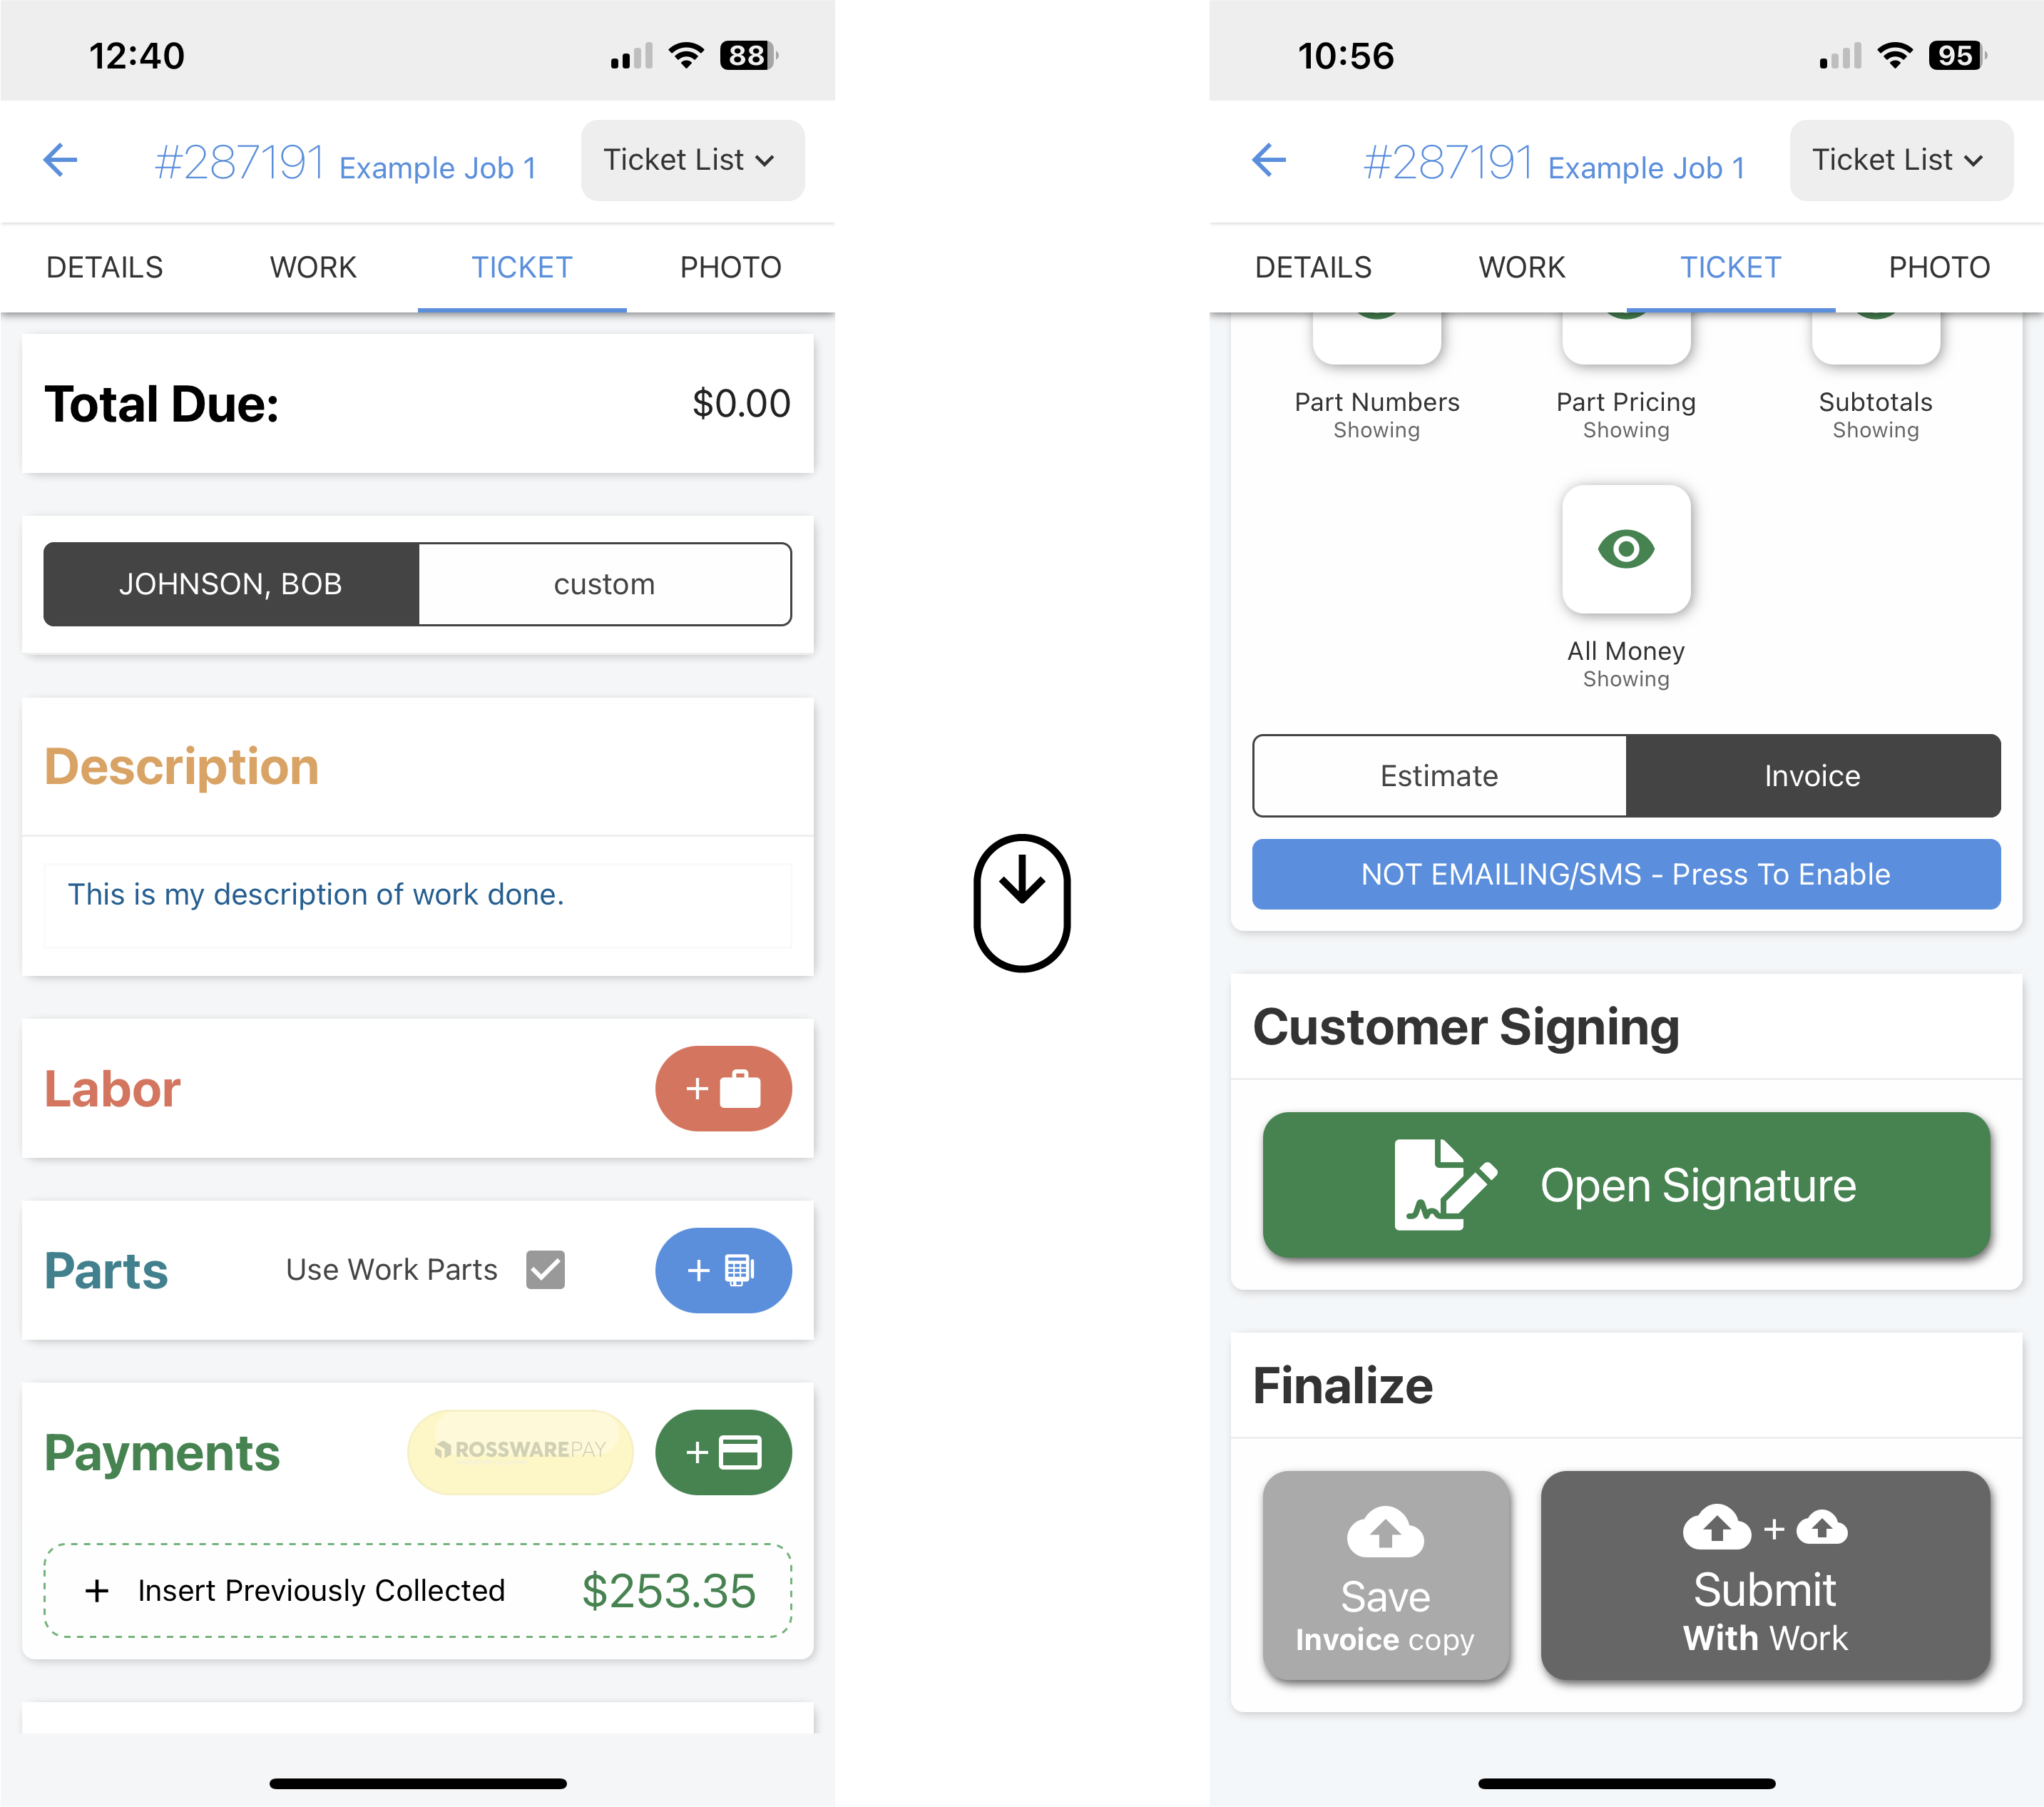
A ticket is a document that is provided to the customer at the end of a job usually via email. It contains information about the job, the work done, and the charges for the work done.
On the Ticket tab you can:
Enter labor
Enter parts used
Collect or document payment
Note whether you're providing an estimate or an actual invoice for work done
Collect customer signature
And finally Submit the ticket (finishing the job)
In the top right corner there is the Ticket List drop down menu. This menu allows you to select which ticket you want to work on from a list of any you have saved previously.
You may also notice on the Estimate/Invoice section there are toggles to hide or show certain elements from the final ticket the customer will recieve when you complete the job.
Customizing mobile tickets
Specify the telephone number and website URL you wish to have appear on the mobile ticket. in the applicable boxes of the SD-MobileLink interface,
If you want to use a different ad line than the standard/default one ("-- next time, book your job online --"), just type it into SDMobileLink’s applicable box.
If you’d like your tickets to look a little more stylized (the above-described header is all just plain text), you may replace the entire standardized header with an artistic/graphic one (i.e., containing your company’s stylized logo and/or other accouterments). To do this, create the graphic image you want, and save it to your server’s \sd\netdata folder under the name SdmLogo.jpg.
A final element of potential customization involves the signature line. If you’d like different language, open any text editing program (NotePad, WordPad, Word, etc.), and type the text you want. Then save. Make sure to save it as a “Plain” or “Text Only” document. Save it to the \sd\netdata folder on your server, as filename SdMobileInvoiceText.TXT. Once you’ve done so, SD-MobileLink will see the file and upload its text, and each of your Tech’s instances of SD-Mobile will download the same and use it in lieu of the written-by-us canned text.
Using Special Disclaimers
Disclaimers are pretty self explanatory, they are documents you can have your customers sign to acknowledge liability or just about anything you want. Here's the two options for using disclaimers in SD-Mobile.
Start with our example/template disclaimers. Download them here and put the files in the
C:\sd\Netdatafolder. You can edit them or leave them if you like how they are.CHANGE THE COMPANY NAME
You must change the company name (as embodied within the text of each) to match your own.
Create your own from scratch.
Open any text editor
Type the desired Header (i.e., the “Title Bar” you want to have appear at the top of your disclaimer)
Then a vertical bar symbol called a pipe (“|”)
Type the body of text you'd like to use
Save the file as
SdMobileDisclaimer1.txtin theC:\sd\Netdatafolder (notice the file name ends in a 1, you can have up to 6 and must change the number for each one you create)
Example SdMobileDisclaimer1.txt
Waiver of Damages When Moving Appliance|I have been informed by the technician that my appliance must be moved to be serviced. I understand there is inherent risk in such movement. There is risk of damage to the machine itself, and to areas surrounding its installation, including but not limited to flooring, cabinetry and countertops.
SD-MobileLink will upload these for use by SD-Mobile once the files have the correct name and are in the correct folder. You can find them in the Sign Disclaimers section of the Work tab in a job.
You may elaborate further on this if desired. In particular, if you want any particular disclaimer to be mandatory (i.e., your techs are required to have the customer sign this disclaimer), you may add text after a second bar symbol (i.e., in a third section of text,where each section is separated by a bar symbol). This section of text may contain the word “ALL” if you wish for the disclaimer to be required on all jobs, or — if you want it only to be required when particular kinds of machines are being serviced — you may list those machine descriptions, separating each by a comma (or, if only one machine type is involved, simply list it alone with no commas). If listing machine types, be certain the spelling is exactly the same as you created in the SeviceDesk machine-types dropdown. Much as in the case of your customized ticket/signature language, once you've done the above, SD-MobileLink will see the file (or files), upload each, and each of your tech's instances of SD-Mobile will download the same, and offer it (or them) for use in collecting signed disclaimers from customers in each applicable instance.
In any instance where a disclaimer is signed, the Mobile/MobileLink system will transmit it back to the office as part of the underlying PVR information. In result, you'll see a reference to each signed disclaimer in any applicable JobHistory as a hyperlink. To actually view a signed disclaimer, double-click on the hyperlink.
In the above example, we signed three different disclaimers in SD-Mobile, and uploaded the PVR. Hence, there are three resulting disclaimer hyperlinks in the resulting JobHistory.
Using Flat-Rates
The Ticket tab is configured to work most easily, in terms of allowing the tech to fill-in a description of what they did and what the charges are, on the basis of a flat-rate system. It's not essential, SD-Mobile will work fine without it, and you should not delay implementation while waiting to get one in place. Read the Flat Rates guide to learn how to implement this.
Scheduling return visits
Techs are able to schedule return visits for jobs right from within SD-Mobile using the New Job button on the bottom menu tray that slides up on the home Job List screen. If you are using SD-CyberOffice, the calendar they are presented with will show live availability and prevent them from booking a job on a date/time that is already booked.
We recommend you use at least the the features within SD-CyberOffice that allows availability to be available for SD-Mobile, but if you do not you can still schedule new jobs.
Using the TimeCard feature
Technicians can Punch in and Punch out via the bottom menu tray that slides up on the home Job List screen. The times of these TimeCard events are saved by SD-MobileLink to a file labeled TimeClock.[two-letter-tech-code].TXT in the C:\sd\Netdata folder on your computer/server. This file can be opened in excel or a similar spreadsheet program to view the data.
Techs can view their own TimeCard data via the Punchcard Review button on the bottom menu tray that slides up on the home Job List screen.
You'll notice two columns that may provide a bit of curiosity: they're labeled "InFudged?" and "OutFudged?". This indicates the technician entered an In or Out time manually. The system allows techs to do this, based on the fact they may have forgotten to Punch in or out.
You can view this visually within ServiceDesk as well with the “DTR Viewer”. In the DispatchMap go to the day of interest and type Alt + T.
ServiceDesk tech settings
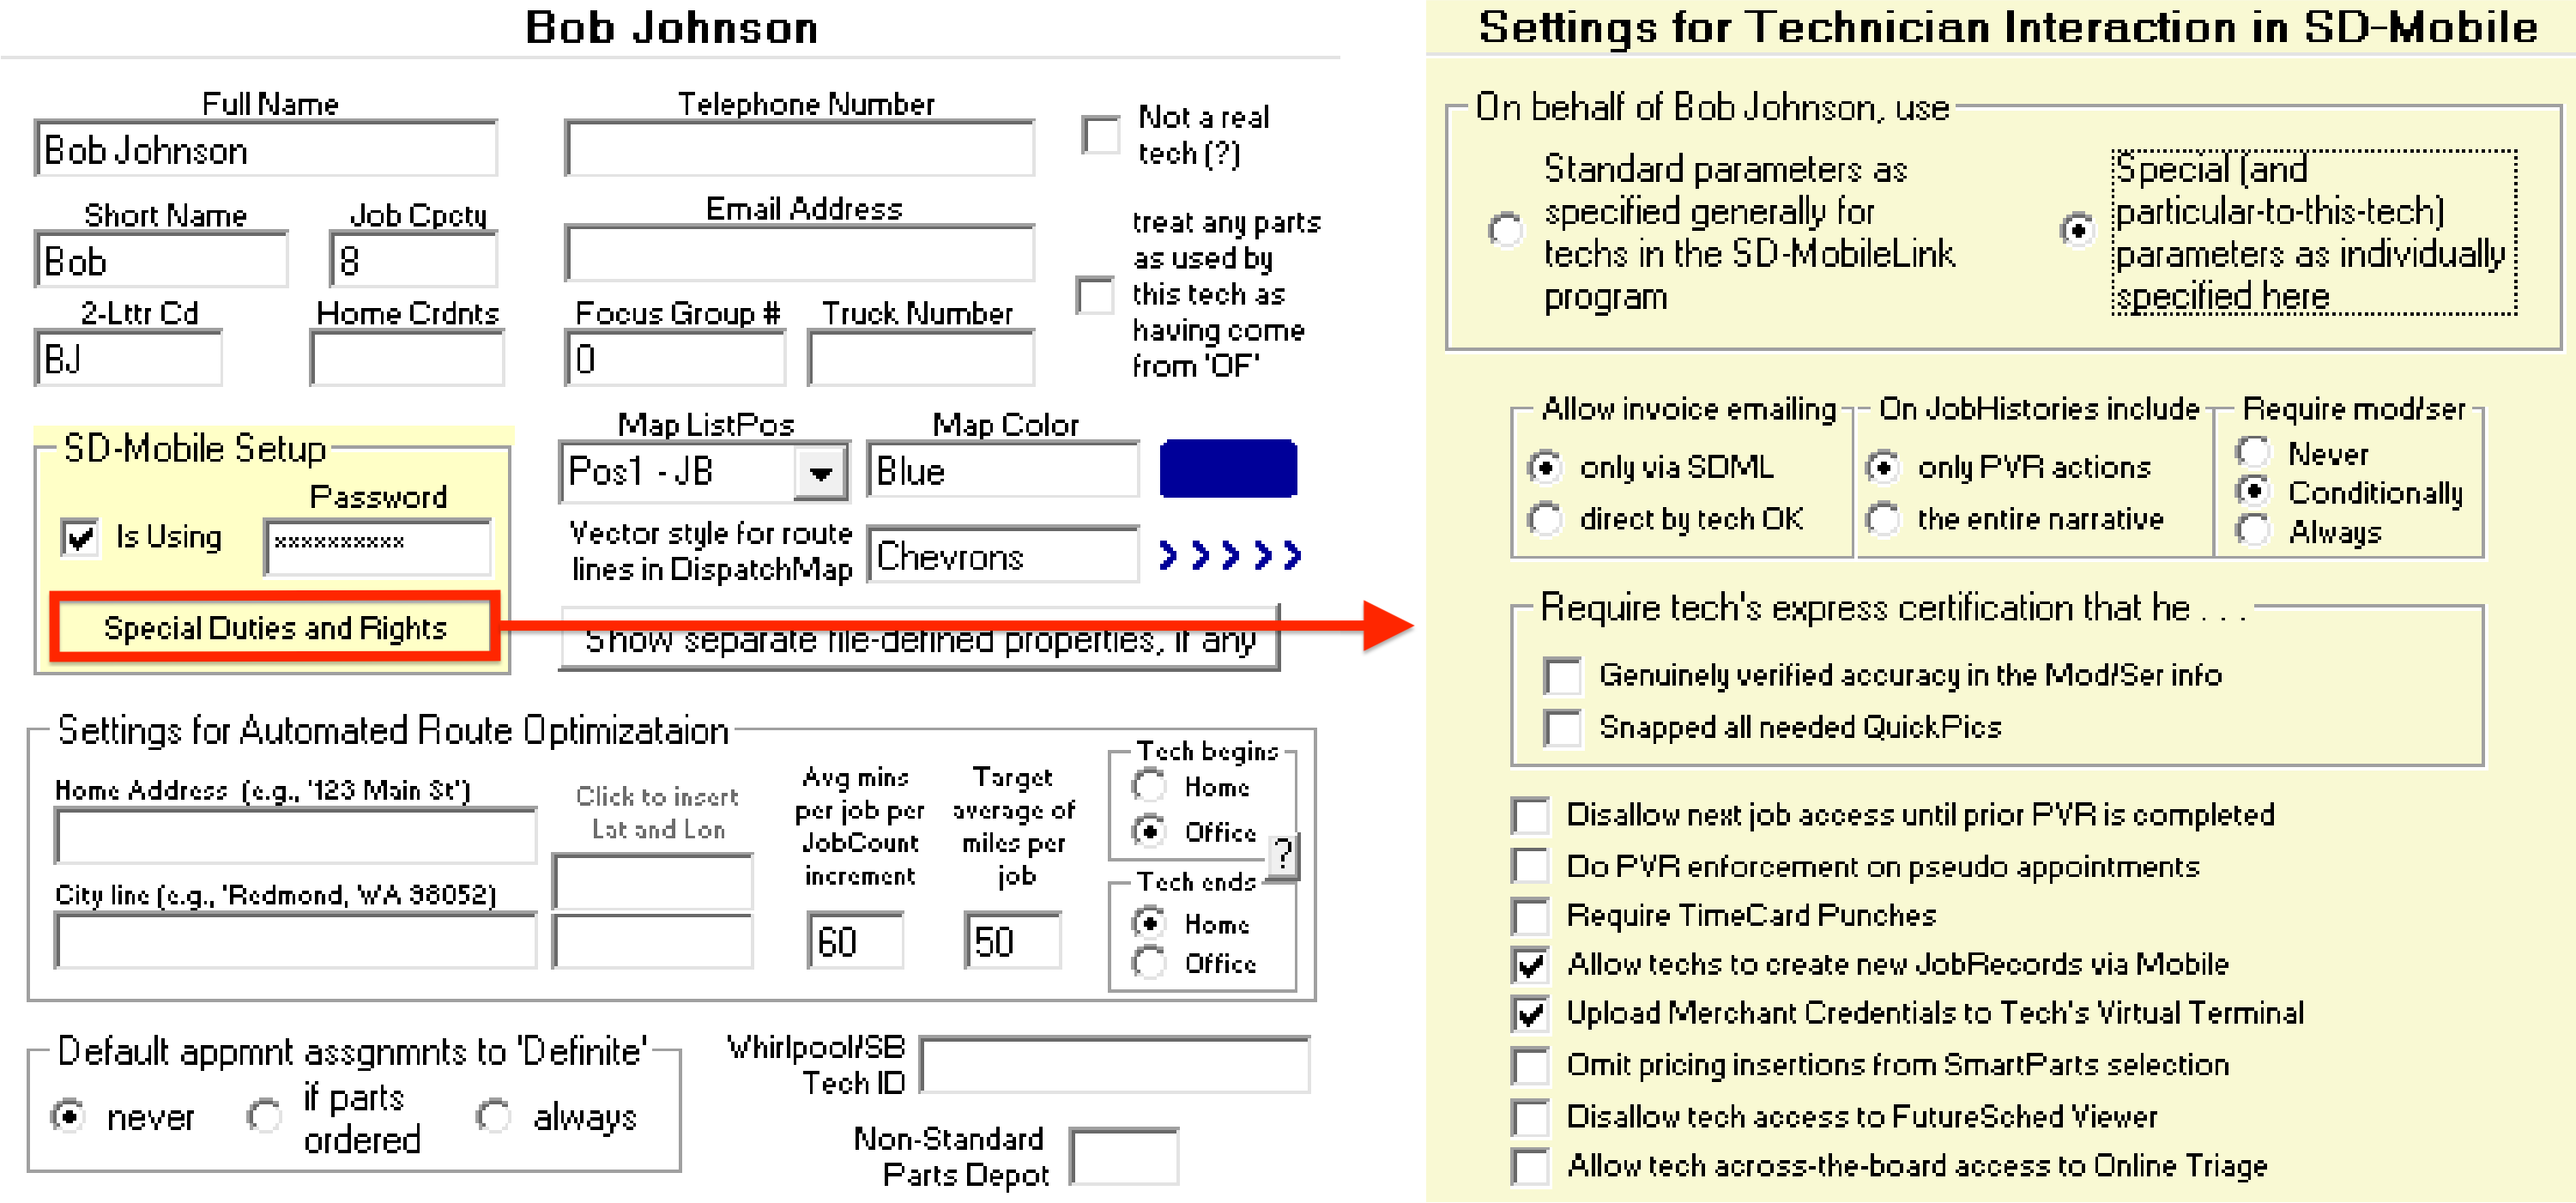
Within ServiceDesk's settings form in the yellow SD-Mobile Setup section for a tech, you can click the Special Duties and Rights button to access tech specific settings. These settings will only affect this tech.
To activate technician specific settings, toggle the top radio button from Standard parameters to Special parameters. This will allow you to change the settings below.
These settings are specific to a single tech, if you want to change the same settings globally (for all techs) you can do so in the SD-MobileLink settings found in the section below.
SD-MobileLink settings
Generally, just like in ServiceDesk, you should hover over a button and it will tell you what it does. This is a good place to start if you're not sure what a setting does.
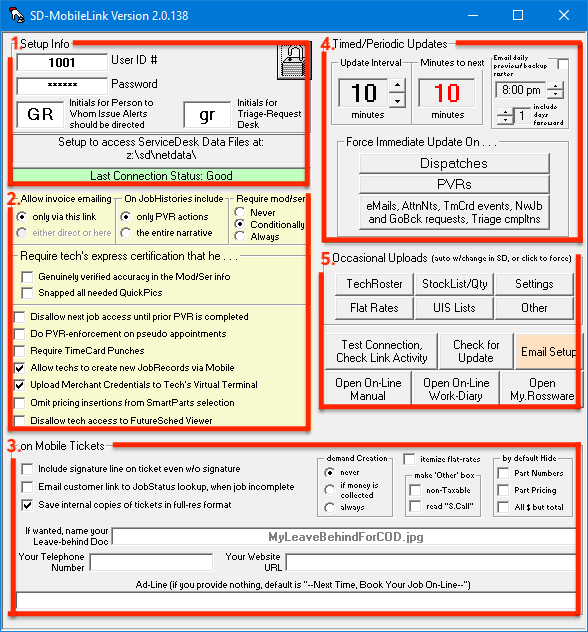
For ease of understanding, we've broken the SD-MobileLink settings into distinct sections. We highlighted each with a number in the picture below corresponding to the descriptions of each setting section.
Setup Info: Here you will enter your company's credentials, as well as change the location of the ServiceDesk files it's referencing. In the top right corner you can see a lock. Clicking this will toggling locking the settings, which will prevent any changes from being made. The "Initials for Triage-Request-Desk" is the initials to where triage parts order requests will be sent via SD-Mail.
There are numerous checkboxes in this section:
Allow invoice emailing: This toggles whether or not invoices can be emailed directly or only through SD-MobileLink
On JobHistories include: Toggles whether JobHistories should include the entire narrative or only PVR actions
Require mod/ser: Changes when techs are required to gather the model and serial number of the equipment they are working on
Require tech's express certification that...: This is a global setting that toggles whether or not techs are required to verify model and serial number, or if the required pictures have been gathered for the job
Other settings: These are miscellaneous settings that can be toggled on or off
Disallow next job access until prior PVR is completed: This is a global setting that toggles whether or not techs are required to complete a PVR before moving on to the next job
Do PVR-enforcement on pseudo appointments: This is a global setting that toggles whether or not PVR enforcement is required for pseudo (fake or placeholder) appointments and is off by default even if PVR enforcement is on
Require TimeCard punches: This is a global setting that toggles whether or not techs are required to punch in and out of jobs
Allow techs to create new JobRecords via Mobile: This is a global setting that toggles whether or not techs are allowed to create new jobs via SD-Mobile
Upload Merchant Credentials to Tech's Virtual Terminal: If you are using our built in payment processing, this will upload the required information for your tech(s) to be able to charge cards in the field
Omit pricing insertions from SmartParts selection: This will hide SmartParts pricing on documentation shown to customer
Disallow tech access to FutureSched Viewer: This will prevent techs from viewing future appointments. This will affect your whole company and can be overridden on an individual tech basis in ServiceDesk's settings form
Mobile Tickets: These customize the ticket presented to the customer upon completion of work.
Timed/Periodic Updates: In this section you can set the frequency of updates (this is when SD-MobileLink will cycle to send information to techs in the field, and retrieve information back from them).
Update Interval with the black number is the amount of minutes between updates. The red number is how many minutes remain until the next cycle.
Email daily preview/backup roster: will send an email at the specified time with a preview of the day's schedule and a backup of the roster. You can also set how many days forward to include.
Force Immediate Update On: will force SD-MobileLink to cycle an update on just the specified data (such as only send and recieve information on Dispatches). Only click these if you don't want to wait for the next update cycle. You can also control click to select different varations of the data to update. Hover over the buttons to see what options are available.
Occasional Uploads: These items do not update on the Timed/Period cycle schedule. They will update only when SD-MobileLinkd detects these settings are changed within ServiceDesk. You can click these buttons to force the updates Immediate.
TechRoster: This will update the roster of techs and their settings in the field
StockList/Qty: This will update the stock list and quantities of parts in the field
Settings: This will update the settings you set for for SD-MobileLink and ServiceDesk so it affects techs in the field
Flat Rates: This will update the flat rates for the techs to access in the field
UIS Lists: This will update the UIS Lists for the techs to access in the field
Other: Uploads other information such as Merchant Credentials for payment processing, your Tax Rates, Disclaimers, and more. Hover this button for more details.
You can override many of these global settings for individual techs in ServiceDesk's settings form.
Enforcing PVRs
If you want to enforce PVRs, you'll need to check the Disallow next job access until prior PVR is completed. This will prevent the tech from moving on to the next job until they complete the PVR for the current job, based on the order of the jobs. If you want to enforce PVRs for pseudo appointments, you'll need to check the Do PVR-enforcement on pseudo appointments.
This is the case for tech specific settings in ServiceDesk and global tech settings in SD-MobileLink.
Leave-Behind documents
An electronic "Leave-Behind" may be auto-provided to your customer. Expand this note to read reasons you may want to do so.
Many service companies have found it beneficial to have the tech leave the customer with a brochure or flyer as each job is completed. These can serve several purposes. There might, for example, be a coupon for future service, tips on machine maintenance, or an invitation to sign up for a maintenance plan. For servicers doing Whirlpool warranty service, a leave-behind might consist of a primer that seeks to poise the customer for providing a beneficial review when a survey inquiry arrives from Whirlpool.
Whatever the purpose, physical leave-behinds cost money to print, take time away from the technician's work as he seeks to provide them, are something of a hassle to keep the technician stocked with, and you never know how reliable the technician will be in distributing them. For such reasons, we were asked to create a system that accommodates the provision of an electronic leave-behind.
How to set up
Create whatever kind of leave-behind document you wish to employ.
Any file format you prefer (.pdf, .jpg, etc.).
You may create different and unique documents to be specifically used with each/any of your particular QET clients (e.g., one to be used in connection with Whirlpool Warranty jobs, another to be used in connection with Warrantech work, etc.).
Save such documents in any location accessible to the SD-MobileLink application (the \sd folder on your server or one of its subfolders will likely be ideal).
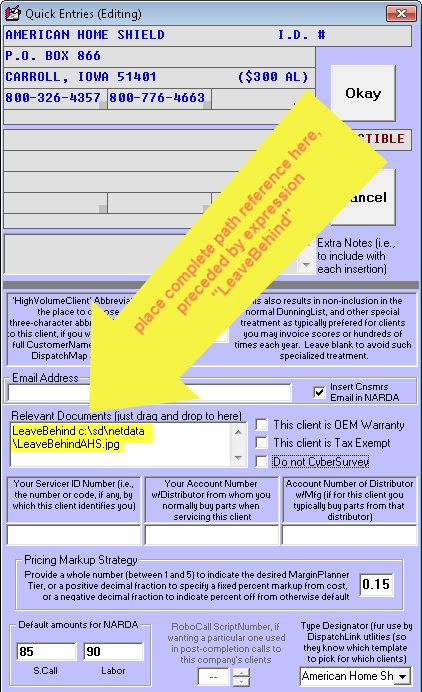
Then, in the QuickEntryTemplate applicable to any client whose jobs you want to have a leave-behind go out on, type within its Relevant Documents box the expression "LeaveBehind" followed by a space, and then a complete-path reference to the desired document.
Here is what then happens.
When SD-MobileLink processes a tech's PVR with an applicable QET client as the paying party, and when it's a PVR on which the tech has created a ticket (or work-completion document) to be office-emailed to the consumer, SD-MobileLink will find the designated document and include it as an added attachment in the same ticket-send email that is otherwise going to the consumer.
Please note this document will not attach if the tech elects (and if you've given him the freedom to) direct-send the ticket (i.e., the attachment occurs only within the office). And (with the exception about to be described), it will only occur where you have direct-designated a document from within the applicable paying-party's QET.
Regarding that exception?
It occurred to us you might want to have a leave-behind structured for your COD customers. If so, create a document called MyLeaveBehindForCOD.xxx (where "xxx" is replaced by whatever is the extension for the file type you've chosen to use.) Save it to the \sd\netdata folder on your server. If it's present, SD-MobileLink will find it there and (similar to the QET situation) make it an added attachment in ticket-send emails (only in this case for COD jobs).
Communication Troubleshooting
SD-MobileLink
Start at the station that is responsible for running the SD-Mobilelink. Ensure it is running in the Windows taskbar. (The area near the date and time on your desktop, or within the '^' section of the Windows taskbar).
If it is running, skip to step 4.
If not, proceed to step 2.
If you cannot see SD-MobileLink in the above step, try to open it again.
If you get a message that states an instance of SD-MobileLink is already running, proceed to step 3.
If SD-Mobilelink starts proceed to step 4.
If you get a message that states an instance of SD-MobileLink is already running, open the Windows Task Manager (Ctrl+SHIFT+Esc or Right-Click the Windows taskbar) and close all instances of SD-Mobilelink. Then repeat step 2.
Let the SD-MobileLink cycle. Pay close attention to any messages that appear. If you get any messages, continue to step 5. If no messages appear, you should have a resolution.
Document the message and grab a screen capture if possible. Make a note of the ServiceDesk user running the SD-MobileLink and the SD-MobileLink version number, if possible.
If the message is regarding credentials, please enter all the credentials again and try to log in again. Otherwise, try to address any messages that are displayed, taking any outlined steps or options while documenting any new messages, please.
Close and restart the application, then repeat step . If you receive the same message as before, move on to step 6.
Please connect to Rossware for additional troubleshooting.
SD-Mobile
Have the technician close and restart the app. Ask them to pay close attention to any messages that appear.
If you get a message while trying to log in, proceed to step 2.
If no message, proceed to step 3.
Document the message and grab a screen capture if possible. Make a note of the Device Platform (Windows, iOS, Android), and the SD-Mobile version number.
If the message is regarding credentials, please re-enter the credentials and log in.
Repeat step 1. If it fails, contact a Support Champion at Rossware.
Check the queue for items that are pending upload. If no items are showing in the queue to upload or listed with failures please proceed to step 4, otherwise, click refresh to attempt a new upload of queued items. If successful, verify the office has received the upload after SD-MobileLink cycles. If not, move on to step i for Windows devices, and step ii for iOS and Android versions.
If items fail to upload and you are on a Windows device, please connect to a Support Champion.
If items fail to upload and you are in the Android or iOS version (blue briefcase icon), under menu, tap the feedback icon. Submit the feedback report with notes about items in the queue, invoice numbers, or other details that may help.
Have the office verify the SD-MobileLink program is operating as expected.
Customer Post-Completion Survey
The criteria for the Customer Post-Completion Survey to be sent are as follows:
PVR must be completed in SD-Mobile.
The technician must indicate that the JobStatus = Complete.
The job must have an email address associated with it.
The technician must indicate the office will email the invoice.
SD-MoblileLink email setup must be functional.
SD-CyberLink must have post completion survey invite box checked.
If those criteria are satisfied, the email that goes out to the customer to convey the invoice image will include the essential overlay to invite the customer to complete the survey.

