Zone setup
In June of 2002 we introduced a new method for scheduling and apportioning appointments. The immediate impetus for this development came via servicers who were doing warranty work for Whirlpool, and receiving jobs as dispatched through ServiceBench.
As it happens, when consumers call in for service under that particular warranty setup, Whirlpool’s national call-taking center (through ServiceBench-linked information) will schedule the job. To make this possible, ServiceBench must be kept apprised of a servicer’s availability for fulfilling potential appointments. Since a servicer may have vacancies within one portion of his territory while being full-up in another, the servicer will have made advance arrangements with ServiceBench to differentially define his territory into various zones, each comprising its own unique list of zip codes. He must then keep ServiceBench informed of which zones he has vacancies within, and for which days. It’s based on this information that ServiceBench provides the information to Whirlpool, via which they then know on which days they can schedule jobs, falling within particular zones, for the servicer.
The system we’ve setup to coordinate in this environment may be useful not only for those who are working within it, but for other servicers of such large size (probably 12 or more trucks) as to find the standard method of assessing schedule availability (based on individual technician loads, generally as viewed from within the DispatchMap) less than optimum.
Setting up your ZoneList.txt file
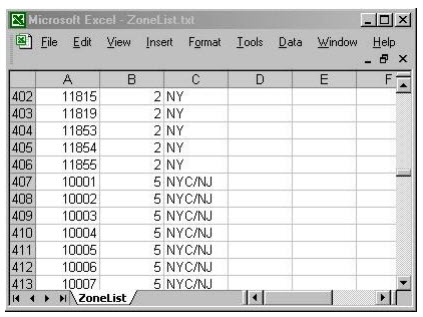
The system depends, fundamentally, upon the servicer first dividing his territory into sections, called zones, and creating a table- type document that essentially lists all zip codes within the area, indicating for each the zone number it fits within.
This can most easily be done via a spreadsheet program such as Microsoft Excel. Start the program and begin a new document. On each line (or record), you’re going to place two items in sequence (i.e., each in its own field or column). First a zip code, then the zone number you’re assigning it to. Optionally, you can use added columns for your personal purposes. In this illustration, for example, the user has placed a short phrase in the third column for the title they are giving to the zone (this is not an element ServiceDesk uses, and can be skipped without consequence).
After you’ve entered such information (we know, depending on the size of your area, it may be significant work, but it’s an essential element if you want this system to work).* You’ll need to save the file in the location, with the name and in the format where ServiceDesk will expect to find it. Specifically, it needs to be saved in the FileServer drive as ‘\sd\netdata\ZoneList.Txt. And it must be in tab-delimited format.
Actually, there is a very helpful shortcut. In ServiceDesk’s DispatchMap F5,there’s an option (hit Alt+P) for exporting a list of zips as applicable to your territory.If you begin by creating your Excel spreadsheet in this fashion, you’ll simply need to add the applicable zone numbers.
Actually, there is a very helpful shortcut. In ServiceDesk’s DispatchMap F5,there’s an option (hit Alt+P) for exporting a list of zips as applicable to your territory.If you begin by creating your Excel spreadsheet in this fashion, you’ll simply need to add the applicable zone numbers.
Tips on designing your zone structure
Often we have seen companies setup a zone for each technician. In other words, zones and techs become somewhat synonymous. In general, we think this is a poor plan. In fact, we think you should strive for use of fewer zones rather than more, and plan to create zone separations only where specifically needed for direct geographic need.
What do we mean by “direct geographic need?”
Let me contrast a couple of different situations, and companies, starting with my own in Southern California.
My territory averaged no more than about a 12 miles radius, and we had five techs. If we happened to have a disproportionately large number of jobs on a particular day in the south, it was no burden (in terms of excessive driving times, and such) to send more of the techs into that region than we typically would, and vice versa. In short, we could easily reshuffle our servicing capacity, around and within that territory, no matter where within the demand happened to arise. For this reason, it was totally sensible to define the entire territory as a single zone.
Now it happened to be that my territory sidled right up against a mini-mountain range, and through a canyon was another community called Lake Elsinore. We occasionally had requests to do service in Lake Elsinore, and always declined (it was about a 45 minute drive each way). However, we might have decided that, if we could do several jobs at a time when making the journey there (clumping all demand for a particular day of the week), it might make economic sense. Had we done this, we certainly would have made Lake Elsinore into a separate zone. As a separate zone, we could separately allocate capacity (perhaps a total of 10 jobs on a particular day-of-the-week, for example, and zero capacity for other days).
The above is an illustration of one situation where zone separation makes sense.
Another exists for a client we have in the Northeast. It’s a huge operation (around 40 techs). It services much of New Jersey and New York, including all of Manhattan and Long Island. Given the large geographic distances involved, it is not practical for a tech that’s on the east end of Long Island, say (and who happens to be lightly loaded on a given day), to drive cross country and help out with overburdened techs in central New Jersey. Given this factor, it’s very sensible to do some reasonable zone divisions. It’s most sensible, indeed, to try to pick, for each zone division, regions within which a groups techs can efficiently move back and forth to satisfy locally varying needs, while not needing to drive cross-country to help techs in another, comparatively remote region.
Please note that, while in general this discussion recommends using as few zones as possible (while nevertheless meeting geographic needs), there is no reason why even a single-tech operation might not find zone divisions useful. Suppose, for example, I’m a single tech covering the greater Los Angeles area (not that we’re recommending that as a general strategy, but if it happened to be your strategy). Rather than being open each day to driving hither and yon across that huge expanse, I might decide to make the northeast sector a zone for Mondays, northwest a zone for Tuesdays, and so on.
The general point is, divide into multiple zones solely on the basis of real geographic need. Do not make divisions otherwise. There is no point in it, and, ultimately, you’ll find it’s counterproductive.
Changes that occur in ServiceDesk after your ZoneList.txt file is created
Each time ServiceDesk starts, it checks for several things as installed on both the local drive and at the server. One of these, in particular, is for the presence (or not) of that ZoneList.Txt file. If it finds such a file in the expected location, it figures you’re using the ZoneScheduler system, and adapts accordingly.
Most particularly, the system adds a new field to entries within the ScheduleList. It’s a field, simply, for the ZoneNumber a job falls within.
Normally, this new field will populate for you, as new appointments are made. This is facilitated, usually, via the system pulling the applicable zone indication from the underlying Callsheet or JobRecord (i.e., which formed the basis for creating an appointment). Of course, that means the underlying Callsheet or JobRecord need, in and of themselves, having the reference.
In this regard, as you create new service requests within a Callsheet (and with your ZoneList.txt file properly installed) you’ll see that as you’re typing in the customer’s address, and as you pick a street from the drop-down list, besides inserting the same information as it did before, the system will now insert a zone reference (in brackets, and after the city/state/zip reference). It’s this bracketed reference that newly-made appointments will pull from, for their own zone reference.
Of course, when you first implement zone scheduling you’ll have a set of appointments (and underlying JobRecords) that are not yet equipped with such references. You have a choice between adding them manually at such point, or simply allowing for a transition period in which they work they way through the pipeline, to be replaced eventually with newly current work that contains all the expected references.
Setting your Zone Capacity levels
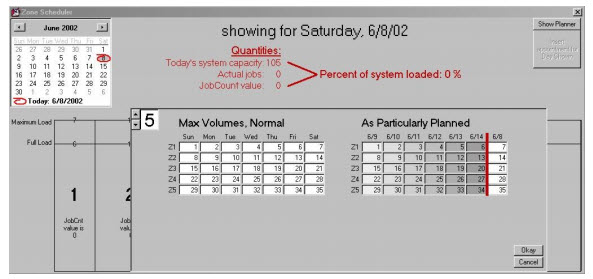
The heart of the ZoneScheduler system is, appropriately, a venue referred to as the ZoneScheduler form. Much like the DispatchMap, this form can be accessed in a variety of ways. Most directly, press Shft+F5 from your keyboard. When first displayed, you’ll find there’s not much of any content within the form, but in its top-right corner you’ll see a button labeled ‘Show Planner’. Click on the button and the system will present the Planner box, within which you can specify the quantity of zones into which you’ve divided your area, and the maximum number of jobs, for each day of the week, that can be handled in each zone. Set the quantity of zones in the little box in the top-left corner of the planner, then proceed in the obvious manner.
As you’ll note, the system actually presents two each-day-of-the-week/calendar grids. The first (as its labeling indicates), is for placing in the job quantities that you’ll consider normal maximums for each zone (i.e., for when you’re full and normally staffed). The second is for when particular circumstances arise that may create, for particular days, changed circumstances so far as maximum availability is concerned (such as, for example, holidays, techs on vacation or sick, a tech that normally takes a particular day off deciding to work instead, etc.).
Values that you place into the left grid may be considered as more or less permanent (applying as the default value to each day-of-the-week as indicated, week after week, month after month) in that they reflect your general, ongoing plan (until and unless that general plan is altered, when of course you’d make changes there accordingly). In the right-hand grid, by contrast, any change that you make will be only for the particular date as specified. After that date passes, the system automatically fill-in the new date for when that day-of-the-week next arises, and will pull the default max-value from the left-hand grid and place it.
To put it in a nutshell, the left-hand box provides the general default values which the first places, as the actual intended values, into a new actual-calendar day as it arises in the right-hand box. If you want to change from that standard default (for any particular zone) then you always can, up to a week ahead of whatever date is present.
Using your ZoneScheduler
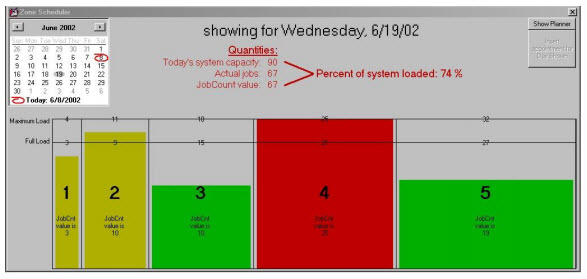
With the above-described setup work having been done, you’ll see that the main portion of the form fills-in with kind of a graph. Each vertical bar in the graph represents one of your zones. They are apportioned in width according to the relative maximum volumes that you’ve assigned to each. Across the top is an indication of that max value. We’ve somewhat arbitrarily placed a line at the 85 percent label and labeled it “Full load.”
Our thinking is that if you’ve set your max values at a level that truly pushes the techs hard, it’s probably at about that lower percentage of max they’re reasonably full. It’s probably also about at this point where (as a scheduling strategy), if you’ve reached such a point for any given day, it makes sense to try steer new appointments toward days that are still comparatively vacant. By this means you leave a little reserve capacity for those calls (still likely to come in) that have to be done right now.
At any rate, as you accumulate items within your ScheduleList (each of which has a ZoneNumber assigned), the system will (for any given day) tally the quantities for each zone, and present them in graph-like fashion (with actual quantities also indicated) here. This makes it very easy to see, at a glance and for any given day, what the job-load is for each and every zone.
In this latter regard, the system also adds a bit of graphic imagery to the conveyance of information even more obvious and intuitive.
For starters, it changes the color of the graph bar, for each zone, depending on whether its job levels fall below full, below max, or at or above max. Sensibly a graph bar will show in green if the corresponding zone is below full (meaning go ahead, schedule more jobs for here). It will show in yellow if at full but below max (signifying more jobs can be scheduled, but it may make more sense to try to steer the customer toward a date that’s still comparatively vacant). Finally, if the levels have reached or exceeded max, a zone will show in red (meaning “hey, no more here unless you really, really have to”).
All of this is in terms of the system’s standard, just-going-there-to-look-at-it display (as when accessing it via the (Ctrl+Shift+I) command, for example). However, the ZoneScheduler does more than that. Much like the DispatchMap, it’s designed to facilitate the actual processes of scheduling, as well as just giving you information.
In fact, it has a rather precise parallel to the ItemLocate function in the DispatchMap. As you probably know, that latter operation is initiated by right-clicking on the address line of either a Callsheet or JobRecord that you want to schedule. In response, the system takes you to the DispatchMap, showing you the location of the item, and allows you to create an appointment right from there.
Very similarly, if you wish to ZoneLocate/Schedule an item, simply right-click in the city/state/zip line of either the Callsheet or JobRecord that you’re wishing to schedule. Now, instead of taking you to the DispatchMap, the system will take you to the ZoneScheduler form. And, instead of showing the job's geographic location, it will flag the particular zone/bar graph that the job fits within.
Indeed, if that zone is in ‘Yellow’ status, the bar graph will be flashing slowly (thus allowing you to see in an instant that perhaps another day would be better). If it’s in red status, it will be flashing rapidly (thus telling you no, no, no; try another day).
As in the DispatchMap, the system will first display for the current day. You can change days using the PgUp and PgDn keys from your keyboard, or you can use the little calendar box in the top-left corner.
When you’ve determined for which day you wish to schedule your customer, you can simply hit Enter to initiate the creation of the needed, new ScheduleList entry (as when a similar process is initiated from within the DispatchMap, the system will then take you to the ScheduleList form, where you can fill in any final details for the ScheduleList entry, then save it). You can also select an appointment day simply by double-clicking the wanted day from within the little calendar box.
Outside integrations
When we first built the ZoneScheduler system, its function was all internal to ServiceDesk. Soon after, however, we built automated integration with ServiceBench -- via the SB-DispatchLink utility, which (and among other processes) keeps ServiceBench automatically informed of your availability status based on your ZoneScheduler setup (and actual appointment loads) with ServiceDesk. Please note that for proper functioning of this integration, you need to have the same zone structure setup at ServiceBench as is setup within ServiceDesk.
Not long after introducing the SB-DispatchLink for automated integration with ServiceBench, we also introduced the SP-DispatchLink for automated integration with ServicePower, then the LG-DispatchLink for the same with LG.
The next step was automated integration with an intelligent online scheduling interface for use with your own website. We call this the SD-CyberLink system.
The final step was live integration with techs via SD-Mobile to accommodate their knowing when vacancies are opening for scheduling new appointments (while presently fulfilling an existing one) or for creating new jobs should the occasion arise.
Using Holdbacks
When you are exposing scheduling availability to third-parties, there is a natural preference to "hold back" some of your capacity for your own COD-scheduling purposes. After all, it is much better to harness your techs' capacity doing higher-paid COD work as opposed to less profitable warranty and/or contract service work.
Since the DispatchLink utilities were first built, they have included an option to directly specify how much availability you wish to hold-back from third-party exposure. However, until 2014, these offerings were relatively "stupid" in the sense that whatever holdback value was specified, it would apply across the board to all zones, all time segments, and all dates. This across-the-board scheme was really insufficient to the need, not only because you might prefer different holdbacks for different zones and/or different time segments but also because scheduling availability is a little bit like fruit: you grow more anxious to use it up as its expiration grows nearer.
To state the above another way, if you're looking at a date ten days out, you may estimate there's a good chance you will be able to self-fill 60 percent of its capacity via your own scheduled COD jobs. Thus, for a date that distance out, you may want to hold back 60 percent of your availability from exposure to third-parties. But consider a date just five days out. If you have not by now filled 60 percent of that date's capacity (and with your own jobs), you may estimate it as less likely you will manage to do so, and may welcome more jobs from third-parties to help fill the vacancies. Hence, you might want to reduce your holdbacks to 40 percent. Now consider a date just one day out (i.e., tomorrow). If tomorrow's vacancies are not otherwise filled, you may welcome any jobs (even if from third parties) that can manage to harness your resources fully. So, for tomorrow, you may want to set your holdbacks at zero.
The bottom line is that, in the real world, intelligence dictates reserving more for dates further out and reserving less for dates closer in (and likely according to some sliding scale).
As mentioned, our holdback schemes initially had no basis for incorporating such intelligence. Now they do.
If you go to ServiceDesk's ZonePlanner interface (Shift+F5 → then click on the "Show Planner" button), you will see it has this settings section:
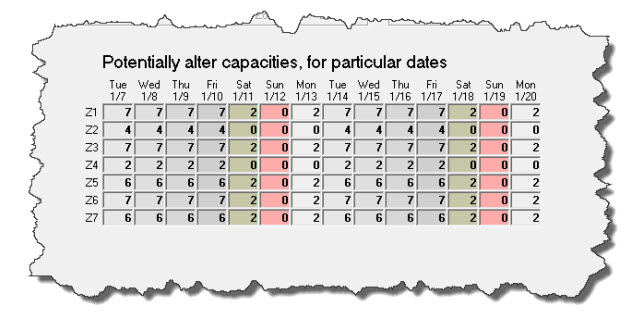
With the default/standard option selected there, the interface shows and works just as it traditionally did. If you select the second option, however, the area where you could prior alter capacities for particular calendar dates changes from something similar to this (varies somewhat depending on your setup):
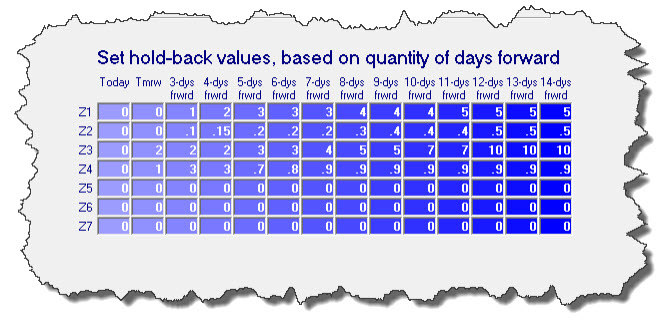
To this:
As you can see, this interface is setup to allow you to specify holdback values individually, for each and every scheduling cell (i.e., zone-and-time-segment combination) -- and according to quantity of days out, varying from today and stretching to two weeks distant. If you float your mouse pointer over, you'll see there are ToolTips to guide you in more particulars.
Most specifically, if you place a whole-number in any cell, the system will then holdback that discrete quantity from your indicated capacity otherwise.
Example: Suppose in a given scheduling pocket you have allocated a capacity of 10, and for the same pocket you indicate a holdback (as applicable for the relevant quantity of days out) of 3. It means, so far as offering pocket-relevant scheduling slots to third-parties for that slot, the system will figure your capacity is 7 (10 minus 3). Thus, if the actual burden scheduled is, say, just 5, the system will offer 2 slots available (7 minus 2). But if the actual burden scheduled is 7 or more, it will offer 0 slots.
In the alternative to placing a whole-number in any slot, you may instead place a decimal-fraction. A decimal-fraction is any number that is greater than 0 but less than 1 (e.g., .2, .37, .9). It is a mathematically perfect way to dictate a percent when applied mathematically (i.e., .2=20%, .37=37%, .9=90%). Use this method if, instead of wanting to holdback a discrete quantity, you instead wish to holdback a particular percent.
Example: Consider the same scheduling pocket as above described. If we indicated a desired holdback of .3 (as opposed to 3) exactly the same result would obtain, so long as designated capacity was precisely 10 (.3 of 10 = 3). But what if capacity was instead set at 12? A holdback of 3 (whole number method) would remain a holdback of 3. A holdback of .3, however, would now result in effectively holding back 4 (.3 times 12 = 3.6, which rounds to 4).
Depending on circumstances, you may find the whole-number method more effective for your purpose, or the percent method. Each is provided so you can choose whichever fits best.
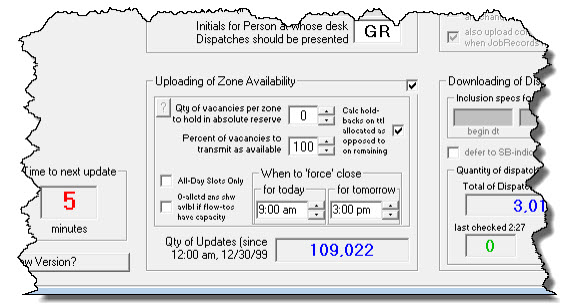
Regardless of which DispatchLink utility you are using, ability to use the old (comparatively "stupid") method still persist and will control, until and unless you create one or more non-zero settings within ServiceDesk’s “intelligent” holdback interface. What happens, essentially, is any DispatchLink utility will look for any non-zero values there. If any finds even one, it will say to itself: "Aha, we're using the intelligent holdback method." Based on this, it will change modes. Instead of using its own ("stupid") settings, it will use what you have created in your ServiceDesk ZonePlanner interface.
To make it apparent which basis is being used, each such utility will change its interface slightly. Specifically, so long as you have checked the option to upload availability, it will change the section where you'd otherwise specify via the old and unintelligent method. Instead of looking like this:
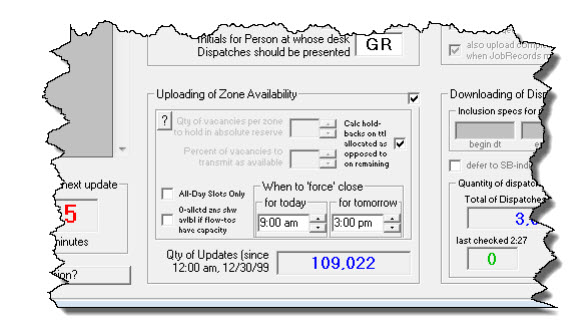
It will instead look like this:
As you can see, the old section is disabled and semi-blanked — so as to make it visually obvious it is having no controlling effect — and that instead it is the intelligent holdbacks (as set from within ServiceDesk) that are having control.
Flowing Pipes
If in any scheduling pocket (i.e., geographical zone, date, segment-of-day, etc.) you have not fully used its allocated capacity, you may want such otherwise unused capacity to be made available within another zone. Conversely, if you have overbooked in a particular scheduling pocket, you may want to deduct the value of such overbooking from availability as otherwise offered in an adjoining zone.
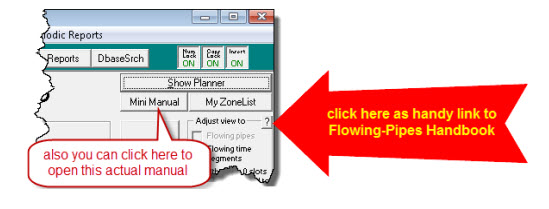
For this kind of need, we’ve developed a concept we call “Flowing Pipes.” We have a separate little document that describes this here, https://help.rossware.com/en/articles/730496. It is available here or, from within ServiceDesk’s ZoneScheduler form. You can click as shown here:
Making Zones that are Department-Specific
All of the preceding discussion has assumed, in regard to scheduling, it's a single product you're managing (e.g., only appliance repairs, or only plumbing repairs, etc.).
What if in fact you sell multiple and distinctly different kinds of service products?
Suppose, for example, you have some some techs who do appliance repairs and some who do plumbing repairs.
In such a case, it's very likely those are different sets of techs. It's also very likely you want to cover the same or at least overlapping geographic areas with both sets of techs. This of course logically means you'll need to manage the capacity of your plumbing techs, within particular geographies, separately from managing the capacity of your appliance techs, and within the same such geographies.
This is pretty easy.
You'll need to begin (if you've not already done so) by using the Departmentalization feature (see here).
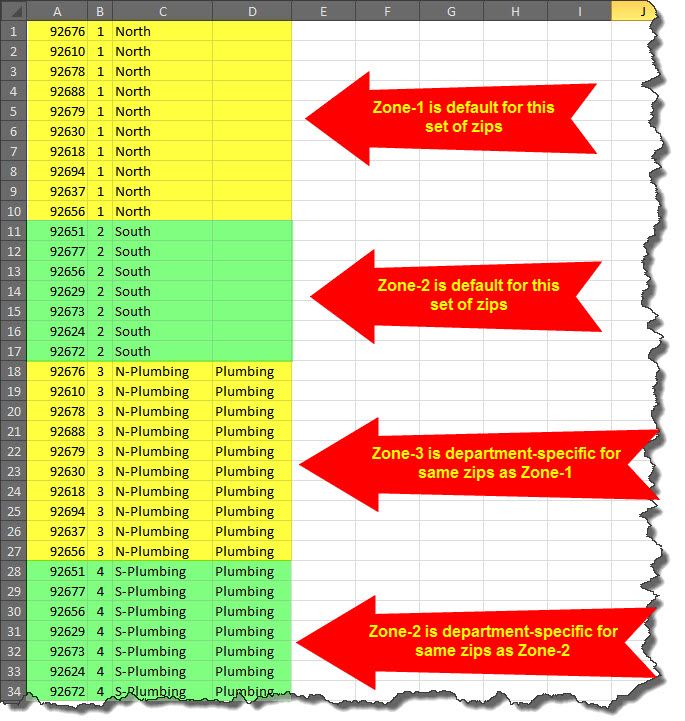
Once that's done, you can make zones that are specific to particular departments simply by making use of an optional fourth column in your ZoneList.txt file. Specifically, you'll want to place in the fourth column the precise department name, as applicable to each line-item that you want to have apply to a department-specific zone.
The following illustrates how this is done:
Please note, while we above illustrate making default, non-department specific zones (as well as ones that are department specific), it's possible, if you preferred, that you could make each of your listings department-specific. Regardless, it is likely good practice to do as per above. The method ServiceDesk uses, when seeking to determine which zone number to assign, is, if a department is specified on a job and it needs to determine the applicable zone, it first looks to see if it can can find a listing with the applicable zip (or postal) code plus the matching department in that fourth column. If it finds this, that's the zone number it assigns. Otherwise, it seeks to find a listing with the zip (or postal) code where the fourth column is left blank.
Please note, when we first introduced this feature we explained that, because no department has yet been assigned when you're working at the Callsheet level, any such department as is inserted when you select from the StreetList dropdown must of necessity be non-department-specific, and that correction is provided downstream, when a department is selected at the Job/Sale transition layer. Since that initial release, we've added a new feature that can surmount this limitation, as described here.

