Tax Rates
Managing Sales-Tax Liabilities in ServiceDesk
For many, sales tax matters are easy. For many others, they are not. It depends on what the applicable governments (federal, state and local) happen to require within the areas you service.
ServiceDesk is designed to manage sales tax issues at all levels, from simple to complex, depending on your needs. Its involvement occurs in two contexts: (1) assuring correct tax is figured on each sale; and (2) providing tallies back to you, by which you can accurately report to the tax jurisdictions that govern your area.
ServiceDesk’s systems are layered.
There’s a basic level that will fully suffice if your needs are basic (e.g., one jurisdiction to report to, and a rate setup that applies uniformly across all your jobs). There’s a next layer up if you must embrace greater complexity (multiple jurisdictions, each with different rates), and still a further layer.
Historically, ServiceDesk began with only the most basic layer. We added the next layer when encountering clients that needed it, and the next layer above that when clients needed it, and so on. Any client may use whatever layers they wish. Internally, ServiceDesk is structured to react dynamically to each situation. If for any job it sees you’ve provided, say, Layer-5 tax guidance, that is the layer it will apply. If not, it looks to Layer-4, and if finding nothing there it goes go Layer-3, etc. Always, it will apply whatever guidance (if any) as it finds at the highest provided level.
Because of this layered structure, it’s a good idea, even if you need a higher layer, if you setup lower layers too.
Layer-1: The most basic
This was the original (and for the first few years only) tax structure in ServiceDesk. It’s completely sufficient if a single tax rate setup is applicable to all your work, and if you report to but a single jurisdiction (in some cases it will be adequate even if you report to multiple jurisdictions).
It’s very simple.
For basic setup, go to your ServiceDesk Settings form (Ctrl-F1). In the boxes provided, indicate the tax rate applicable to materials sold, and as applicable to labor.
Based solely on the above, ServiceDesk will figure that (aside from tax-exempt sales) these are the rates that should apply on every sale. It will auto-calculate where applicable on such basis, warn you if sales entries do not comply with such rates, and so on.
Additionally, a simple Sales Summary report (from the F11 Reports form) will tally figures showing what your simple tax liability is, for any period, based on this very basic setup.
Again, even if your needs are more complex than as embraced in this simple and basic layer, we recommend you set its mechanisms for the rate set that applies at your headquarters, regardless. At the very least, the rates as placed here will apply (at least generally) to transactions conducted via Point-of-Sale operations from said headquarters.
If you do not have more complex needs, there is no need to read further in this handbook.
Layer 2: Allowing user/ad-hoc rate determination
This is what we first added upon encountering users who had to charge different tax rates, depending on where each job is performed. Candidly, it’s not a “system” so much as it’s an absence of one.
By way of explanation, we did not initially have time to create a system that would “know” what rate should be charged at each of varying, different-rate locations. So, we punted.
This “punting” is done via the mechanism of you picking a particular option in the Settings form. It’s the checkbox (toward the top-right corner of the purple section) as follows:
Quite simply, with the above-indicated box checked, ServiceDesk refrains from calculating sales tax for you (except in POS operations, where it assumes you’re conducting the sale from your office, and that the rate provided within the standard rate boxes should apply). When you’re entering completed sales for ordinary service, it permits you to proceed with any implicit tax amount so long as it fits within a range between 0 and 15 percent.
Of course, even if the system is leaving you free to enter sales with whatever (within reason) tax amounts your sales-entry happens to indicate, you need more, even under this plan. You need a method by which to determine how much of your collected taxes are owed to each of varying jurisdictions.
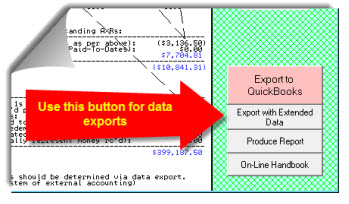
For this purpose, we created a simple data export as available after you create a Sales Summary from the F11 Reports form. At such point, look in the Report form’s lower-right:
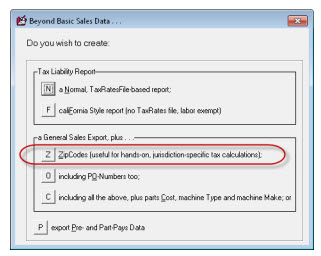
The report in question is a spreadsheet that details each sale as involved in the period, with applicable zip code.3 It’s selected from the options list that’s presented when you click on the above-identified button:
This export leaves it up to you, as the user, to manipulate the data (typically within Excel) to self-calculate your individual liabilities at each jurisdiction, based on your own knowledge of which zip codes belong in each jurisdiction.
This method involves more than a tiny bit of user work (and skill in using Excel’s tools), but we had many users using it with significant effectiveness, prior to providing more advanced systems.
Layer 3: Using a TaxRates file
The simple idea behind a TaxRates file is that you’ll indicate, in a very simple document (and for each zip code in your area), what are the applicable rates for each such zip code. You’ll save this document as a simple file, which ServiceDesk will then consult on each occasion when needing to work with tax amounts.
A. How to create Your TaxRates file
Your tax-rates document will consist of rows and columns. There will be a “row” (aka line of text) for each zip code in your area, with each such line divided into four data elements (sometimes called “fields”) as follows:
Element 1: A descriptor for the jurisdictional area that governs the zip code
Element 2: Applicable zip code
Element 3: Tax rate as applicable to materials
Element 4: Tax rate as applicable to labor
Where each “line” has these four data elements, it ends up forming what are essentially “columns.” Within each line, each field is separated by a simple tab character.
You could use any of several methods to create this simple document, but if you have Excel or similar (and are not totally incompetent in its use), our suggestion is to use that (it has the benefit of lining up your rows and columns in a visually pleasing and easy-to-use grid).
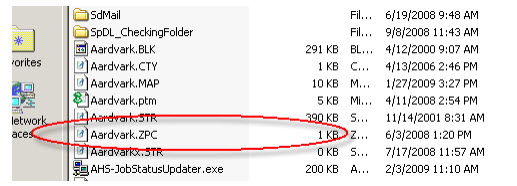
We also suggest (for maximum ease) you start with a zip code list we’ve already created for you. It’s one of the custom files that begins with an abbreviated variation of your business name, and can be found within the x:\sd folder on any drive where ServiceDesk is installed (substitute the actual drive letter, where installed, for the x: as indicated: usually it will be c:\sd).
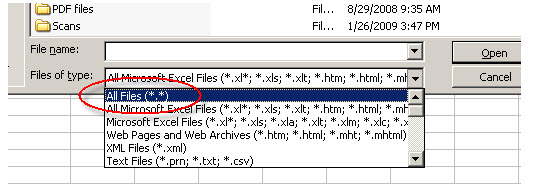
In particular, after opening Excel choose its File-Open dialog. In the ‘Files of Type’ drop-down at the very bottom, you’ll need to choose ‘All Files’, as per the following:
After this choice, navigate to a drive where ServiceDesk is installed, and within the applicable folder look for the file that has that abbreviation of your business-name, followed with a .zpc extension. Choose that file to open.
Again, bear in mind it’s the file that’s referencing your own business name you’ll be looking for.
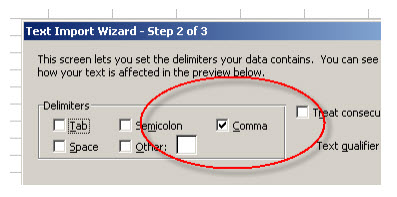
After you select that file, Excel may ask for some guidance in properly parsing its contents. Basically, you just need to let Excel know it’s a ‘Comma-delimited’ file:
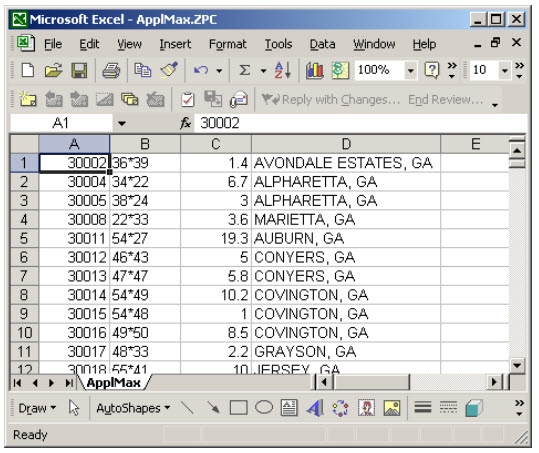
Then proceed, and Excel should open the file nicely, with a result that looks something like this:
Now bear in mind this is not the document you want to end up with. We’re only suggesting you start with this one, to avoid having to create a list of zip codes from scratch.
Also please be certain you DO NOT SAVE this particular document with any changes as made in it. This document is used by ServiceDesk for important internal purposes. If you change it, AND SAVE AS THE SAME DOCUMENT, you’ll destroy those important internal purposes. Again, DO NOT SAVE any changes to your xxxxxx.ZPC file. When it’s time to save your work, you’ll do it under a different name (in a slightly different format, too).
In regard to such work, your first task if beginning with this document is to get rid of the columns we’ll not be using in our new document. Just right-click on the letter-heading at top of each column you don’t want (that’s going to be columns B, C and D). As you right-click on each, choose Delete from the dropdown. In result, you’ll end up with a single column, consisting of zip codes only.
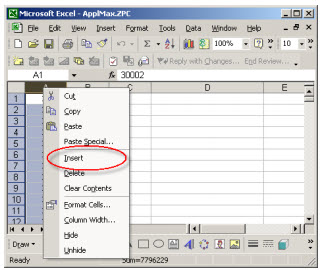
Now you’ll want to insert a new column in front of the zip codes. To do so, right click on the header at the top of Column A. From the drop-down, pick ‘Insert’.
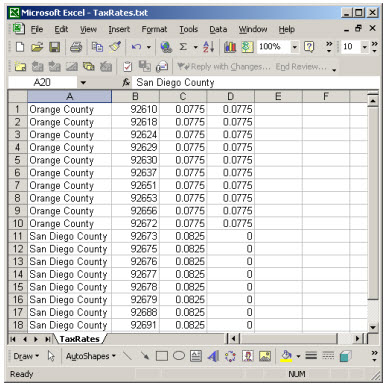
This will make the zip codes column second, which is precisely where you want it. Now, all that’s left is to appropriately fill-in the other three columns. Following is an example of correct completed formatting:
As you can see, we have rows and columns precisely fitting the description provided at the outset of this chapter. The first column describes each applicable jurisdiction, second the zip code, third the applicable tax rate for materials, and fourth the rate as applicable to labor.
Once you’ve created the above structure, it’s time to save the document. In particular, you must save it:
As the correct type;
With the correct name; and
Located in the correct place.
Specifically, the type must be a tab-delimited file. The name must be TaxRates.TXT. The location must be the \sd\netdata folder on your server drive. All these are essential. If you miss on either of the latter two, ServiceDesk will not find your file. If you miss on the first, it will fail to properly read its data.
Also (and to remind again), please DO NOT — repeat DO NOT — simply save the xxxxxx.zpc document that was originally opened. If you did simply save, you’d replace a perfectly good .ZPC file with what — for .zpc purposes — would be utter garbage.
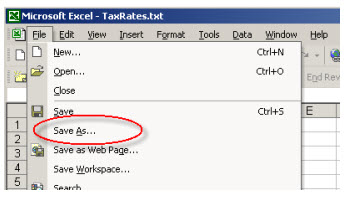
To do this “Save” correctly, you must choose “Save As” under Excel’s ‘File’ menu (again, it’s NOT “Save,” it’s “Save As”).
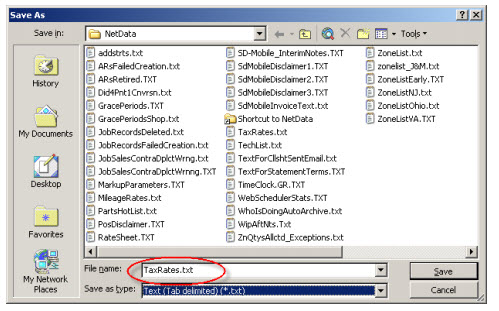
This opens the ‘Save As’ dialog box. The first thing you’ll need to do in that box is indicate the type of file you want to save. Do this by opening the ‘Type of File’ drop-down, near the bottom:
After appropriately picking “Text (Tab delimited)” (as above shown), navigate to the \sd\netdata folder for your server driver, and in the provided box type the name for your new file:
Then, finally, click on ‘Save’.
At this point, actually, you should be done — except Excel is going to pester you, and with messages that are quite confusing. Essentially, Excel knows if you save in simple Tab-delimited text format, you’ll lose any special formatting and related features that exist only in an Excel-format document. It wants to be sure you don’t do that unwittingly. In our case, in fact, that’s precisely what we want (i.e., text only, with no special Excel formatting), so when confronted with the following message:
We’ll go ahead and say ‘Yes’.
Now we really are done — except for one more pestering element. When we go to close Excel, we’ll likely get this message box:
This is aggravating, since (and in fact) we just barely saved the file. Here you need to say ‘No’, because what Excel is actually wondering (though not really saying so) is if we want to save it now as an Excel document. We don’t, so the ‘No’ answer is totally appropriate.
B. How your TaxRates file is used within ServiceDesk
Having discussed how your TaxRates file is first created, the next question is: How does ServiceDesk use it?
Quite simply, on startup ServiceDesk looks for the file. If it sees it, it opens, and loads its contents into memory. On the basis of this data, wherever ServiceDesk needs to know the tax rates that should apply on a job (anything, in other words, outside POS operations), it consults this data. Specifically, it looks at the zip code that applies on the job, then looks for the same zip code in your TaxRates data. Upon finding a match, it takes the corresponding rates, and applies them (as used, for example, when auto-filling tax amounts within the FinishedForm context, or checking for matching total balance during a SalesEntry process).
Additionally, if you are using SD-Mobile, the MobileLink program will consult this file as it uploads each dispatch to your technicians, deduce therefrom what tax rates should apply, and provide such information to the tech’s Mobile interface.
Perhaps most importantly, your TaxRates data is used by ServiceDesk when you ask it to create a Tax-Liabilities report on your behalf.
You may recall our discussion of the report as provided under Layer 2, which leaves significant work for you to do, when seeking to deduce what your liabilities are for each taxing jurisdiction. We have a much better report available under Layer 3.
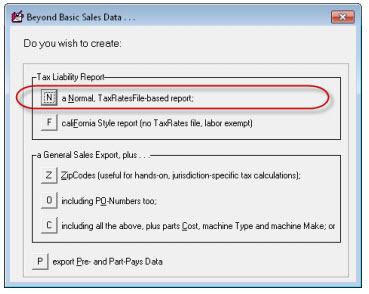
Like the more primitive report, this one is also accessed by first displaying a Sales Summary from the F11 Reports form, for the period of interest. With said report displayed, you’ll again pick the “Export with Extended Data” button in the Reports’ form’s lower-right. Only, for this far superior output, you’ll pick a different suboption:
When you pick this option (and with your TaxRates file as a foundation), you’ll get an extremely nice, summary type document (opens in Excel) with all the needed figures, making it very convenient to file reports with all entities of interest:
It’s this method that is likely ideal for most users.
Layer 4: Dealing with split zip codes
This layer was added in January 2012. Immediately after creating it, we discovered it would not be adequate for the very user who prompted its creation. For such reason, we were immediately presented with a new design brief, to add Layer 5 (see next chapter), leaving us uncertain if any users have (or will) implement this one. Regardless, it remains available. Additionally, our description here of what prompted the need will be instructive in general.
The problem we’re addressing is where particular zip codes are found to lie partially within one taxing jurisdiction, and partially within another (often with different rates, too). You may recall our Layer 3 solution is totally zip code-based, so to whatever extent you have a zip code that crosses jurisdictions, it will at the least be moderately inaccurate if solely depended on.
If you have this issue, you can deal with it in one of two ways:
Cheat. Essentially, do nothing beyond Layer 3. For a zip code that’s subject to different jurisdictions, simply pick the jurisdiction you think is predominant (or perhaps the one with the higher rate), and treat the whole zip code as though it belongs to that jurisdiction. This has the virtue of simplicity, and we think it’s very unlikely any auditing authority will give you a hard time upon finding you paid the full tax amount, even if not perfectly accurate about which jurisdictions (within a given zip) each transaction occurred in. This is what we recommended prior to adding further layers, and it sufficed for many users for a long time (we never heard of anyone being in trouble because of it).
Don’t cheat, and instead use either Layer 4 (discussed here) or Layer 5 (next Chapter).
We built this layer based on a misunderstanding of the prompting user’s situation. We thought they’d indicated that each differing tax jurisdiction could be classified with a different city name (it’s not uncommon that different city names fit under a common zip code). So, Layer 4 was made to key first off the zip code (just as in Layer 3), but additionally off the city name too.
We will sometimes refer to this as the “split-zip code” solution, because (and by virtue of the city name that’s provided) it allows you to essentially “split” a given zip among multiple city names. Please note this system is derivative of Layer 3. It simply augments the zip-rate definitions that are there provided.
Implementation is achieved by adding a fifth column to your TaxRates file.
This fifth column can (and positively should) remain blank for any zip code that’s subject to a single jurisdiction only. To state this another way, do not place any text in the fifth column as connected to any zip code that’s subject to a single tax jurisdiction only.
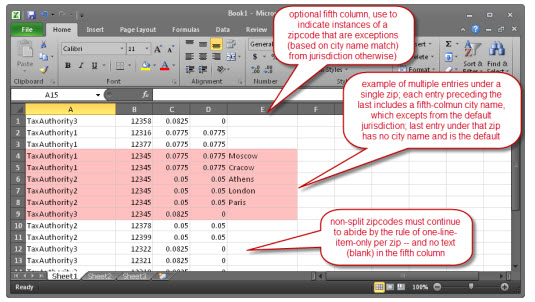
For any zip code that’s subject to multiple tax jurisdictions, by contrast, you will need to create multiple line items with that zip code (note this is a departure from our rule otherwise, where there positively should be but a single line-item per zip code). At minimum, you’ll need a separate line item for each of the jurisdictions to which the zip code is subject, and each will need to show within its first column the jurisdictional name it involves. The new and optional fifth column should show the city name, for that line item, as applicable to the involved jurisdiction.
We’ll imagine a scenario to help you understand. Suppose you have zip code “12345” that is subject to three different jurisdictions. We’ll call these TaxAuthority1, TaxAuthority2 and TaxAuthority3. Given this, within your TaxRates file you should setup one line for that zip code with TaxAuthority1 in the first column, and another with TaxAuthority2, and a third with TaxAuthority3. On the basis simply of seeing those three different lines (under one and the same zip code), ServiceDesk can deduce that this zip area is subject to the three different jurisdictions.
But, how does ServiceDesk know, for any given job under zip code 12345, which of the three jurisdictions to connect it with?
This is where that added fifth column comes in. Simply, when ServiceDesk looks in your file for a matching zip, upon finding a match it then looks to see if there is text in that fifth column. If not, it says to itself: “I’ve found my match, and I’m going with it.” If there is text there, however, it looks to see if such text matches the city name as present in the job for which it’s seeking to apply tax. If the two city names match, it again says to itself: “I’ve found my match.” Otherwise, it searches within your file to find any next instance of a line where the zip code matches, and applies the same rule.
Given the above, you’ll need to apply some thought as you setup your multiple line items (under a given zip) to cover the different jurisdictions as applicable.
Make line-item entries for jurisdiction’s that are more the exception from what the zip area is otherwise more predominant to, rather than for the jurisdiction that is more likely dominant.
Make a line-item entry for each city name that’s within an excepted jurisdiction.
Upon having created such line-item entries for the exceptions within a zip, create one more where the fifth column is blank.
Assure the blank entry is sequenced last, among the entries for the zip in question. This is because, if ServiceDesk reads through the other zip entries and finds no matching city name, it will have the entry with blank for the city name as a default to fall back onto. If you do not have an entry with that fifth field blank, there will be no default (defaults are important).
To show how implementation of the above strategy might look, let’s continue with our example. Suppose TaxAuthority3 predominates among the households we are likely to be serving within zip 12345. TaxAuthority1 rules over households with city names Moscow and Cracow. TaxAuthority2 rules over households with city names Athens, London and Paris. Here’s how we’d setup multiple entries, within our TaxRates file, for zip code 12345:
Besides setting up your TaxRates file in this fashion, there is an obvious other need. If you want ServiceDesk to manage to match jobs within a split zip to the appropriate jurisdiction, you obviously must setup each applicable job with its appropriately matching city name (otherwise, ServiceDesk will have no basis to make the excepted connection).
At first blush, you might think the above-expressed need would be easily satisfied. However, when we at Rossware build your StreetList for you (which is the basis for populating the city/state/zip line in Callsheet when a user selects from the dropdown StreetList), we match city names to streets on the basis of the zip code the street fits within. Our source data gives us no other basis by which to add a city name. Given this, it’s inevitable that all streets within a given zip (in the StreetList as created for you) will be attached to one and the same city name. Thus, absent amending that StreetList or editing the city name as inserted when you select a street from it, you’re going to end up with the same city name (inserted to a Callsheet for streets under a given zip) every time. There are two potential ways of managing this:
Simply have your users attentive to replacing the inserted city name with the city name as indicated by the caller; or
Amend the StreetList (as created by Rossware for you) to show, for each street entry under a given zip that should be attached to a different city name, that city name instead. If you wish to pursue this strategy, it’s likely easiest if you use the Connect for Assistance tool with Rossware, and we’ll provide a brief and personal tutorial to show how it’s done.
Layer 5: Using a TaxSchemes file
This layer was added in April 2012, after we learned from the user who prompted Layer 4 that it was inadequate. Turns out, we’d misunderstood when believing that, for this client’s area, a zip code-plus-city-name is a sufficient basis to define applicable rates and jurisdiction. In point of fact (we learned after we’d “gloriously” introduced Layer 4), this user has customers living within one and the same zip code and city name, but with dramatically different tax rates. Moreover, for this user so odd a situation is not a mere rare exception that can be reasonably ignored.
Layer 5 involves use of another user-created file.
To remind, Layers 3 and 4 use a file called TaxRates.txt, which lists zip codes (or zip codes augmented with city names) for ServiceDesk to consult when determining what tax rates (and which jurisdiction) should apply to each job.
This layer provides an entirely independent strategy. It involves creation of a file called TaxSchemes.txt. Instead of listing zip codes with their applicable rates and jurisdictions, this one will instead list each particular tax-setup scheme you must deal with.
For example, you may have to report to JurisdictionA with a particular set of rates, to JurisdictionB with another set, and so on. Each such dynamic will have an entry within this list.
Specifically (and assuming you must use this layer), you’ll structure this file with columns as follows:
Column 1: An ID number (may be any simple, non-zero integer) for the “scheme” in question
Column 2: Descriptive Text
Column 3: Tax rate as applicable to materials
Column 4: Tax rate as applicable to labor
Column 5: Responsible jurisdiction
Aside from its differing contents and structure, you should use precisely the same guidelines, for creating this file, as we gave you in Chapter 3 for creating a TaxRates file — with one other difference only. For this file you should place headers in the very first line. The purpose of the headers is to remind you of what each column is for (ServiceDesk will not otherwise use the line, but it’s important for you to place it there, because it will otherwise ignore what’s in your first line).
Thus, you should end with a file that, in Excel/table format, that looks something like this:
Save your file using the same guidelines as outlined in Chapter 3, but under the name TaxSchemes.txt instead.
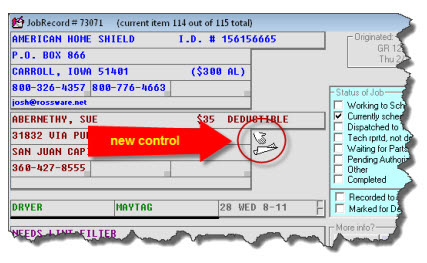
Here’s what happens when ServiceDesk, on startup, looks for and sees this file. It says to itself: “Aha, we have a setup with Level 5.” It reads values from each of your schemes and places them into memory. It further places a new control into your F7 current-JobRecords form:
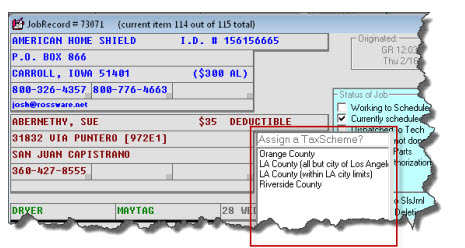
If as a user you click on this new control, you’ll be presented with a dropdown list, which you may use to assign a TaxScheme to the job:
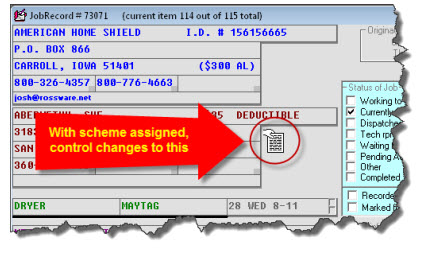
Simply pick the scheme that’s applicable to the job. Based on this fact alone, ServiceDesk will know what to apply on that job. It will also alter the new control’s image, to signify that a tax scheme is attached to the job:
Please note you may if desired use all tax management layers below this one, and reserve the use of this one (e.g., where you make an explicit assignment on a job as to which scheme it belongs to) only for particular exceptions as needed. Or, you may make it a practice to always assign each job to a scheme. It is up to you.
We do want to provide a strong precaution in regard to management of your TaxSchemes.txt file. In a nutshell, ServiceDesk provides no policing functions on your logic there. Internally, when it accepts your assignment of a JobRecord to any particular scheme, it tracks that assignment on the basis of the ItemID field, as pulled from your TaxSchemes file (again, this is a simple integer). Likewise, when you record a completed sale, that sale entry will have accompanying it a notation of the corresponding ItemID. For both, this is the only scheme-connection information that is directly maintained.
What this means is you must be careful to maintain integrity in your scheme ItemIDs. If, for example, you were to re-use a scheme ItemID for a different scheme, it would effectively change all prior-created records (with that ItemID) to your new scheme. In most instances, that would likely be an unwanted result. Similarly, if you removed a scheme that already had jobs and sales entries attached to it, those attachments would no longer have any validity. Of course, it’s also important to assure that each ItemID you create is unique, or unintended results will occur. To avoid any such issues is entirely your responsibility. Again, ServiceDesk will not be policing this file’s management for you.
Aside from mentioning the above, we also want to add: Most companies will not need this layer. We marketed ServiceDesk for over ten years with many hundreds of users — all doing rather well without it.
As a final note on Layer 5, there is an important question: How do you harvest such tax-relevant data as is created when using this method?
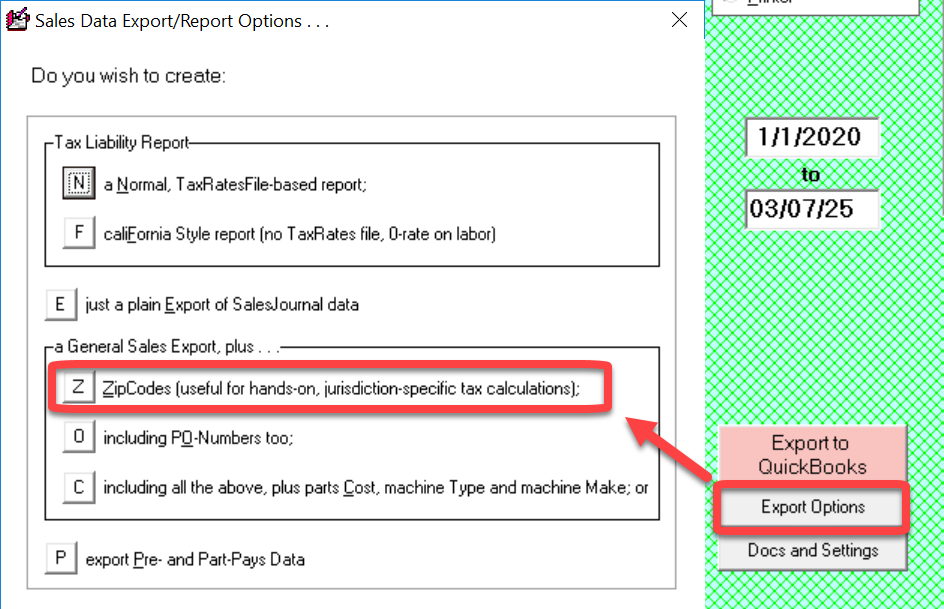
Happily, the answer is simple. Just run a SalesSummary report in ServiceDesk (for any period of interest), then click on the button to “Export Options,” and choose the option as shown here:
(Or, you may choose either of the two options immediately following if wanting their added data.)
This creates an Excel file you may use to tabulate such liabilities as exist under each of your Tax Schemes (and, of course, as applicable to the period in question).
Layer 6: Hybridizing layers three to five
This advance came in early 2019, when we realized that a slightly modified Layer-3 TaxRates file (or even one that is Layer-4 augmented) could be used as the basis to automate Tax-the Scheme assignments of Layer-5.
How it works is pretty simple.
You will make a Layer-3/Layer-4 TaxRates file, and a Layer-5 TaxSchemes file. Your Layer-3/Layer-4 file will have one simple addition: a sixth column. For each line item in the file (each of which, of course, corresponds to a zip or postal code), you will in the sixth column position place the ItemID of the TaxSchemes-file defined tax scheme to which that zip or postal code belongs.
What ServiceDesk does on this basis is, in general, pretty basic.
When you do a Job/Sale transition from a Callsheet to JobRecord, ServiceDesk looks to see if the applicable zip or postal code is included (in particular, as a single line-item entry) in your TaxRates file. If yes, it then looks for text in that line-item's 6th column. If it finds a number there, it figures: "Aha, that is the ItemID for the TaxScheme that should be assigned to this job." On that basis, it automatically assigns that TaxScheme to that job, and there is no need for a user to do it manually.
It works similarly if you have multiple line-item entries for a single zip or postal code in your TaxRates file, and with fifth-column-indicated city names. If the system finds there is only one line-item that matches for both postal code and city name, it reacts essentially the same as the above.
If the above was all this hybridization did, it would not be very interesting because, well, if zip/postal code and city-name combinations were for you fully sufficient to define which jurisdiction and tax rates were applicable in each instance, there would be no need for Layer 5, nor for hybridization between it and others
Where this becomes interesting is for those particular zip/postal codes where addition of city names is not sufficient for needed differentiation as to which is the applicable jurisdiction and set of rates -- and in regard to which, therefore, you find yourself needeing to go to Layer 5 in the first place. For these, how it works is as follows.
When ServiceDesk does that "look-see" in your TaxRates file to determine which TaxScheme to automatically set for a JobRecord, it's possible it will find that more than a single line-item is a complete match for the applicable zip or postal code (or for the zip or postal code plus city name). In particular, that's precisely what it will find if, in your TaxRates file, you have created more than one such line-item match as applicable to the circumstance.
Anyway, if ServiceDesk sees more than one such match, it will not automatically assign a TaxScheme to the job. Instead, upon completion of the Job/Sale transition, it will present the JobRecord with a dropdown of TaxSchemes to pick form . . . much as is done without this hypbridization, but here there is an important difference: it will only include in the dropdown those particular schemes for which it found line-item matches in your TaxRates file.
Thus, the user will see an appropriately-limited array of Schemes (in most cases probably just two) from which to pick -- and will only have to pick in those particular instances where zip or postal code alone (and/or combination of zip or postal code plus city name) is not in itself a sufficient basis for determining applicable jurisdiction and rates.
To make this pick-situation work, all you must do is have separate line-items in your TaxRates file for each instance of a zip or postal code that may potentially belong to multiple jurisdictions, and, in respect each, in that sixth column indicate the TaxScheme ItemID that is applicable to each such separateinstance.
We hope that strategy is simple enough (especially for something where the underlying matter that we are seeking to deal with is pretty complex).
Augmented information when making SalesJournal entries
At the same time we added Layer 5, we had a simultaneous need to better assist a Canadian client in regard to separately tracking the two elements of tax (in Canada the breakdown is between PST and GST, as opposed to between materials and labor as is typical for the U.S.).
Historically, our SalesJournal has had but a single tax figure that combines both elements. That’s generally been fine, because, to whatever extent separation has later been needed, it’s been a simple matter to do so deductively. However, this user had a situation where, depending on circumstances, one or the other of the two elements might or might not apply within a sale. It was not a situation that made it possible to deductively distinguish later on, yet later separation was critical for certain tax liability purposes.
Based on the above, there was an added reason for Ver. 4.6.0 of ServiceDesk to introduce a new data-format in the SalesJournal. One reason was to accommodate a new field indicating the ItemID (if involved) of any TaxScheme as applicable to the sale. The other is to allow separate recording of the two tax-element amounts.
Initially, at least, we are mostly keeping these separated fields invisible to the user. This is on purpose, because we don’t want users who’ve been perfectly satisfied with non-separated fields to suddenly be put off with what may appear to be a new complication. For such reason, it’s our intent to keep the separation primarily a behind-the-scenes matter.
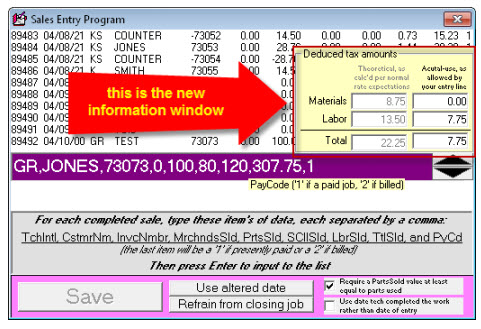
Even so, we have deemed it important, where such separation is occurring, to make it at least visible to the interested user, to allow verification as to whether the about-to-be-recorded separation is precisely as per intent. Thus, we have provided an added little window as involved when a user is making a (F9 form) SalesJournal entry. It will display the moment all fields are inserted within the entry line:
As you can see, it’s designed to show exactly what tax elements the system has deduced should be applied on the sale (first column), and what it’s going to figure as actually applied based how much room for tax you’ve allowed in your entry figures (as in other contexts that adapt to Canadian separation of PST and GST, labeling will change appropriately in such an instance).
Additionally, this new little display is chock-full of ToolTips. Please float your mouse pointer over the boxes, and over the label above the first column. You’ll find, with the latter, a ToolTip appears to tell you the basis (whether it’s a finding from any of Layers 1 through 5) the system used to deduce the tax rates that should apply. The ToolTip as corresponding to each box will tell you precisely the basis by which its value was produced.
The values as shown in the two (non-totaling) boxes on the display’s right are precisely what will go into the underlying, separated fields within your recorded SalesJournal entry.
In most cases, the separation for these two fields will be deduced logically on your behalf. The one exception is if: (1) your entry line is populated for you by a link from the FinishedForms context; (2) you’re a Canadian user setup with separated PST and GST; and (3) the FinishedForm as involved has separate boxes for PST and GST. Where all these conditions are met, the values will be pulled direct from such separated FinishedForm boxes.
Managing tax rates for POS operations
If you have but a single location from which direct, customer-physically-present sales are conducted, it logically follows there will be but a single tax rate as applicable to those sales. ServiceDesk will simply use the pair of rates (materials and labor) you’ve entered in the provided boxes of the Settings form, and life will be simple.
At least this is nearly true.
There is need for you to understand in what contexts ServiceDesk will interpret your work in the FinishedForms interface as involving a “from-the-store” sales, versus when you are working in that context to formulate and/or revise tickets as involved in field service (where, if it has so interpreted, it will apply whatever rate as it finds applicable to the customer’s physical address (i.e., pursuant to whatever schemes work you might have setup otherwise pursuant to strategies discussed in the preceding chapters).
The logic in this regard is straightforward. ServiceDesk will figure it’s a POS context situation (and so work to apply an appropriate local-to-store tax, as opposed to an as applicable-to-customer’s-location tax) in the following circumstances:
No invoice number has yet been assigned to the FinishedForm as loaded;
The invoice number as assigned has a negative value (which naturally occurs in a pure POS situation when using the actual POS ticket);
The underlying JobRecord is designated as a ShopJob; or
POS is the particular ticket type that is in use (note that it’s possible to use this ticket type even where a JobRecord is attached, in which case it is not a negative invoice number that’s assigned, so situation #2 does not otherwise apply).
So, knowing now that those are the situations that are apt, the next question is what to do if you have multiple store locations that are subject to different tax rates? (If this is not your situation, there is positively no need to read further in this chapter).
First let’s consider a basic situation, where you have distinct user desktops at each different location. Desktops at location-A only conduct sales at location-A, and Desktops at location-B only conduct sales at location-B. For this, all you must do is the following:
Open any text editor (e.g., Word, WordPad, NotePad, etc.).
Type the first tax rate (it's the rate on materials if you're U.S.; PST if you're Canadian), then strike the Tab key on your keyboard and type in the second rate (it’s the rate on labor if you're U.S., GST if you're Canadian). Type each rate as a decimal fraction (e.g., 7.25 percent would be typed as .0725).
Save the file as "MyPosTaxRates.TXT", and be sure to save as "File-Type" Text-Only.
Place a copy of this file into the operative LocalData folder as applicable to each/any desktop whose local rate departs from the otherwise standard rate (as specified in the Settings form). (To determine which is the applicable LocalData folder for any station, bring up its About ServiceDesk form; a list of applicable paths is in the lower-left.)
The above is all you must do for this basic situation. ServiceDesk looks for the above-described file on startup. If it sees it, if reads inside to find the two, special for-local-use rates you have provided. It then applies these in the POS context, for the station involved.
But suppose your situation is more complex, in that you have single desktops that, via remote functionality, conduct particular-to-store-location sales, but in regard to multiple/different locations, and each with different tax rates? Oh boy, what a mess you say? Well, there is an answer.
If this is your situation, you’ll want to use essentially the same file setup as above described, only now the file’s contents will be slightly more complex. Specifically, it will contain multiple line-item rate specifications, one line for each different sales location, and now instead of just the two fields (each separated by a tab), there will be three. That third field will be a text string that, in each instance except (potentially) the last, will match a name of one of your Departments. Thus (and with normally-hidden tabs and return characters made visible here for your benefit), the text in your file might look something like this:
The basic idea is, if you’re operating on a level that demands this level of complexity, you’ll need to setup POS-oriented Departments for each sales location. You’ll need to have each POS transaction based in a JobRecord (i.e., the pure/direct POS path is out), and that JobRecord will need to be assigned to the Department as applicable to the sale. In any “to-be-locally-applied” tax situation, ServiceDesk will note which Department the underlying JobRecord is assigned to, then it will look in this file to find the line-item that includes that Department’s name, and (if found) will apply the tax rates as found on the same line.
As one more matter you may note that the third line in the example file, as illustrated above, has a third field with the text string “Other”. The general idea here is you may include such a line if you want a default/fall-back rate to apply where no matching Department is otherwise found (and, incidentally, one that’s different than the base rate as found in the Settings form, which would otherwise be the fall-back).
By the way, when adding accommodation for this last layer of “to-be-locally-applied” complexity, it occurred to us that it would be nice to have direct indication of what basis the FinishedForm context is using for tax purposes, in any particular instance. We added a ToolTip to inform. It shows after you’ve made any edit that induces a tax calculation, and when you float your mousepointer over, as follows:
Summary
At Rossware, we always prefer simplicity, at least where it’s sufficient to meet need. If our Layer 1 solution is sufficient for you, do not go beyond it.
If you must accommodate differing tax rates but have not yet had time to do the underlying setup as needed for Layers 3 or 5 (Layer 4 is pretty much just an augmentation of Layer 3), it makes sense to use Layer 2 as at least a temporary expedient.
If you do have differing tax rates for different geographic areas, Layer 3 (with potential augmentation by Layer 4) is the most simple solution. It’s ideal, in particular, in that it involves no added user burden while interacting within ServiceDesk, and accommodates a very effective, designed report.
Finally, if you have the super-oddball situation where it’s required, Layer 5 is available to you.


