Spiffs
This feature was added September 2012. Its creation was triggered by anew (and very large) user that had an extremely complex compensation plan. Different kinds of compensation could be triggered by all kinds of different circumstances. Some were percent based (and off of different elements in the sale); some were flat amounts. Some were payable based on mere job completion; others were not payable until the underlying job itself was paid.
We created this feature to accommodate such extreme variations. It does not supersede prior-created systems; it simply provides another option.
Contrasting with other SD compensation systems
From day one ServiceDesk has had two other systems for calculating compensation.
For hourly or salaried personnel, it’s had the WageReport (F11→R→W). This ties directly to the built-in TimeClock feature (F2), and RateOfEarnings form (Alt+F2), where basic compensation rates are set.
For techs working on a commission basis, it’s had the Commissions Report (F11→R→C). This ties directly to sales entries (F9→ Shift+F3), along with commission rates as applicable thereto, as also set in the RateOfEarnings form (Alt+F2). In general, few businesses have needed methods extending beyond the above.
Nonetheless, in early 2012 we took on a client that, in addition to standard commissions for its techs, employs a system of “spiffs” to especially reward with added amounts in particular situations. Their program was not overly complex, so we came up with a method that involved minimal programming from our end to satisfy it. We’ll put this in our numbered sequence as:
For a simple system of spiffs, each sale can be coded for the particular spiff, if any, that you wish to apply.
In a nutshell, this simple spiffs system works as follows:
When you’re entering a sale (via the F9 form), notice if it’s one on which you wish to pay the tech a spiff. If so, right-click in the entry line. A dialog box then asks you to type whatever text you wish (to signify the spiff), up to eight characters. This can be a code of some kind (your own code that means something to you), or an actual dollar amount. ServiceDesk records what you’ve typed, as part of the SaleJournal entry as then created. You can retrieve later (for all such entries covering any period of interest) by running an F11 SalesSummary report, then doing an extended export. From that export, you may then self-manipulate within Excel (or similar) to calculate the spiffs as applicable to each party in question.
As you may note, these prior systems leave you well covered for dealing with standard hourly or salaried personnel, and for standard commissions (whether percent or fixed-dollar-per-job amounts). There is also provision for what might be called a “weak” spiffs system (weak in the sense it’s really leaving it up to you to do most of the work).
In regard to spiffs, that weak system did not seem adequate for the very complex structure (and large quantity of personnel) as involved with the new client we took on in September 2012. Hence, the added/new system that is the topic of this mini-manual.
Setting up your MySpiffsScheme file
The foundation of our expanded Spiffs system (from here on we’ll call it “SpiffsSystem2”) is in a simple table you will create, to describe the spiff/compensation setup you desire.
In such regard, please note you may be describing an entire compensation system as applicable to certain personnel, or perhaps merely a scheme that is supplemental to other elements. It is entirely up to you, how you choose to structure it, and how you choose to use it.
At any rate, this table (that you will make) will describe the elements as involved for this particular segment.
To build the table, it will be best to use Excel, or a similar (spread-sheet-type) program. Begin with a new document within said program. You will need to create five columns within the document. On the first row, enter headers for each of the columns, as follows:
The truth is you could use any headers as wanted (ServiceDesk won’t actually pay attention to text in this first row), but the headers as here suggested will provide a good self-reminder of how the substantive text will be used, within each of the columns, in rows that follow.
After putting in that first, headers row, it’s time to put in a row for each element of compensation (i.e., each different spiff) that exists within your program (in particular, the program you are wanting to setup here).
Thus, suppose in some instances you want to pay a straight $10 when noting the tech has sold a particular category of item (say accessories). You want this amount to be payable to the tech only when the job is paid (i.e., not when it’s merely completed but billed). Make a line item for that:
Note we’ve picked a single-character code for the line item. This single character can be any character you choose (letter, number, even symbol; it doesn’t really matter, except that each of your items should be unique in such regard).
We’ve also picked a Description for the item. The description can be whatever you wish. It’s likely wisest to make it, well, descriptive. It can be as long or short as you wish.
In the Amount column we’ve put the amount that is applicable.
In the Sales Category column, we’ve placed nothing. The reason is this column is intended, when we want our compensation to be a percent, to indicate the category of sale (merchandise, part, service-call or labor) against which the percent will apply. Where the compensation element is a fixed amount, Sales Category is not relevant.
Finally, in the “Applicable when job is” column we’ve typed the word “PAID,” to signify this element becomes payable to our employee only when the job itself is paid.
Let’s try another example. Let’s suppose that when our tech does a sealed system repair, we want to pay him an extra 5 percent on his labor (we’ll further assume we’re paying him a base rate separately via SD’s standard Commissions system). Let’s create a line-item in our table for that:
Here I’ve just randomly picked “X” as my one-character code (for simplicity, you might have picked “B,” but I’m wanting to demonstrate it doesn’t matter). I’ve typed a reasonable description for how I’m intending for this item to apply. I’ve indicated it’s a percent item, and in a specific manner. My percent is done in decimal format, and this is critical (it’s how you must do it here, if wanting to indicate a percent). I have further indicated the Sales category to which the percent should be applied. Finally, by use of the word “COMPLETED” I’ve indicate this item applies (i.e., is payable to my tech) when the job is completed, and regardless of if at such time it is paid (or later paid).
So, the above examples should serve to give you a good general concept of how to go about setting up your table, so that it accurately describes the particular kinds of special compensation you want in your system. Here are some added notes:
Regarding the Amount column: Entries should always be numeric. Use a decimal fraction to indicate where it’s a percent of a sale element that will be paid. Use a greater-than-fraction value (i.e., something equal to or greater than 1) to indicate an item where you’re paying a fixed sum.
Regarding the Sales Category column: ServiceDesk will recognize only four base expressions here (any other expression will have zero meaning). These expressions are MERCHANDISE, PARTS, SERVICECALL and LABOR. The only permitted variation is you may combine items. For example, suppose you want to pay a percent on both the ServiceCall and added-Labor components in a sale. If so, you would configure text for this column as SERVICECALL+LABOR. Regardless, please be sure it’s only the base expressions (as such) that you use, and also bear in mind it’s only relevant where it’s percent basis, and not where it’s a fixed amount being paid.
In the last column, you must have either of two words only. It must be the word “PAID” or the word “COMPLETED.” Nothing else will work here.
Once you’ve setup your table to be a good reflection of the particular elements you wish to have in your program, you need to save it. In particular, you need to save in the particular format, with the name and in the location where ServiceDesk is prepared to find it, and read its contents.
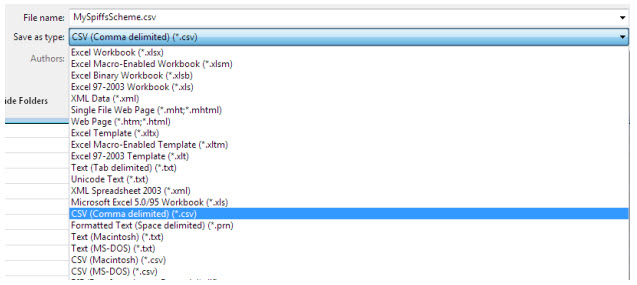
The location must be the \sd\netdata folder on your ServiceDesk server. The name must be MySpiffsScheme.csv. The format must be comma delimited.
In regard to this latter (and from within Excel or similar), you’ll need to pick Save As, then (in the Save As dialog box) open the Save as type dropdown. Within that dropdown, you’ll pick as follows:
So, that’s how you pick the type (or format) of save. Be sure to also pick the required name and location, and your task (in regard to creating this file) should be done.
If you’re curious, yes, you can indeed come back to edit and update this file, according to whatever is your future need.
Coding for actual application of SpiffsSystem2, as each sale is entered in ServiceDesk
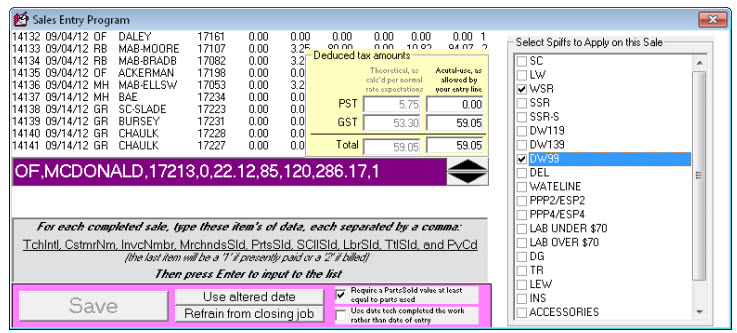
Whenever you open the SalesEnter form F9 in ServiceDesk, the system looks to see if you have a MySpiffsScheme.csv file in place. If so, the system will present an expanded instance of the SaleEnter form, containing a new/added dropdown on the right:
Of course, your dropdown will have your Spiff descriptions.
The general idea is that, once you have valid entry text in the main entry line, that dropdown on the right become operative. At such point, you can “check” the particular spiff items that you want to have apply (in payment to the tech) on the sale (the example is based on a file that has a large quantity of spiff items without very descriptive text; you can likely make yours better). When the entry is saved, data (regarding what you have checked) is saved as part of it.
In terms of underlying structure, it’s saved in the same field as is text that’s manually input under the old/simple spiffs system, and is saved as a simple string of applicable one-character codes. This is not something you have to know operationally, but the fact is noted here for any benefit it may provide you. One such benefit, for example, would arise if you wanted to later change the spiffs you’d encoded with the sale. It can be done by going to the SalesRead form Shift+F3, and there right-clicking on the line-item in question. This shows you what’s been encoded, and allows you to revise.
Reporting on SpiffsSystem2 results
SpiffsSystem2 offers two main benefits over the old/simple system. First is the facilitated encoding via F9-form dropdown, as just discussed. Second is the fact ServiceDesk will compile a complete report for you (as opposed to leaving it up to you to put one together, on the basis of an export).
To create your SpiffsSystem2 reports (i.e., what did each applicable person earn during a particular earnings period?), go to your Reports form F11, and pick Payroll. When sub-options then appear, pick Spiffs:
Just as with other reports, you’ll provide beginning and end dates for inclusion in the report, and be asked for the two-letter abbreviation as applicable to the employee you are compiling a report for. When you then click on the button to “Produce Report,” it will compile (and print) for you.
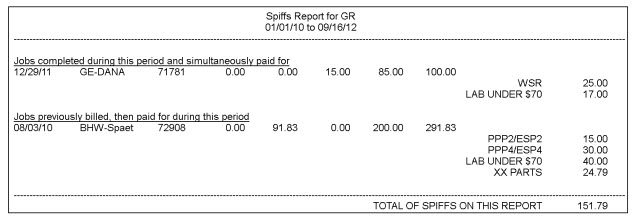
In terms of methodology, this report simply goes through each SalesJournal entry that fits within the date range you specify. It looks to see who was the credited tech under the entry. If it was the tech for whom the report is being compiled, it further looks to see what spiff items were checked for that entry. For any that were checked, it applies according to the rules you setup, and reports accordingly.
We added a few codes to our fictional/test sales data here (which is very sparse over time, so it does not make a realistic looking report), and with an underlying MySpiffsScheme.csv file as provided by the particular client that triggered this work (again, the descriptions are not very descriptive). Nevertheless, you can see the general format of report that results:
Yours will likely be much more extensive.


