Scheduling from Callsheets
There are two contexts in which you may be making appointments with your customers.
You’re originally scheduling the job, generally at the same time your customer first places his or her order.
Any subsequent scheduling, such as if the first appointment was canceled and a new one is needed, for example, of if the technician found on the first visit that he needed to order a part, and therefore rescheduling was required after the part arrived, etc.
It’s important to conceptually distinguish between these contexts, the mode of scheduling from within ServiceDesk varies depending on which context is involved.
First time/original scheduling
Specifically, and for the first context, if you’re making a first-for-the-job appointment with your customer, it follows you’re probably still at the point where you’re typing job-initiating information into the Callsheet. Thus, there is as yet no JobRecord for the job. To this point, it’s represented only by the Callsheet upon which you are typing various kinds of information.
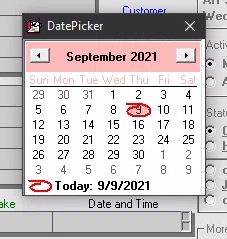
Obviously, the first appointment is one such item, so naturally there’s a place in the Callsheet for you to enter a short notation describing it. Logically, it’s the box labeled ‘Date and Time’. You can select the Date/Time with the date picker using either your mouse or arrow keys. Of course, the simple fact of entering an appointment within this box does not create an entry into your ServiceDesk ScheduleList (this is a separate file where ServiceDesk keeps track of each appointment).For that to occur, you must create a job from the Callsheet via the Job/Sale process. As part of the process when you do so, ServiceDesk will read the notation in the Callsheet’s ‘Date and Time’ box, and create a corresponding entry in the ScheduleList for you.
Scheduling from DispatchMap
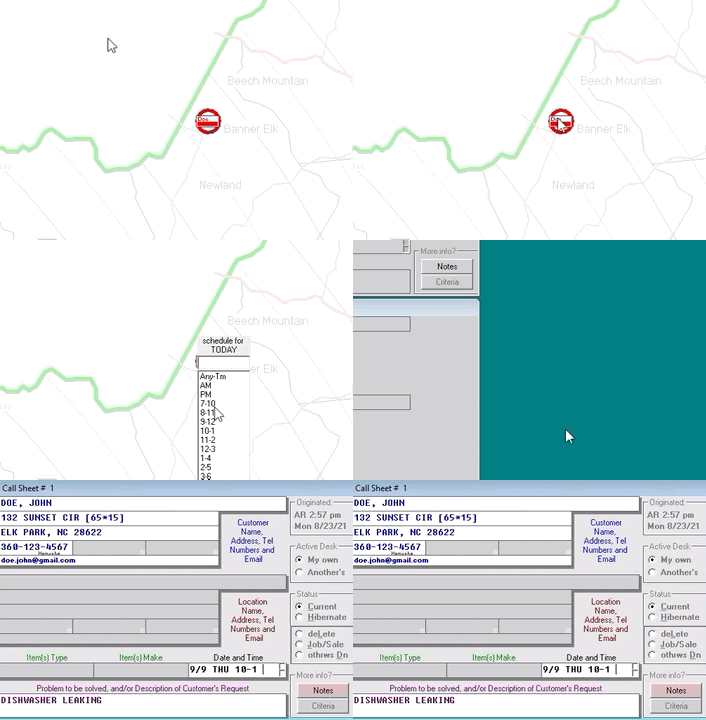
Of course, there’s “easy” and “easier.” In most cases of scheduling, you will have used the Callsheet’s ItemLocate feature to view the job’s location from your DispatchMap. It’s likely while there, seeing how a new job can fit in your current schedule, that you will have agreed with your customer on a suitable day and time for the appointment. Simply left-click on the item’s graphic reference, as flagged in red. In response, you’ll see a combination entry/list box. You may either select a time-frame as offered in the list or type-in a different time or time-frame as wanted. The system will assume that the day displayed within the map is the day wanted, and create an appropriate notation in the Callsheet for you.
Always bear in mind the appointment notation within the Callsheet is not the same as an entry in the ScheduleList. That date/time only becomes operative only when you create a job from the Callsheet using any of the above methods, until then it is simply a note.
Subsequent scheduling on existing job
Later in time, if a followup appointment is needed, the originating Callsheet has long since done its job and so has been retired to the Callsheet Archive; thus, it is no longer the tool for the process. Instead, scheduling on existing jobs is done from the job’s JobRecord, using the JobsCurrent form (or, though it’s comparatively clumsy, you can do it by making entries directly from the ScheduleList form itself).
Summary
For an appointment that’s made at the same time you’re creating a job from its initiating Callsheet, simply place an appropriate notation in the Callsheet’s ‘Date and Time’ box. You can place it there using helpful tools that are attached to the box itself (which will automatically appear at appropriate moments), or by signifying your appointment from the ItemLocate context in the DispatchMap, or even by typing manually. Regardless, when you then create a job from that Callsheet, an appropriate (and operative) appointment entry will be inserted to the ScheduleList for you.


